
Grease splatters from cooking can be a real nuisance, and figuring out How to Remove Grease from Kitchen Ceiling can seem tricky, especially if you’re new to cleaning. It’s easy to worry about making a mess or damaging your ceiling. But don’t fret!
We’ve got a simple, step-by-step plan that will help you get your kitchen ceiling looking great again. Get ready to see how easy it can be!
Cleaning Grease Spots from Your Kitchen Ceiling
Grease on the kitchen ceiling is a common problem because cooking releases tiny oil particles into the air. These particles stick to surfaces, and over time, they build up, especially on the ceiling where they can become sticky and dull. This section will walk you through understanding why grease sticks and what makes it hard to clean.
We’ll cover the best ways to tackle these spots so your kitchen looks fresh and clean again.
Why Grease Sticks to Kitchen Ceilings
Grease is made of oil and fat molecules. When you cook, especially when frying or sautéing, these molecules become airborne. They are very light and can travel throughout your kitchen.
The ceiling is often the highest surface, so these airborne grease particles settle there easily. Because oil and water don’t mix well, regular water cleaning might not be enough to remove the sticky film.
The warmth from cooking can also make the ceiling surface slightly more receptive to the grease. Over time, this creates a sticky layer that attracts dust and dirt, making the ceiling look dingy and stained. This buildup can be tough to remove because it bonds with the ceiling paint.
-
Airborne Particles: Cooking, particularly at high temperatures, sends tiny oil droplets into the air. These microscopic particles are the main culprits. They spread through your kitchen and eventually land on the ceiling.
This is a constant process whenever you cook.
-
Surface Adhesion: The ceiling surface, often painted, provides a good place for these oily particles to stick. The paint’s texture, even if smooth, can create microscopic pockets where grease can lodge itself. This makes it hard to wipe away with just a damp cloth.
-
Heat and Time: The heat generated during cooking can make the grease more liquid and easier to spread. As it cools and sits on the ceiling for extended periods, it hardens slightly and becomes more difficult to dislodge. This is why older, set-in grease stains are the hardest to clean.
Common Challenges for Beginners
For many people cleaning their kitchen ceiling for the first time, there are a few common issues. One is not knowing which cleaning products are safe and effective. Using the wrong cleaner can damage the paint or leave streaks.
Another challenge is reaching the ceiling safely. Standing on chairs can be wobbly and unsafe.
Beginners might also worry about making the problem worse. They might scrub too hard, which can remove paint, or use too much water, which can cause damage to drywall or plaster. Getting the right balance of cleaner and water is key, and that’s something that can be learned.
-
Choosing the Right Cleaner: Many don’t know if dish soap, a special degreaser, or something else entirely is best. Using a cleaner that’s too harsh can strip paint, while one that’s too mild won’t cut through the grease. Finding that balance is important.
-
Safety and Access: Safely reaching the ceiling is a big concern. Most people don’t have ladders handy, and using unstable furniture is dangerous. This worry can stop people from even trying to clean the grease.
-
Avoiding Damage: There’s a fear of scrubbing too hard and damaging the ceiling paint or texture. Over-wetting the ceiling can also lead to water stains or damage to the drywall or plaster underneath. Beginners often feel unsure about how much pressure to apply.
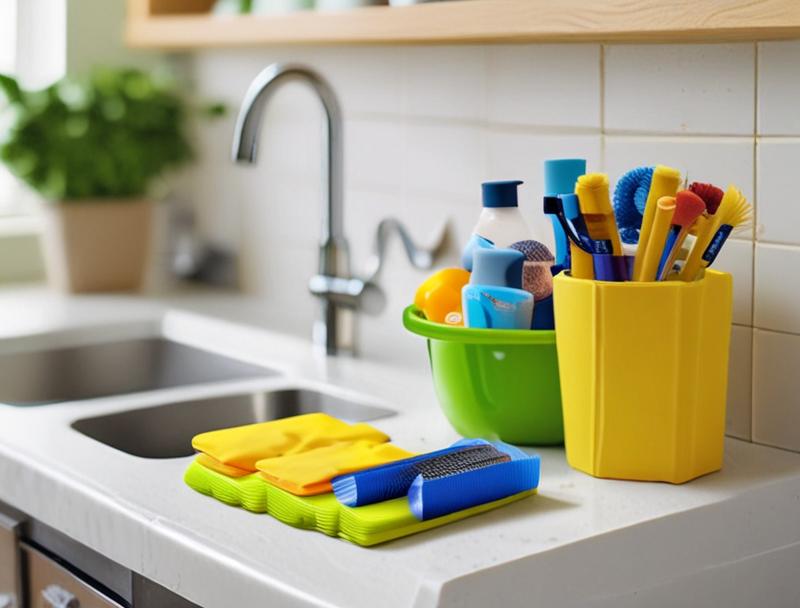
Gathering Your Cleaning Supplies
Before you start cleaning, having all the right tools and cleaning agents ready is super important. This makes the whole process go much smoother and faster. We’ll look at what you need, from cleaning solutions to safety gear.
Having everything in one place means you can focus on the job without stopping to find something you forgot.
Essential Cleaning Solutions
For cutting through grease, simple household items often work best. Dish soap is a fantastic degreaser because it’s designed to break down oils and fats from dishes. For tougher spots, a mixture of vinegar and water can also be very effective.
Vinegar is acidic, which helps to break down the greasy film. Baking soda is another great option; it’s a mild abrasive that can help scrub away stuck-on grime without scratching.
Commercial kitchen degreasers are also available. These are specially formulated to tackle tough grease build-up. When using these, always follow the product instructions carefully and ensure the area is well-ventilated.
Some people prefer natural options, while others opt for stronger commercial cleaners. The best choice depends on how bad the grease stains are and what you have available.
-
Dish Soap: This is your go-to for most grease situations. It’s mild enough not to damage most ceiling paints but strong enough to break down cooking oils. Just a few drops in warm water create a potent cleaning solution.
-
White Vinegar: A natural acid, vinegar is excellent at dissolving grease and grime. Mix it with water in a spray bottle. Its slightly strong smell can be a downside for some, but it dissipates quickly.
-
Baking Soda: When made into a paste with water, baking soda acts as a gentle scrubbing agent. It can lift stubborn grease spots without harming the ceiling’s surface. It’s also good for deodorizing.
-
Commercial Degreasers: For very tough, built-up grease, a dedicated kitchen degreaser might be necessary. These are powerful and work quickly. Always ensure good ventilation and wear gloves when using these stronger products.
Tools for the Job
You’ll need a few tools to apply your cleaning solutions and wipe away the grease. A spray bottle is handy for applying liquid cleaners evenly. For wiping, soft cloths or sponges work well.
Avoid abrasive scrub pads, as they can damage the paint on your ceiling.
To reach the ceiling safely, a sturdy step stool or a small ladder is ideal. If you don’t have these, you can use a mop with a detachable head. You can attach a cloth or sponge to the mop head, dip it in your cleaning solution, and use it to reach higher areas.
Make sure you have plenty of cloths, as you’ll want to switch to a clean one often to avoid spreading grease around.
-
Spray Bottles: These are perfect for applying your chosen cleaning solution evenly across the affected areas. They help control the amount of liquid used, preventing oversaturation of the ceiling.
-
Soft Cloths or Sponges: Microfiber cloths are excellent because they are absorbent and gentle on surfaces. You’ll need several, as you’ll want to use a clean one for rinsing and drying.
-
Step Stool or Ladder: Safety first! A stable step stool or a small ladder is essential for reaching the ceiling without strain or risk of falling. Ensure it’s placed on a level surface.
-
Bucket: You’ll need a bucket to hold your cleaning solution if you’re using a sponge or cloth directly. It’s also useful for rinsing your tools.
-
Mop with Detachable Head (Optional): If you don’t have a stool or ladder, a mop can be adapted. Wrap a cleaning cloth around the mop head, or use a sponge mop, to reach higher areas.
Safety First: Protecting Yourself and Your Space
When cleaning, it’s important to protect yourself and the areas below your ceiling. Wear old clothes, as cleaning solutions can sometimes stain fabric. You might also want to wear gloves to protect your skin, especially if you’re using a stronger cleaner.
Protecting your eyes with safety glasses is a good idea, too, just in case any drips or splashes occur.
To protect your kitchen surfaces and floor, lay down old sheets, newspapers, or tarps. This will catch any drips from your cleaning efforts. Ensure good ventilation in the kitchen by opening windows or turning on the exhaust fan, especially if you’re using cleaners with a strong smell, like vinegar or commercial degreasers.
-
Wear Old Clothing: Protect your regular clothes from potential drips and splashes. Cleaning agents can sometimes discolor or damage fabric.
-
Use Gloves: This is especially important if you have sensitive skin or are using stronger cleaning products. Gloves protect your hands from dryness and irritation.
-
Protect Your Eyes: Safety glasses are a smart precaution to prevent any accidental spray from getting into your eyes.
-
Cover Surfaces: Lay down drop cloths, old newspapers, or towels on your countertops, stove, and floor to catch any drips. This makes cleanup much easier afterward.
-
Ensure Ventilation: Open windows or use your kitchen’s exhaust fan to keep the air fresh, especially when using vinegar or commercial cleaners.
Step-by-Step Guide to Removing Ceiling Grease
Now that you have your supplies ready, let’s get to the actual cleaning. This guide breaks down the process into simple, manageable steps. We’ll start with preparing the area and then move on to cleaning and drying.
Following these steps will help you get the best results without any fuss.
Preparing Your Kitchen
The first thing to do is clear the area. Move any small appliances, decorations, or items from your countertops that might get in the way or be damaged by drips. Cover your stove, countertops, and floor with old towels or plastic sheeting.
This step is crucial for protecting your kitchen from cleaning solution and grease splatters.
Make sure your ventilation is set up. Open windows and turn on your kitchen fan. If you have pets or small children, it’s a good idea to have them in another part of the house while you’re cleaning to keep them safe from fumes and spills.
-
Clear the Decks: Remove small appliances, utensils, and decorations from countertops and the kitchen table. Anything that could get in the way or be splattered needs to be moved.
-
Cover Surfaces: Use old towels, newspapers, or a plastic drop cloth to cover your countertops, stove, sink, and the floor directly beneath the area you’ll be cleaning. This acts as a protective barrier.
-
Ventilate the Room: Open windows and turn on your kitchen’s exhaust fan. This is important for air circulation, especially if you’re using cleaners with strong odors.
Applying the Cleaning Solution
Start by mixing your chosen cleaning solution. For most grease stains, a solution of warm water and a few drops of dish soap is a great start. If you’re using vinegar, mix equal parts white vinegar and water in a spray bottle.
If using a commercial degreaser, follow the instructions on the bottle.
If you’re using a spray bottle, lightly mist the greased areas of the ceiling. Avoid spraying too much at once, as you don’t want the ceiling to become overly wet. If you’re using a bucket and sponge or cloth, dampen the cloth or sponge in the solution and gently wipe the ceiling.
Work in small sections so the solution doesn’t dry before you can wipe it away.
-
Mix Your Solution: Prepare your cleaning mixture in a spray bottle or bucket. A common, effective mix is warm water with a good squirt of dish soap.
-
Test a Small Area: Before cleaning the whole ceiling, spray or wipe a small, inconspicuous spot to make sure it doesn’t damage the paint. Wait a few minutes, then wipe it clean to check for any adverse reactions.
-
Apply Sparingly: Spray the solution lightly onto the greased areas of the ceiling. If using a cloth or sponge, dampen it and wipe. The goal is to dampen the grease, not soak the ceiling.
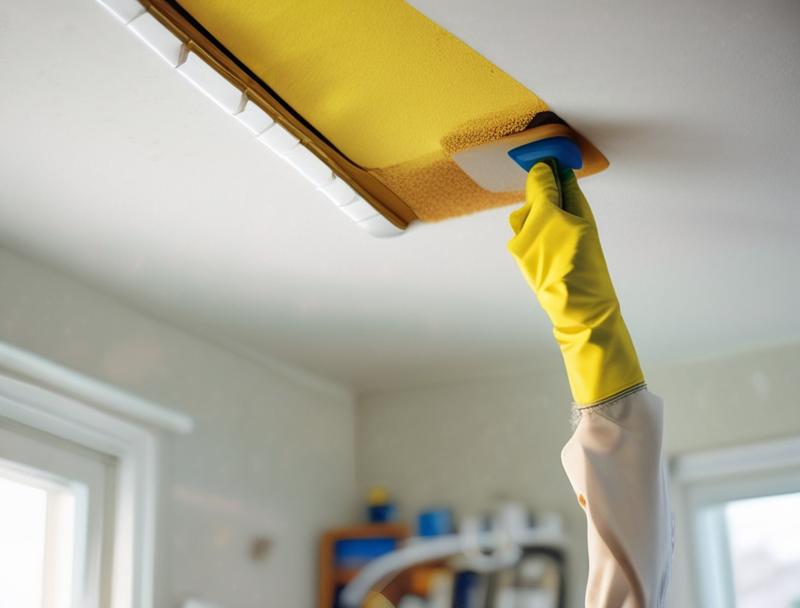
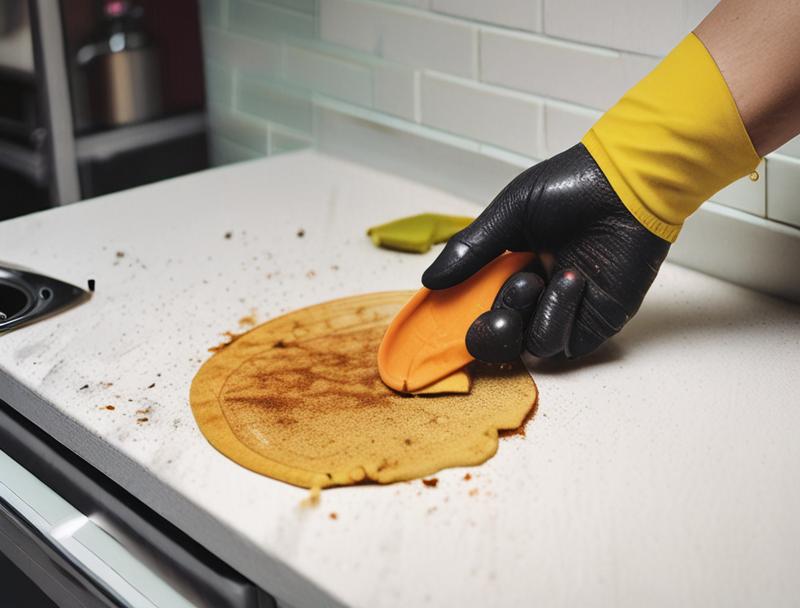
Wiping Away the Grease
Once the cleaning solution has had a moment to loosen the grease (usually just a minute or two), it’s time to wipe. Use a clean, soft cloth or sponge. Gently wipe the ceiling in a circular motion.
You should see the grease starting to come off onto your cloth. Rinse your cloth frequently in clean water or switch to a fresh cloth as it becomes soiled.
For tougher spots, you might need to apply a little more pressure or use a slightly stronger cleaning solution. Be patient; it might take a few passes to get all the grease off. If you’re using a mop with a cloth attached, you can do this in a similar wiping motion.
-
Gently Wipe: Use a clean, damp cloth or sponge to wipe the ceiling. Use gentle, circular motions to lift the grease without damaging the paint.
-
Rinse and Repeat: As the cloth picks up grease, rinse it thoroughly in clean water or switch to a fresh cloth. This prevents spreading the grease back onto the ceiling.
-
Address Stubborn Spots: For areas with heavy grease build-up, you may need to apply the solution again or let it sit for a bit longer before wiping. A gentle scrubbing motion might be needed, but always be careful not to be too rough.
Rinsing and Drying
After you’ve wiped away the grease, it’s important to rinse the ceiling. This removes any leftover cleaning solution and residue. Use a clean cloth dampened with plain water.
Wipe the areas you cleaned to ensure no soap or vinegar is left behind, which can cause streaks when dry.
Finally, dry the ceiling thoroughly with a clean, dry cloth. This prevents water spots and helps the ceiling look its best. Make sure all areas are completely dry before removing your protective coverings or turning off the ventilation.
Good ventilation helps the drying process.
-
Rinse Thoroughly: Use a separate, clean cloth dampened with plain water to wipe down the cleaned areas. This removes any lingering cleaning solution or loosened grime.
-
Dry the Ceiling: Use a clean, dry cloth to pat or wipe the ceiling dry. This helps prevent water spots and leaves a streak-free finish.
-
Allow Air Circulation: Keep windows open and the fan running for a while longer to ensure the ceiling dries completely and any remaining moisture evaporates.
Dealing with Stubborn Grease Stains
Sometimes, grease stains can be quite persistent, especially if they’ve been there a long time. These need a bit more attention than a light wipe-down. This section will cover strategies for tackling those really tough spots that don’t come off with regular cleaning methods.
We’ll look at ways to increase the cleaning power without damaging your ceiling.
When Simple Methods Aren’t Enough
If your initial cleaning efforts don’t fully remove the grease, don’t get discouraged. Some stains require a bit more effort. For tougher spots, you might need to use a stronger cleaning solution or apply it more frequently.
A paste made from baking soda and water can be very effective for scrubbing stubborn grease.
Another approach is to use a commercial degreaser. These are powerful and designed for tough jobs. Always test these in a small area first to ensure they won’t harm your ceiling’s paint.
Following the product instructions carefully is key to using them safely and effectively.
-
Repeat Applications: Sometimes, a second or even third application of your chosen cleaner is needed. Let the solution sit for a few minutes each time to break down the grease more effectively.
-
Increased Concentration: For vinegar solutions, you can try a slightly stronger mix, like 2 parts vinegar to 1 part water, but always test this in a small spot first.
-
Baking Soda Paste: Mix baking soda with a little water to form a thick paste. Apply this paste to the stubborn stain, let it sit for 10-15 minutes, then gently wipe it away with a damp cloth.
Using a Commercial Degreaser
Commercial kitchen degreasers are powerful cleaners designed to cut through thick grease. They can be very effective on stubborn ceiling stains. When using one, always read and follow the instructions on the product label very carefully.
Ensure the area is well-ventilated. You may want to wear gloves and eye protection. Spray the degreaser onto the affected area, let it sit for the time recommended on the label, and then wipe it away with a damp cloth.
Rinse the area thoroughly with a clean, damp cloth to remove all traces of the degreaser.
-
Read Instructions: This is the most important step. Every degreaser is different, and improper use can be harmful or damage your ceiling.
-
Ventilation is Key: Many degreasers have strong fumes. Open windows and use your exhaust fan to ensure good air flow while you work.
-
Targeted Application: Spray the degreaser directly onto the greasy spot. Avoid overspray onto surrounding, clean areas if possible.
-
Wipe and Rinse: After the recommended dwell time, wipe away the cleaner and grease with a damp cloth. Then, rinse the area thoroughly with a clean, damp cloth to remove all residue.
What to Avoid When Cleaning Grease
It’s also important to know what not to do when cleaning grease from your kitchen ceiling. Avoid using abrasive scrubbers like steel wool or harsh brushes, as these can scratch or remove the paint. Never use too much water; excessive moisture can damage drywall or plaster and lead to stains.
Don’t forget to test any cleaning solution in an inconspicuous spot first. This prevents accidental damage to your ceiling’s finish. Avoid using bleach-based cleaners unless specifically recommended for ceiling paint, as they can sometimes discolor or weaken paint finishes.
-
Harsh Scrubbing Tools: Do not use steel wool, abrasive pads, or stiff brushes. These can easily damage your ceiling’s paint and texture, leaving permanent marks.
-
Over-Wetting: Excessive water can seep into the drywall or plaster, causing stains, peeling paint, or structural damage. Use damp cloths, not soaking wet ones.
-
Untested Cleaners: Always test any cleaning solution in a hidden spot before applying it to the entire ceiling. This helps you avoid widespread damage to the paint.
-
Bleach-Based Products (Generally): While effective for some cleaning tasks, bleach can often discolor or weaken certain types of ceiling paint. Use with extreme caution or avoid altogether.
Preventing Future Grease Buildup
The best way to deal with grease on your kitchen ceiling is to stop it from building up in the first place. Prevention is always easier than cleaning. This section offers practical tips to keep your ceiling cleaner for longer, meaning less work for you down the road.
These are simple habits that make a big difference.
Using Your Range Hood
Your range hood is designed to capture grease and smoke from cooking. Make sure you turn it on every time you cook, especially when frying or sautéing. For best results, turn it on a minute or two before you start cooking and leave it running for a few minutes after you finish.
This helps pull away airborne grease particles before they can reach your ceiling.
Clean your range hood’s filters regularly. Most filters can be washed with hot, soapy water or put in the dishwasher. Dirty filters are less effective at trapping grease, so keeping them clean is important for the hood to do its job properly.
This simple habit can significantly reduce grease splatter getting into the air.
-
Always Use It: Turn on your range hood before you start cooking and let it run for a few minutes after you’re done. This is its primary job: to capture grease.
-
Pre- and Post-Cooking: Start the fan a minute or two before you begin cooking and let it run for 5-10 minutes after you finish. This captures grease both during and immediately after cooking.
-
Effective Airflow: Ensure your range hood is properly vented to the outside. If it recirculates air, it’s less effective at removing grease and odors permanently.
Regular Kitchen Cleaning Habits
Incorporating regular cleaning into your routine can prevent grease from becoming a major problem. Wipe down your backsplash and stovetop after each use. This removes fresh splatters before they can dry and become harder to clean.
Even a quick wipe of the walls near the stove can make a difference.
Periodically wipe down your kitchen walls and cabinets as well. These surfaces can also collect a thin layer of grease. A gentle cleaning solution, like soapy water, can keep them clean.
When you address these surfaces regularly, less grease will make its way up to the ceiling.
-
Wipe Spills Immediately: Clean up grease splatters on your stovetop, backsplash, and nearby walls as soon as they happen. Fresh spills are much easier to remove.
-
Clean Walls and Cabinets: Make it a habit to wipe down kitchen walls and cabinet fronts weekly or bi-weekly. Use a mild cleaner to remove any grease film.
-
Address Kitchen Air: Beyond the range hood, consider using air purifiers or opening windows regularly to help clear cooking odors and grease particles from the air.
Protecting Your Ceiling While Cooking
For areas where you do a lot of high-heat cooking, like above a wok station or a deep fryer, you might consider temporary or permanent protective measures. Some people use removable plastic sheeting or washable panels specifically designed for kitchen walls and ceilings. These can be cleaned or replaced as needed.
If you’re planning a kitchen renovation, consider using a washable or grease-resistant paint finish on your ceiling. Satin or semi-gloss finishes are generally easier to wipe down than matte finishes. This makes future cleaning much simpler.
-
Washable Paint Finishes: Opt for satin or semi-gloss paints for your ceiling. These finishes are more durable and easier to wipe clean than flat or matte paints.
-
Protective Barriers: For areas with extreme grease splatter, consider installing removable, washable panels or even a protective film that can be cleaned or replaced.
-
Ventilation Upgrades: If your current ventilation isn’t enough, consider upgrading to a more powerful range hood or ensuring your existing one is properly maintained and vented.
Frequently Asked Questions
Question: What is the best way to clean light grease on a kitchen ceiling?
Answer: For light grease, a simple solution of warm water and a few drops of dish soap usually works best. Wipe the ceiling with a soft, damp cloth, rinse with a clean, damp cloth, and then dry it thoroughly with a dry cloth.
Question: Can I use a magic eraser on my kitchen ceiling?
Answer: While a magic eraser can be effective, it’s also slightly abrasive. It’s best to test it on a small, hidden area first to make sure it doesn’t remove or damage the paint. Start with gentler methods if you’re unsure.
Question: How often should I clean my kitchen ceiling?
Answer: It depends on how much you cook. A good rule of thumb is to inspect it monthly and clean as needed. If you notice a greasy film or dullness, it’s time for a cleaning.
Regular light cleaning prevents heavy buildup.
Question: What if the grease has caused the paint to peel or bubble?
Answer: If the paint is peeling or bubbling, it might mean moisture or grease has seeped underneath. You’ll need to carefully scrape away the loose paint, clean the area thoroughly, and then repaint the affected section of the ceiling.
Question: Can I paint over grease stains on my kitchen ceiling?
Answer: It’s generally not recommended to paint directly over grease stains without proper preparation. The grease can bleed through the new paint. You should clean the ceiling thoroughly, and if any stains remain, use a stain-blocking primer before applying new paint.
Final Thoughts
Tackling grease on your kitchen ceiling doesn’t have to be a chore. With the right approach and simple supplies, you can easily restore its clean look. Remember to protect your space, use gentle yet effective cleaners, and work in sections.
Keep up with regular cleaning and ventilation to prevent future build-up, making your kitchen a brighter, cleaner place to be.