
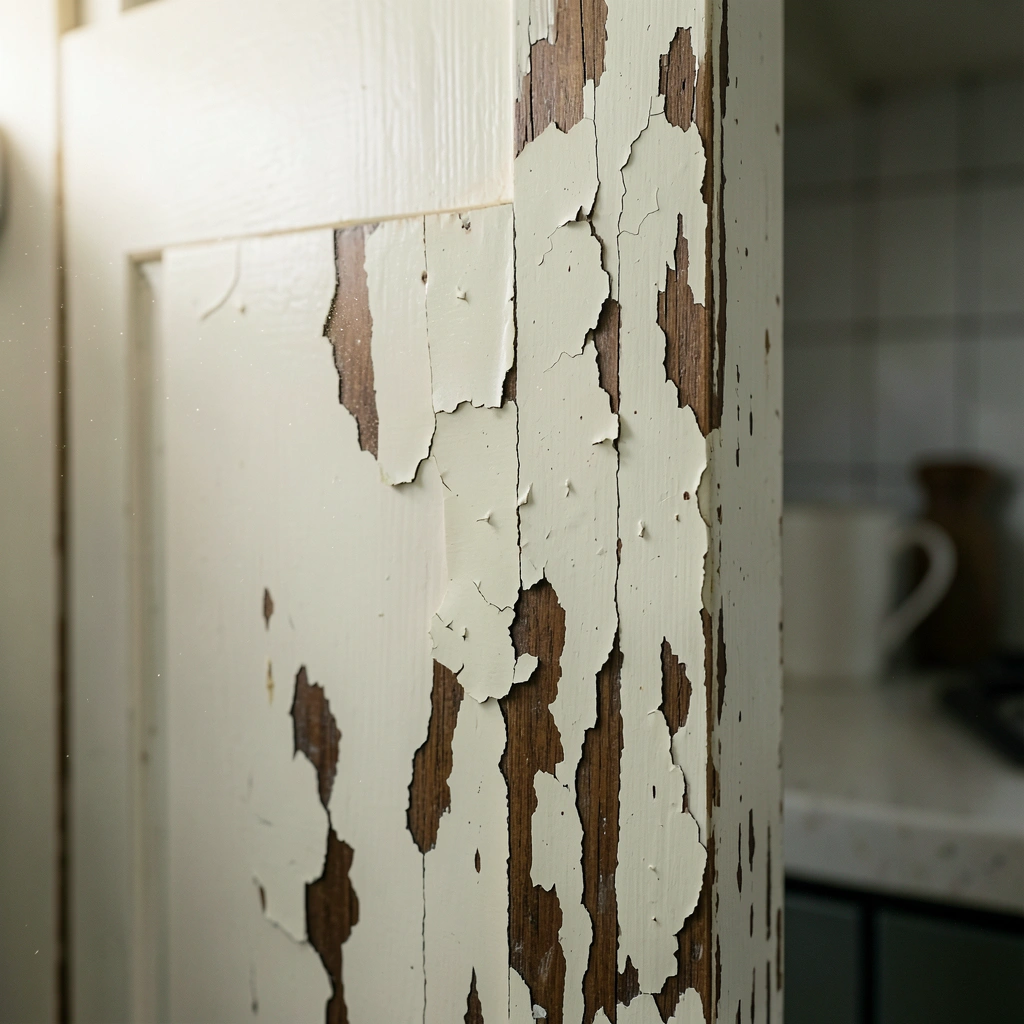
It’s super common to wonder Why Painted Kitchen Cabinets Start Peeling, right? For folks just starting out with DIY projects, it can seem like a tricky puzzle. But don’t you worry!
We’ll break it all down super simply, step by step, so you can fix it and keep your cabinets looking great. Get ready to learn exactly what goes wrong and how to make it right.
Understanding Why Painted Kitchen Cabinets Start Peeling
This section will explore the main reasons why paint on kitchen cabinets might start to lift and peel away. We’ll talk about the common culprits that lead to this frustrating problem, especially for those new to painting projects. Understanding these issues is the first step to preventing them and ensuring your painted cabinets last a long time.
We’ll cover everything from surface preparation to the types of paint and finishes you use.
Surface Preparation is Key
Before you even think about picking up a paintbrush, getting the cabinet surface ready is the most important step. If the surface isn’t clean and smooth, the paint won’t stick properly. This is a major reason why paint starts to peel later on.
Imagine trying to glue something to a greasy surface; it just won’t hold!
-
Cleaning Thoroughly: Kitchen cabinets are exposed to a lot of grease, food splatters, and general grime over time. This layer of dirt and oil acts like a barrier, preventing new paint from bonding with the cabinet surface. You need to remove it completely.
Think about the last time you cleaned your stovetop after a week of cooking. That oily film is also on your cabinets, especially near the stove. If you just paint over it, the paint will have nothing solid to grip onto.
It’ll just sit on top of the grease. Then, as the cabinets get touched, used, and cleaned, that loose paint can easily start to flake off. A good degreaser is your best friend here.
-
Sanding for Adhesion: After cleaning, you need to lightly sand the cabinets. This creates a rougher surface, like tiny little scratches, that the paint can grab onto. Without sanding, the paint is just sitting on a smooth, slick surface, which is like trying to stick a sticker to a shiny plastic bag – it slides right off.
Sanding doesn’t mean taking off the old finish entirely, unless it’s already peeling badly. For most cases, a light scuff sand with a fine-grit sandpaper (like 150 or 220 grit) is enough. This dulls the surface and gives the primer and paint something to adhere to.
If you skip this, the paint might look fine at first, but it’s just waiting for the right moment to start peeling. It’s like building a house on sand; it looks okay for a bit, but it won’t last.
-
Repairing Imperfections: Before painting, it’s essential to fix any dents, chips, or holes. If you paint over these, the paint will settle into the cracks, making them more visible and creating weak spots. A smooth surface leads to a smooth, durable paint job.
Small dents or gouges can trap moisture or create edges where paint can get caught and lift. Using a wood filler or putty to smooth these out is a simple step that makes a big difference. Once the filler dries, you sand it smooth so it blends in with the rest of the cabinet.
This ensures the paint has an even plane to cover, reducing the chances of peeling at these damaged areas.
Choosing the Right Paint and Primer
The type of paint and primer you select plays a massive role in how well the paint sticks and how long it lasts. Using the wrong products can lead to peeling, even if you did everything else perfectly. Kitchens are tough environments, and your paint needs to be tough too.
Paint Types Explained
There are many types of paint, but for kitchen cabinets, you need something durable and resistant to moisture and wear. Latex and oil-based paints are common. For cabinets, a high-quality enamel paint is usually recommended.
-
Latex (Water-Based) Enamels: These are popular because they are easy to clean up with water, dry faster, and have less odor. Modern latex enamels are much improved and can be very durable if they are a good quality product. Look for acrylic latex enamels that are specifically designed for cabinets or trim.
The benefits of using a good quality water-based enamel are significant for DIYers. You can usually finish a cabinet door or two in a day because they dry relatively quickly. This speeds up the whole process.
Cleanup is also a breeze – no need for harsh solvents, just soap and water. However, not all latex paints are created equal. Cheaper versions might not offer the hard, durable finish needed for high-traffic areas like kitchens, making them more prone to chipping or peeling.
-
Oil-Based Enamels: These paints are known for their hard, durable finish that is resistant to moisture and scrubbing. They also tend to level out nicely, giving a very smooth, factory-like appearance. However, they have a strong odor, require mineral spirits for cleanup, and take longer to dry.
When it comes to toughness, oil-based paints often win out. They cure to a very hard surface that can withstand the daily wear and tear of a kitchen environment better than many standard latex paints. If you’re aiming for a super-smooth, almost glass-like finish that can take a beating, oil-based paint is a strong contender.
The trade-offs are the smell and the cleanup. If you’re sensitive to fumes or don’t have great ventilation, this might not be the best choice.
-
Cabinet-Specific Paints: Some brands offer paints specifically formulated for kitchen cabinets. These often combine the best qualities of latex and oil-based paints, offering durability, adhesion, and easier cleanup.
These specialized paints are often the easiest route to a professional-looking and long-lasting finish. They are designed to adhere well to properly prepared surfaces and cure to a hard, scrubbable finish. Many of these also have excellent leveling properties, meaning brush strokes are less visible.
While they might be a bit more expensive than standard paints, the results and durability are often worth the extra cost, especially when trying to avoid peeling.
The Role of Primer
Primer is like the glue that holds your paint to the cabinet. It seals the surface, blocks stains, and provides a uniform base for the topcoat to adhere to. Skipping primer is a common mistake that leads to peeling.
-
Adhesion Primers: These are specifically designed to stick to tricky surfaces like laminate, metal, or previously finished wood. They create a strong bond that the topcoat can then grip onto.
For kitchen cabinets, especially if they have a slick finish or are made of materials other than raw wood, an adhesion primer is non-negotiable. It’s formulated with special binders that can grab onto surfaces that standard primers might struggle with. This ensures that the paint layers are well-connected to the cabinet material itself, reducing the risk of the paint separating and peeling.
-
Stain-Blocking Primers: If your cabinets have old stains from water, smoke, or tannins in the wood, a stain-blocking primer is essential. These primers prevent the stains from bleeding through the new paint.
Wood, especially certain types, can “bleed” tannins or have old water spots that can darken over time. If you paint directly over these without a stain-blocking primer, those unsightly marks will likely reappear, sometimes even after multiple coats of paint. A good stain-blocking primer seals these in, giving you a clean, uniform canvas for your chosen paint color.
-
Proper Application: Just like with paint, applying primer correctly is crucial. It should be applied in thin, even coats and allowed to dry completely according to the manufacturer’s instructions before sanding lightly.
A thick, uneven coat of primer can actually be detrimental. It might look like you’re covering more area, but it can lead to cracking or peeling later on. Light, thin coats are always better.
After it dries, a quick scuff sand (again, fine-grit) will knock down any rough spots and further improve adhesion for the paint.
Environmental Factors Affecting Painted Cabinets
The kitchen is a busy place with a lot of changing conditions, from steam to heat. These environmental changes can put a strain on your painted cabinets, leading to peeling if they aren’t prepared or painted correctly to withstand them.
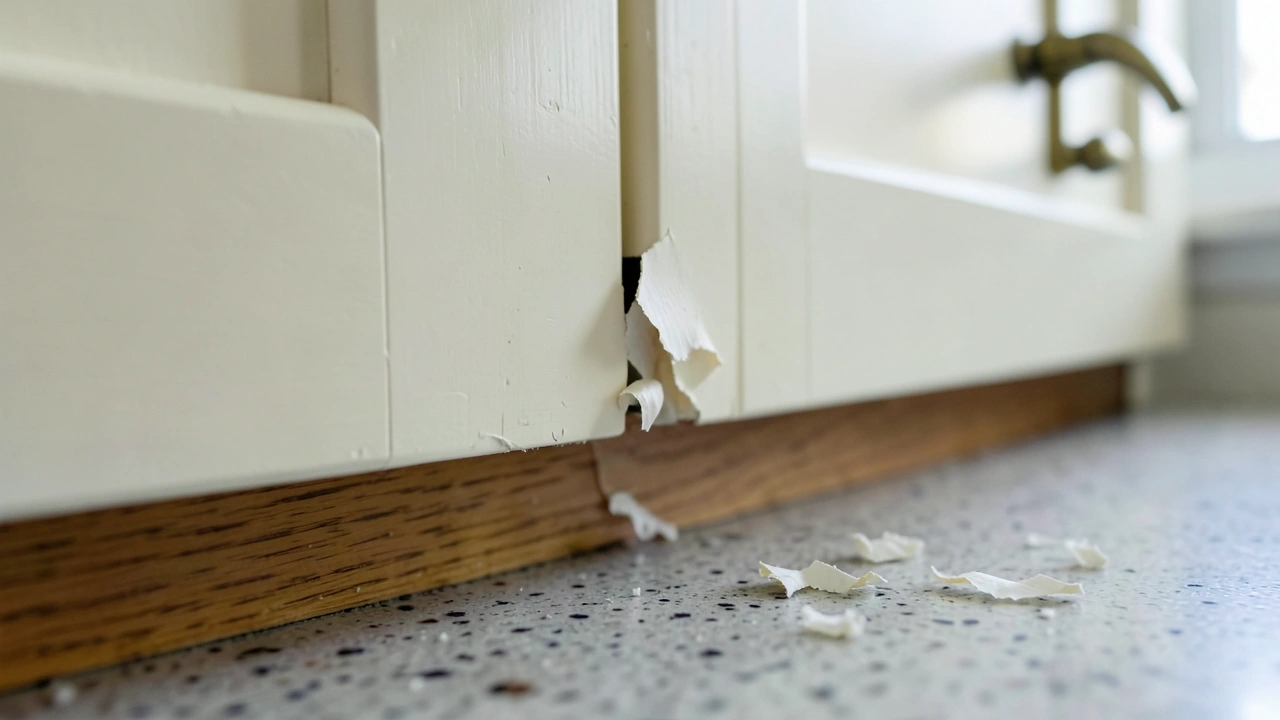
Humidity and Moisture
Kitchens are naturally humid environments, especially around the sink and dishwasher. High moisture levels can cause wood to expand and contract, and if the paint job isn’t flexible or well-adhered, this movement can lead to cracks and peeling.
-
Steam from Cooking: Boiling water, simmering sauces, and even running the dishwasher can release a lot of steam. This warm, moist air can settle on cabinet surfaces.
If the paint isn’t sealed well, this moisture can seep into the paint film or even the wood beneath. Over time, this constant exposure to moisture can weaken the bond between the paint layers and the cabinet, making it a prime candidate for peeling. Think of it like leaving wallpaper in a steamy bathroom; it eventually starts to bubble and peel away from the wall.
-
Water Splashes: Accidental splashes from the sink or spills can also introduce moisture directly to the cabinet fronts, especially those near the sink area.
Even though you wipe these up, repeated exposure can still affect the paint. If the paint isn’t a good quality, moisture-resistant enamel, the water can penetrate the finish. This is why using a cabinet paint designed to resist moisture is so important in a kitchen setting.
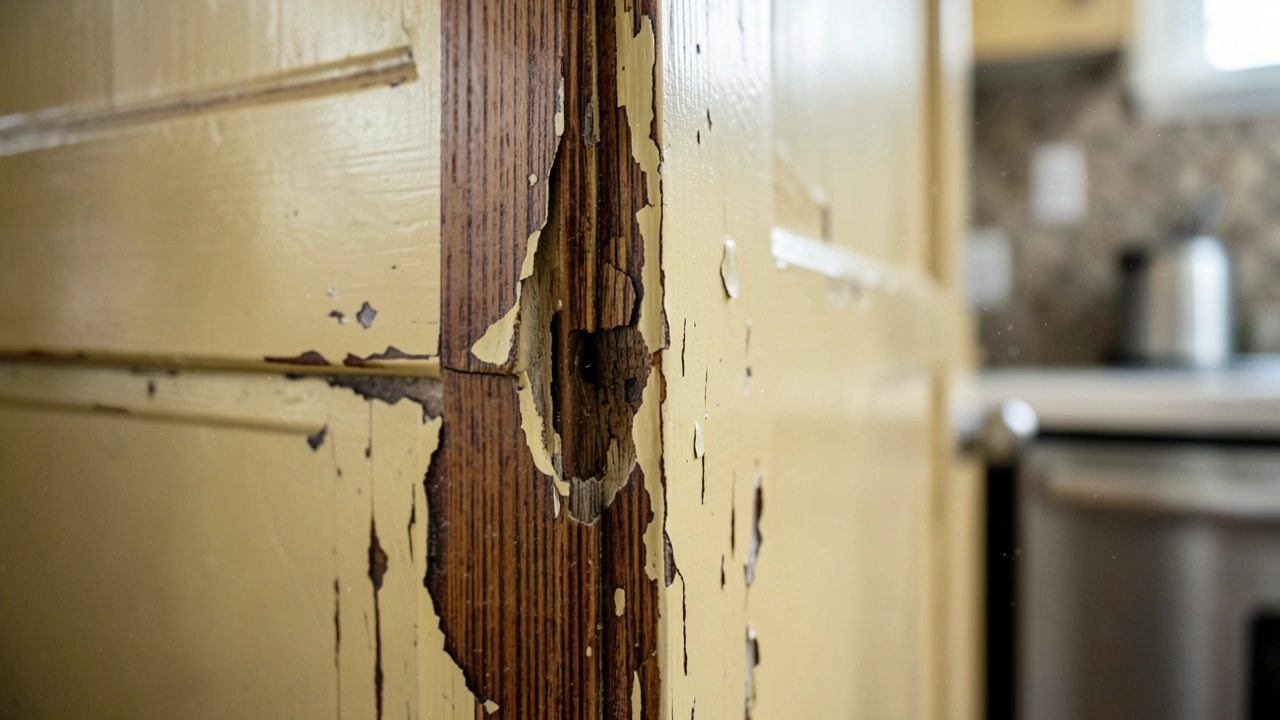
Temperature Fluctuations
Like humidity, changes in temperature can also cause the cabinet materials to expand and contract. If the paint is too rigid or poorly adhered, these movements can cause stress that leads to peeling.
-
Heat from Appliances: Ovens, dishwashers, and even warming drawers can emit heat that warms up the surrounding cabinet surfaces.
This constant cycling of heat and then cooling can stress the paint. If the paint is brittle, it’s more likely to crack under this thermal stress. A flexible, well-adhered paint can handle these temperature shifts much better.
-
Seasonal Changes: Over the course of a year, your home’s temperature can fluctuate significantly. This impacts the materials your cabinets are made from.
The wood in your cabinets naturally expands when it’s warm and humid, and contracts when it’s cool and dry. Paint that isn’t flexible enough to move with these changes will be put under strain. This strain is a major contributor to paint cracking and peeling, especially along the edges and joints.
Application Mistakes That Cause Peeling
Beyond the surface and the products, how you actually apply the paint makes a huge difference. Even with great preparation and top-quality paint, mistakes during application can sabotage your efforts and lead to peeling.
Too Few Coats or Thin Coats
One of the biggest mistakes beginners make is not applying enough paint, or applying coats that are too thin. Paint needs a certain thickness to form a durable, protective film.
-
Inadequate Coverage: If you apply coats that are too thin, the paint layer won’t be thick enough to provide adequate protection or durability. It might look okay at first glance, but it’s more prone to wear and tear.
Think of applying sunscreen. If you put on just a tiny, thin smear, it won’t protect you from the sun. Paint works similarly.
You need enough layers of paint to create a robust barrier. Skimping on coats to save time or paint often backfires, leading to premature peeling.
-
Rushing the Process: Applying multiple thin coats with proper drying time in between is essential. If you rush and apply a second coat before the first is dry, you can trap solvents or moisture, which weakens the paint film and can lead to peeling.
Each coat needs to cure properly. This means it needs to dry to the touch and then continue to harden for a period before the next coat is applied. If you put a wet coat on top of a not-quite-dry coat, the layers can mix in a bad way, creating a weak bond.
This is particularly true with certain types of paint.
Improper Drying and Curing Times
Paint needs time to dry and then even more time to fully cure. Drying means it’s no longer wet to the touch. Curing means it has hardened and reached its maximum durability.
Rushing these stages is a recipe for peeling.
-
Not Waiting for Full Dryness: If you touch up a spot or close a cabinet door before the paint is dry to the touch, you can mar the finish and create weak points.
This can happen easily when you’re trying to finish a project quickly. You might think it’s dry, but there’s still some moisture or solvent evaporating. If you put pressure on it or rub against it, you can smudge the paint, cause tackiness, or even lift already applied paint, setting up for future peeling.
-
Ignoring Cure Times: Even after paint is dry, it takes days or even weeks for it to fully cure and reach its maximum hardness. During this time, the paint is still somewhat vulnerable.
During the curing period, the paint film is still hardening. This is when the paint is most susceptible to damage from heavy use, harsh cleaning chemicals, or impact. If you start heavily using or cleaning your cabinets too soon, you can damage the paint before it’s fully hardened, leading to chips and peels down the line.
Always check the paint can for recommended cure times.
Using the Wrong Tools
The tools you use can also impact the quality of your paint job and its longevity. Using old, worn-out brushes or rollers can leave a poor finish that’s more likely to peel.
-
Low-Quality Brushes and Rollers: Cheap brushes can shed bristles that get stuck in the paint, creating bumps. Old, worn rollers can leave an uneven texture.
These imperfections not only look bad but can also create areas where moisture or dirt can collect, weakening the paint. High-quality tools apply paint more smoothly and evenly, creating a better surface for adhesion. A good synthetic brush is often recommended for latex paints, while natural bristles are often preferred for oil-based paints.
-
Not Cleaning Tools Properly: If you don’t clean your brushes and rollers properly after use, dried paint can harden on them. This makes them stiff and unusable for future projects, and also can transfer old paint debris to your new paint job.
This might seem minor, but using a brush that still has old, hardened paint in it will inevitably leave bits of that old paint on your fresh coat. These bits are weak points and can easily flake off later, taking some of the new paint with them. Always clean your tools immediately after use.
Addressing Peeling: Repair and Prevention
If you’re already seeing peeling, don’t despair! There are ways to fix it and, more importantly, prevent it from happening again. The process involves removing the loose paint, repairing the surface, and then repainting with the right methods.
How to Fix Peeling Paint
The first step in fixing peeling paint is to remove all the loose, flaking bits. You want to get back to a solid, well-adhered layer of paint.
-
Scrape away all the loose and peeling paint using a putty knife or scraper. Be gentle so you don’t damage the underlying surface.
The goal here is to make the edges of the remaining paint smooth. If you leave jagged edges, the new paint won’t lay down nicely over them, and you’ll be able to see where the repair was made. Use a flexible putty knife for this to avoid gouging the wood.
-
Sand the edges of the remaining paint and the exposed areas until smooth. This helps to feather the edges and blend them into the surrounding area.
After scraping, there will be a noticeable ridge where the paint stopped peeling. Sanding these edges down is critical for a smooth finish. Use fine-grit sandpaper (150-220 grit) to avoid creating deep scratches.
The idea is to create a smooth transition so the new paint can cover it seamlessly.
-
Clean the entire area thoroughly to remove all dust from sanding. Then, apply a good quality primer, making sure to cover the sanded areas and the bare wood.
Dust is the enemy of adhesion. After sanding, wipe down the cabinets with a damp cloth, or use a tack cloth for best results. Once clean and dry, apply your primer.
If you’re painting over bare wood, a stain-blocking primer is a good idea. Ensure the primer covers the repaired spots and extends slightly onto the surrounding painted surface.
-
Once the primer is dry, lightly sand it smooth. Then, apply your chosen cabinet paint in thin, even coats, allowing adequate drying time between each coat.
Just like with the initial painting, multiple thin coats are better than one thick one. This ensures even coverage and a durable finish. Make sure to follow the manufacturer’s recommendations for drying times between coats.
Preventing Future Peeling
The best way to deal with peeling paint is to stop it before it starts. This means following best practices from the very beginning.
-
Invest in Quality Materials: Always use high-quality paints, primers, and tools specifically recommended for cabinets. They might cost a bit more, but they offer superior adhesion and durability.
When you buy cheaper paint, you often get what you pay for. It might seem like a good deal at first, but it can lead to more problems and expense down the road if it starts peeling. Investing in premium products means you’re getting formulations designed for toughness and longevity, which is exactly what kitchen cabinets need.
-
Don’t Skip Steps: Proper cleaning, degreasing, and sanding are non-negotiable. Ensure each layer of primer and paint is fully dry and cured before proceeding to the next.
Every step in the painting process has a purpose. Skipping them, even if it seems like a minor detail, can weaken the entire paint job. This includes allowing enough time for the paint to cure fully before putting cabinets back into heavy use.
Patience here pays off significantly.
-
Maintain Your Cabinets: Regularly clean your cabinets with mild soap and water to remove grease and grime. Avoid harsh chemicals or abrasive cleaners that can damage the paint finish over time.
Consistent, gentle cleaning is key to maintaining the integrity of your painted finish. Wipe up spills immediately. A simple routine of wiping down the cabinets with a damp cloth can prevent the buildup of grease that can degrade the paint and lead to peeling.
Case Study: The Kitchen Refresh That Went Wrong
Sarah wanted to update her kitchen on a budget. She decided to paint her old oak cabinets herself. She found a good deal on paint and skipped the primer because the can said “paint and primer in one.” She also rushed the process, doing only one thin coat and closing the cabinet doors the next day.
Within six months, she noticed small chips and peeling edges, especially around the sink and stove. The moisture and heat from cooking and cleaning were too much for the single, non-primed coat. Her initial savings ended up costing her more as she had to strip, repair, and repaint them properly.
Sample Scenario: A New Painter’s Caution
Mark is painting his kitchen cabinets for the first time. He’s read online that preparation is key. He starts by removing all the doors and drawers.
He then uses a strong degreaser to clean every surface, making sure to rinse and let them dry completely. Next, he lightly sands all the cabinet surfaces with 180-grit sandpaper until they are dull. He wipes away all the dust.
He then applies one coat of a high-quality adhesion primer, lets it dry for 24 hours, and sands it lightly again. Finally, he applies two thin coats of a durable enamel paint, allowing at least 12 hours between each coat and letting the cabinets cure for two weeks before putting them back to use. He’s taking his time, using good materials, and following all the steps, which should prevent peeling issues.
Statistics on Cabinet Refinishing
| Year of Refinishing | Likelihood of Peeling After 3 Years | Primary Cause Cited (if peeling occurred) |
|---|---|---|
| 2018 (DIY, Poor Prep) | 65% | Inadequate cleaning/sanding |
| 2019 (DIY, Good Prep) | 20% | Moisture damage or paint type |
| 2020 (Professional) | 10% | Extreme environmental factors |
These numbers show a clear trend. When proper preparation and quality materials are used, the chances of painted cabinets peeling significantly decrease. The majority of peeling issues arise from shortcuts taken during the DIY process, particularly with cleaning and sanding.
Frequently Asked Questions
Question: Can I paint over peeling paint without fixing it first?
Answer: No, you should never paint over peeling paint. The new paint will only stick to the loose paint, and it will peel off along with the old layer. You must scrape, sand, prime, and then repaint for a lasting finish.
Question: How long should I wait between coats of paint on cabinets?
Answer: Always check the paint can, but generally, you should wait at least 4-6 hours between coats for latex-based paints and 16-24 hours for oil-based paints. It’s crucial for the paint to dry enough for the next coat to adhere properly.
Question: Do I really need to sand my cabinets if they are already painted?
Answer: Yes, even if they are already painted and in good condition, light sanding (scuff sanding) is important. It creates a surface for the new paint or primer to adhere to, ensuring a more durable finish.
Question: What’s the best way to clean kitchen cabinets before painting?
Answer: Use a good degreaser cleaner specifically designed for kitchens. Clean thoroughly, rinse well with clean water, and allow the cabinets to dry completely before proceeding to sanding or priming.
Question: Can I use a roller for painting cabinets, or do I need a sprayer?
Answer: You can use a high-quality foam roller for a smooth finish, especially on cabinet doors and flat surfaces. However, for the most professional, factory-like finish with minimal brush or roller marks, a paint sprayer is often recommended, though it requires more setup and practice.
Final Thoughts
Understanding why painted kitchen cabinets start peeling comes down to preparation, product choice, and patience. By cleaning, sanding, priming correctly, and using quality paints, you can prevent most peeling issues. Take your time, follow the steps, and your cabinets will look great for years.

Leave a Reply