
Making kitchen cabinets from pallet wood sounds like a fun, thrifty project, right? But for folks just starting out, it can bring up a few tricky spots. You might find that pallet wood isn’t always straight, or it can splinter easily.
Dealing with these Problems with Kitchen Cabinets from Pallet Wood (And How to Fix Them) is common, but don’t worry! We’ll walk through it all, step by step, making it super simple. First, let’s look at why these issues pop up and what makes them a bit of a puzzle for new builders.
Dealing with Problems with Kitchen Cabinets from Pallet Wood (And How to Fix Them)
When you decide to build kitchen cabinets from pallet wood, you’re often drawn to the cost savings and the rustic charm it can bring to your home. However, this type of reclaimed material presents unique challenges that can be quite difficult for beginners to overcome. Pallet wood is not manufactured lumber; it’s typically rough, uneven, and can contain hidden nails or staples.
These issues can lead to frustration, wasted materials, and a less-than-perfect finished product if not addressed properly. This section will explore the common hurdles you’ll face and offer clear, easy-to-understand solutions.
Finding and Preparing Your Pallet Wood
The first step in any pallet wood project is sourcing your materials. Not all pallets are created equal, and finding good quality wood can be a hunt. You’ll need to know where to look and what to avoid to make your cabinet-making process smoother.
Once you have your wood, preparing it is just as vital. This involves cleaning and removing any unwanted hardware. It sets the stage for all the other work you’ll do.
Where to Find Pallet Wood
Scouring for pallet wood can feel like a treasure hunt. Many local businesses, especially those receiving frequent shipments, are happy to let you take their used pallets off their hands. Places like hardware stores, garden centers, and small manufacturing plants are good starting points.
Always ask permission before taking any pallets from a business, though. Some businesses have specific disposal services or may not want you taking their wood. You might also find pallets left out on curbs, but be cautious and aware of local ordinances regarding taking discarded items.
- Local Businesses: Many shops and factories get deliveries on pallets. They often have stacks of them waiting to be discarded. A friendly conversation can yield a great source of free wood.
- Online Marketplaces: Websites and social media groups dedicated to freecycling or local swaps can be excellent places to find people giving away pallets.
- Construction Sites: Sometimes, construction sites have excess pallets they need to get rid of. It’s essential to get permission from the site manager before taking anything.
When you’re looking, try to find pallets that are marked with an “HT” stamp. This means they have been heat-treated, which is a safer option. Pallets marked “MB” have been treated with methyl bromide, a chemical that you don’t want in your kitchen.
Look for pallets made from hardwoods like oak or maple if possible, as these will be stronger and more durable for cabinet construction.
Cleaning and Disassembling Pallets
Once you’ve gathered your pallet wood, the real work of preparation begins. This isn’t the most glamorous part, but it’s crucial for a safe and beautiful end result. Pallets can be dirty and may have sharp metal pieces hidden within them.
Thorough cleaning and careful disassembly are key to avoiding splinters and ensuring your cabinets are safe to use.
- Cleaning: Start by brushing off any loose dirt, cobwebs, or debris. Then, use a stiff brush and soapy water to scrub the wood. For tougher grime or mold, you might need a mild bleach solution. Always rinse thoroughly and let the wood dry completely in the sun.
- Removing Nails and Staples: This is often the most time-consuming part. Use a pry bar and hammer to carefully remove nails. For stubborn staples, a staple remover or pliers can be very helpful. Be sure to check every piece of wood for any metal remnants to prevent injuries or damage to your tools.
- Inspecting for Damage: While you’re cleaning and disassembling, keep an eye out for wood that is rotten, severely warped, or has large cracks. These pieces might not be suitable for structural cabinet parts.
Taking your time here pays off. You’ll have cleaner, safer wood to work with, and you’ll be less likely to encounter unexpected issues down the line when you’re cutting and assembling your cabinets. Imagine building a beautiful cabinet only to have a rusty nail snag your clothes or a splinter jab your hand – that’s what good preparation helps you avoid.
Common Wood Issues and Solutions
Pallet wood is charmingly imperfect, but these imperfections can cause significant headaches during cabinet building. Uneven surfaces, warping, and hidden defects are common. Learning how to spot these problems and having simple methods to fix them will save you a lot of frustration and help you achieve a professional-looking outcome, even with beginner skills.
Warping and Twisting
Pallet wood can often warp or twist over time due to changes in moisture and how it was stored. This means the boards aren’t flat or straight, which makes it very hard to build square cabinet boxes. Imagine trying to build a box where the sides don’t meet evenly; it just won’t fit together right.
- Identify Warping: Lay a straight edge across the board. If there’s a gap, it’s warped. Twisting means the ends don’t line up on the same plane.
- Flattening: For minor warping, you might be able to flatten boards using clamps and weights while they dry. Sometimes, letting the wood acclimatize in a stable environment for a few weeks can help.
- Planing: A hand plane or a power jointer can flatten surfaces, but this requires some skill and tools. For beginners, it might be easier to select the straightest boards for visible parts.
- Embrace Imperfection: For less critical areas, a slight warp might be acceptable, especially if you’re going for a very rustic look. You can also use these boards for internal parts that won’t be seen.
If a board is severely warped, it’s often best to set it aside and find a straighter piece. Trying to force a very warped board into a project will likely lead to stress and future problems.
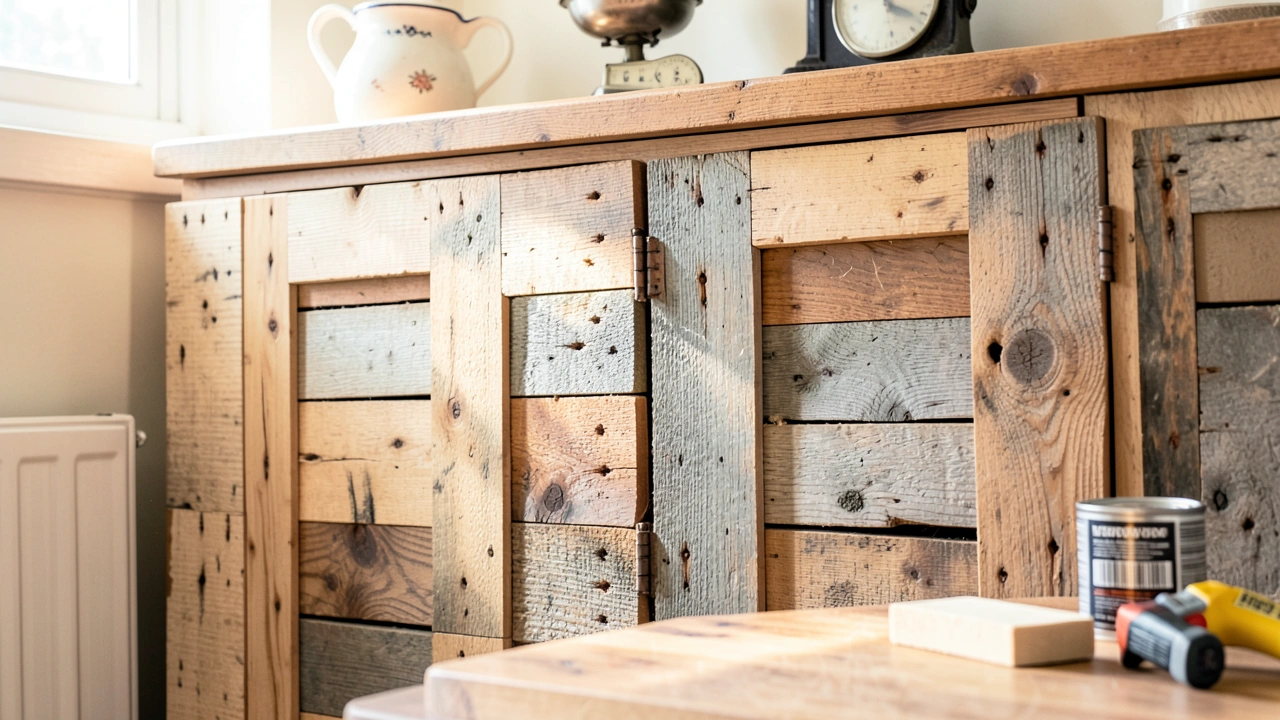
Splintering and Rough Surfaces
Pallet wood is typically rough and prone to splintering, which can be a nuisance and a safety hazard. Building with it requires care to avoid injury and to get smooth finishes for your cabinets. Rough surfaces can also make it hard for paint or stain to go on evenly.
- Sanding: This is your best friend. Start with a coarse grit sandpaper (like 60 or 80 grit) to remove the roughest parts and splinters. Progress to finer grits (120, 180, and even 220) for a smoother feel. A random orbital sander makes this job much faster.
- Edge Treatment: For edges that will be handled often, like cabinet doors or drawer fronts, consider rounding them slightly with sandpaper or a router bit. This makes them much more comfortable and less likely to snag.
- Wood Filler: Small cracks or gouges can be filled with wood filler. Apply it generously, let it dry, and then sand it smooth to match the surrounding wood.
- Protective Gear: Always wear gloves when handling pallet wood to protect your hands from splinters.
A well-sanded surface is crucial for any finish you plan to apply. If you want painted cabinets, a smooth surface is essential for a professional look. For stained cabinets, sanding to a higher grit will help the stain penetrate evenly and highlight the wood’s natural beauty.
Hidden Defects and Hardware
One of the biggest risks with pallet wood is discovering something unexpected within the boards. These can be old nails, staples, screws, or even rotten spots hidden beneath a solid-looking surface. These surprises can damage your tools, ruin your cuts, and compromise the strength of your cabinets.
- Metal Detectors: A simple stud finder or a handheld metal detector can help you locate hidden nails and staples before you start cutting. This saves your saw blades and prevents kickback.
- Visual Inspection: Look closely at the wood for any dark spots, nail heads, or signs of rot. Tap on the wood; a hollow sound might indicate rot or a void.
- Use the Right Tools: If you’re using a table saw, always use a sharp blade designed for rough lumber. A carbide-tipped blade will last longer and cut cleaner. Be prepared to stop if you hit metal.
- Strategic Cutting: If you find a small nail, you might be able to cut around it. For larger defects, it’s best to cut that section out and use the remaining good wood.
It’s also a good idea to test cut small pieces of your pallet wood before making critical cuts for your cabinet parts. This allows you to gauge the wood’s behavior and ensure your tools are set up correctly. Finding these hidden issues early is far better than discovering them when you’re halfway through assembling a cabinet.
Designing and Building Your Pallet Wood Cabinets
Once you’ve tackled the wood preparation, the exciting part is designing and building. Making your own kitchen cabinets can seem like a big project, but with a clear plan and the right approach, it’s totally doable. We’ll cover how to measure, cut, and put your cabinet pieces together so they look great and work well in your kitchen.
Simple Cabinet Design Principles
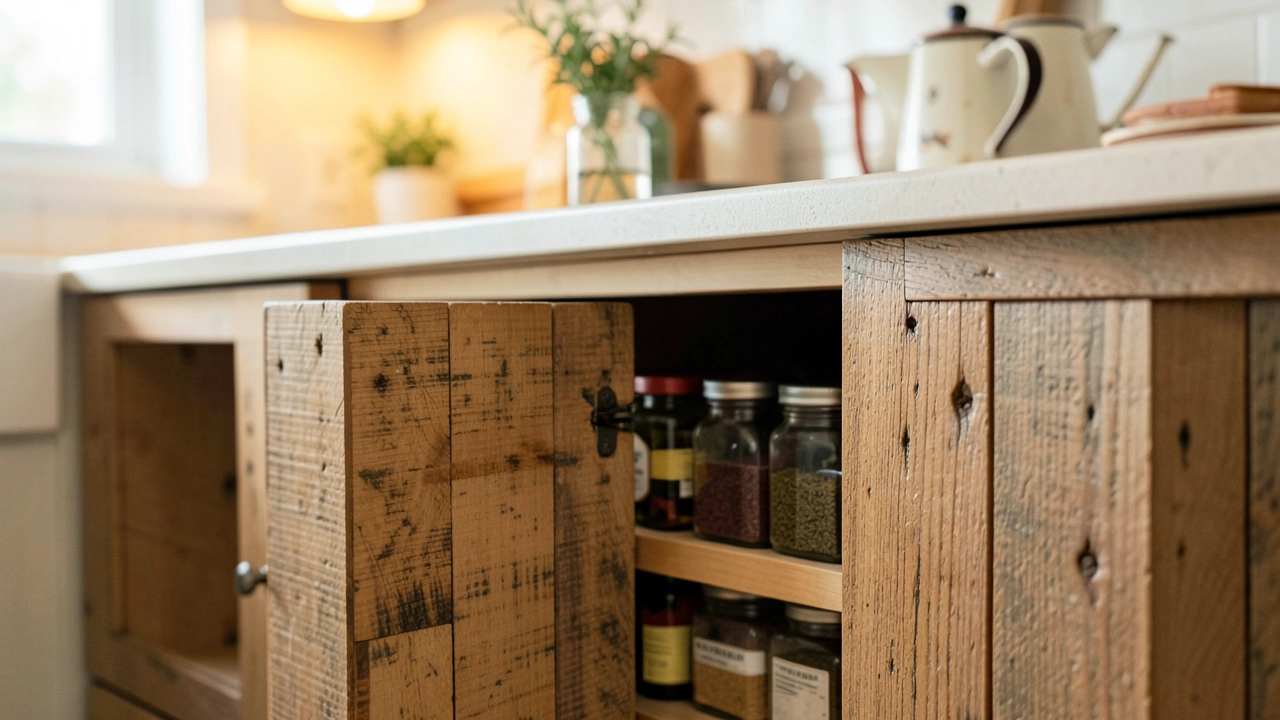
When building cabinets from pallet wood, keeping the design simple is key, especially for beginners. Pallet wood isn’t as uniform as new lumber, so overly complicated designs can amplify any imperfections. Focusing on basic box construction and straightforward door styles will lead to a more successful build.
- Box Construction: The simplest cabinets are just sturdy boxes. You can build these from plywood or from joined pallet wood planks. For front frames, you’ll use strips of pallet wood.
- Door Styles: A flat panel door is the easiest to make. This involves creating a frame from pallet wood strips and then inserting a thinner panel in the middle. Avoid raised panels or intricate details when starting out.
- Drawer Design: Simple drawer boxes can be made with butt joints or dado joints. The drawer fronts can match your cabinet doors.
- Hardware Placement: Think about where your hinges and drawer slides will go. Ensure you have solid wood to attach them to.
It’s helpful to sketch out your cabinet ideas on paper or use a simple design app. Measure your kitchen space carefully to ensure your cabinets will fit perfectly. Considering the available space and the functionality you need will help you create cabinets that are both beautiful and practical.
For instance, imagine building a base cabinet. You’ll need a bottom panel, two side panels, a back panel, and a top piece for it to sit on. Then, you’ll add a front frame and a door.
This basic box structure is manageable and can be adapted to fit your specific needs. If you’re building wall cabinets, the principles are similar, just on a smaller scale.
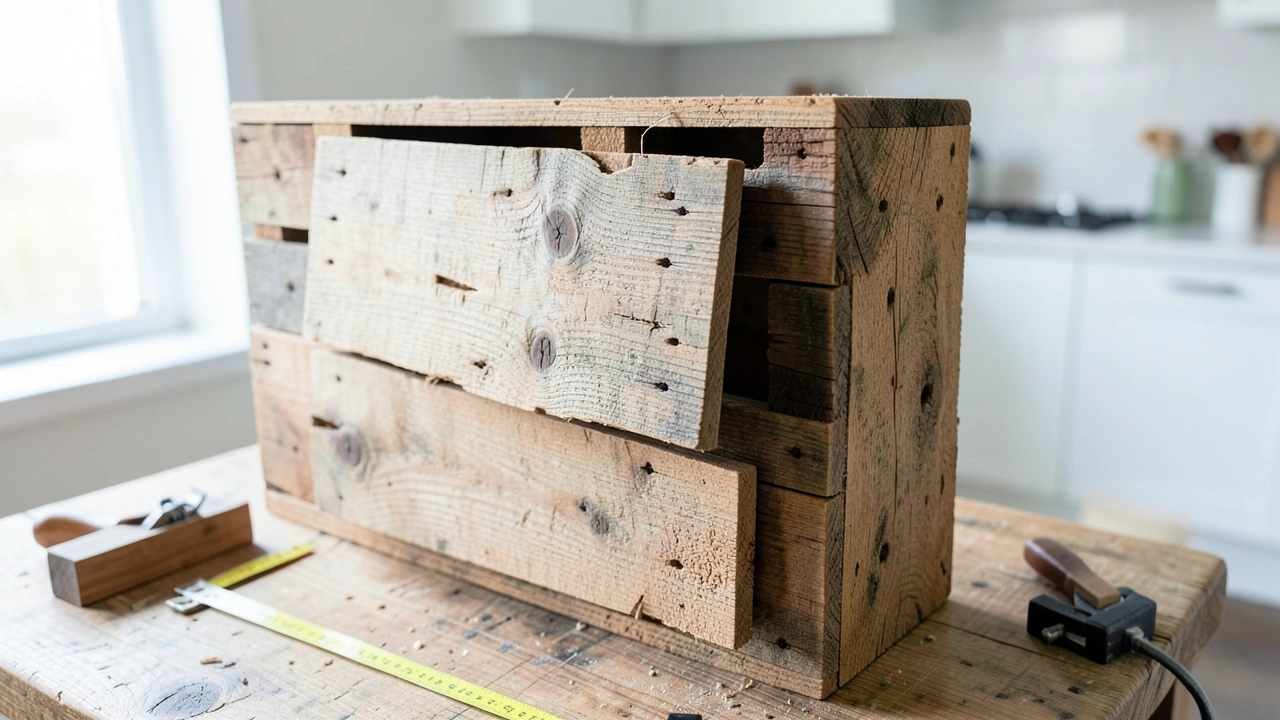
Measuring, Cutting, and Assembling
Accuracy in measuring and cutting is paramount for any cabinet project, but it’s especially important when working with pallet wood. Even slight errors can lead to misaligned joints and wobbly cabinets. Taking your time and using the right techniques will ensure your cabinets are strong and look professional.
- Accurate Measurements: Always measure twice, cut once. Use a reliable tape measure and a pencil to mark your cut lines clearly.
- Straight Cuts: A circular saw or a miter saw will give you the straightest cuts. If using a handsaw, ensure you have a steady hand and a good guide. Pallet wood can be hard to cut, so a sharp blade is essential.
- Joining Methods: For cabinet boxes, screws and wood glue are your best bet for a strong bond. Pocket holes can also be used to create strong, hidden joints. If you’re joining planks for larger panels, biscuits or dowels can add extra strength.
- Assembly Order: Build the main box of the cabinet first. Then, add the front frame, followed by the doors and drawers. This staged approach makes the process more manageable.
Consider using a Kreg Jig for pocket holes. This tool makes it easy to create strong joints that are hidden on the inside of your cabinets. It’s a beginner-friendly way to achieve professional results.
When using screws, pre-drilling pilot holes will prevent the wood from splitting, especially important with older, drier pallet wood.
A useful tip is to assemble the cabinet box on a flat surface. Clamp the pieces together firmly before screwing or gluing. This ensures that all the corners are square.
You can check for squareness by measuring the diagonals of the box; they should be equal. If they aren’t, you can gently force the box into square before the glue dries.
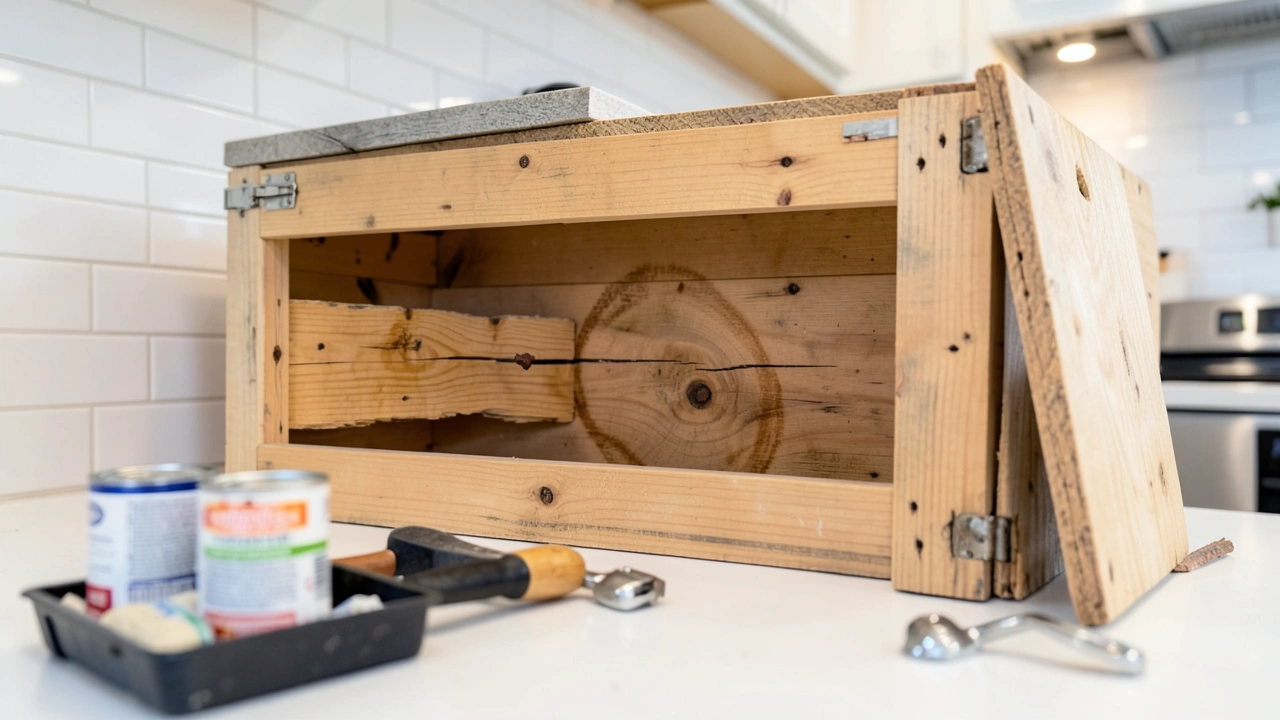
Finishing Your Pallet Wood Cabinets
The final steps involve finishing your cabinets. This not only protects the wood but also gives your cabinets a beautiful, polished look. With pallet wood, the finish can really enhance its rustic charm or cover it up for a more modern appearance.
- Sanding for Finish: Ensure all surfaces are sanded smooth, working up to at least 180 or 220 grit sandpaper. This prepares the wood for stain or paint.
- Staining: If you want to highlight the natural grain and imperfections of the pallet wood, staining is a great option. Use a pre-stain wood conditioner first, especially on varied pallet wood, to help the stain absorb evenly.
- Painting: For a clean, uniform look, painting is ideal. Use a good quality primer first, followed by two coats of your chosen paint color. Chalk paint or milk paint can offer a lovely, slightly distressed finish.
- Sealing: Regardless of whether you stain or paint, you must seal your cabinets. A clear coat of polyurethane or varnish will protect the wood from moisture and wear. Apply two or three coats for maximum durability.
When applying a finish, work in a well-ventilated area. For a smoother finish, you can lightly sand between coats of paint or sealant with a very fine-grit sandpaper (320 grit or higher). This removes any tiny bumps or dust specks.
A good example of finishing is choosing a dark stain for your pallet wood cabinets. This can really bring out the character of the wood, making the knots and grain pop. Then, a few coats of matte polyurethane will protect it without adding too much shine, keeping that rustic feel.
Alternatively, a crisp white paint can completely transform the wood, giving your kitchen a bright, farmhouse-inspired look.
Troubleshooting Common Pallet Wood Cabinet Issues
Even with careful planning and preparation, you might run into unexpected snags when building kitchen cabinets from pallet wood. This section focuses on common problems that can arise during the build and offers practical, easy-to-implement solutions to keep your project on track and ensure your cabinets are functional and attractive.
Dealing with Uneven Surfaces and Gaps
One of the most frequent challenges with pallet wood is that the boards are rarely perfectly flat or uniformly thick. This leads to uneven surfaces and gaps between pieces, which can affect both the appearance and the structural integrity of your cabinets. Addressing these issues is crucial for a professional finish.
- Using a Planer: A thickness planer is the ideal tool for flattening and smoothing wood. If you have access to one, run your pallet wood through it to achieve consistent thickness and flat surfaces. This is a significant investment, so consider renting one if possible or finding a local maker space that offers tool access.
- Hand Planing: For smaller projects or minor adjustments, a sharp hand plane can be used to flatten surfaces. This requires some practice but can yield great results. Take light, consistent shavings to gradually achieve flatness.
- Sanding Techniques: If planing isn’t an option, aggressive sanding can help. Use a coarse grit sandpaper on a power sander to knock down high spots. For gaps, you might need to fill them with wood filler or use a sealant caulk after assembly.
- Strategic Placement: Use the flattest, most uniform pieces for visible areas like cabinet doors and drawer fronts. Less perfect pieces can be used for internal supports or the back of cabinets.
When you’re assembling cabinet boxes, the corners might not meet perfectly flush due to uneven edges. You can often hide minor inconsistencies by using wood filler to bridge small gaps after assembly. If the gap is larger, you might consider adding a decorative trim piece over the joint to conceal it.
Think of it as adding character rather than a flaw.
A scenario: You’ve joined two planks for a cabinet door, but one edge is slightly higher than the other, leaving a visible step. Instead of re-doing the entire door, you could carefully sand down the high edge until it’s flush. If that’s not possible, you could add a thin strip of wood around the perimeter of the door, effectively creating a frame that covers the uneven join.
This adds a design element while solving the problem.
Ensuring Structural Integrity
Kitchen cabinets need to be strong and durable, able to hold the weight of dishes, cookware, and food items. Pallet wood, while often sturdy, can sometimes be brittle or have hidden weaknesses that could compromise the structural integrity of your cabinets if not managed carefully.
- Reinforce Joints: Don’t rely solely on glue and screws. For critical joints, like where the sides meet the bottom or top of a cabinet box, consider adding corner braces or reinforcing blocks of wood. Pocket holes are also excellent for creating strong, hidden joints.
- Plywood or Solid Backs: While you can make cabinets entirely from pallet wood planks, using a thin sheet of plywood for the back panel can significantly increase the rigidity and strength of the cabinet box. This helps prevent racking, which is when the cabinet twists out of shape.
- Consider Weight Limits: Be realistic about how much weight your pallet wood cabinets can safely hold. For very heavy items, you might want to reinforce shelves with additional supports or use stronger shelving materials.
- Durable Hardware: Invest in good quality hinges and drawer slides. Cheap hardware can fail over time, putting extra stress on your cabinet construction. Ensure the hardware is securely attached to solid wood.
When building drawer boxes, the sides can sometimes pull away from the front or back if they are under a lot of stress. To prevent this, consider using dadoes (grooves) in the side pieces where the bottom panel slides in. This creates a stronger, more integrated drawer box.
Alternatively, using screws from the outside into the drawer front and back provides good reinforcement.
A practical example of ensuring strength: You’re building a base cabinet meant to hold heavy pots and pans. Instead of just screwing the shelves into the side panels, you could add small wooden cleats or brackets underneath each shelf. These cleats run the length of the shelf and attach to the side panels, providing substantial extra support and preventing the shelves from sagging over time.
Addressing Finish and Durability Concerns
The final look and longevity of your pallet wood cabinets depend heavily on the finishing process. Pallet wood’s unique texture and potential for staining unevenly can pose challenges, and ensuring the finish is durable enough for a kitchen environment is essential.
- Proper Surface Prep: Thorough sanding is non-negotiable. Start with coarse grit and move to finer grits. Any roughness left will show through the finish. Clean the dust off completely with a tack cloth or damp rag before applying any finish.
- Testing Finishes: Always test your chosen stain or paint on a scrap piece of pallet wood from the same batch. This helps you see how the color will look and if you need to adjust the application.
- Moisture Resistance: Kitchens are humid environments. Use a durable, water-resistant topcoat like polyurethane or a marine-grade varnish. Apply multiple coats, sanding lightly between each, for maximum protection.
- Wear and Tear: Cabinets, especially those around the sink, experience a lot of wear. For high-traffic areas, consider a tougher finish or plan for occasional touch-ups.
When you stain pallet wood, some areas might absorb the stain more deeply than others, leading to dark blotches. Using a wood conditioner before staining can help create a more even absorption. If blotchiness still occurs, a glaze applied over a clear coat can sometimes unify the color, or you can embrace it as part of the wood’s unique character.
Consider a scenario where you’ve painted your cabinets a lovely color, but after a few weeks, you notice minor scuffs and scratches near the sink area. This is where the durability of your topcoat comes in. If you had used a high-quality, multiple-coat polyurethane finish, these minor marks might not have appeared.
If they do, a light sanding and another coat of clear finish can often repair them. This shows why focusing on a good protective seal is so important for kitchen cabinets.
Frequently Asked Questions
Question: Is pallet wood safe for kitchen cabinets?
Answer: Pallet wood can be safe if you choose your pallets carefully. Look for ones marked with “HT” (heat-treated) and avoid those marked “MB” (methyl bromide), as it’s a chemical treatment. Thoroughly clean the wood to remove any dirt or potential contaminants.
Question: How do I make pallet wood smooth enough for cabinets?
Answer: You’ll need to do a lot of sanding! Start with a coarse grit sandpaper (like 80 grit) to remove rough spots, then move to finer grits (120, 180, 220) for a smooth finish. A power sander will make this much easier.
Question: Can I build cabinets with warped pallet wood?
Answer: Minor warping can sometimes be managed by careful selection of pieces or by using clamps and weights to try and straighten them while they are glued. However, severely warped boards are best avoided for structural cabinet parts, as they can make assembly very difficult and lead to weak joints.
Question: What’s the best way to join pallet wood for cabinet boxes?
Answer: For strong and simple joints, using wood glue along with screws is a great method. Pocket holes, made with a Kreg Jig, are also excellent for creating strong, hidden joints that add to the cabinet’s durability and appearance.
Question: How do I protect my finished pallet wood cabinets from moisture?
Answer: It’s crucial to seal your cabinets well. After sanding, staining or painting, apply at least two to three coats of a durable, water-resistant topcoat like polyurethane or a marine-grade varnish. This will protect the wood from spills and humidity in the kitchen.
Final Thoughts
Building kitchen cabinets from pallet wood presents unique challenges, like warped boards and rough surfaces. You can overcome these by carefully preparing your wood, sanding it thoroughly, and using simple, strong joinery methods. By understanding these common Problems with Kitchen Cabinets from Pallet Wood (And How to Fix Them) and applying these straightforward solutions, you can create beautiful, functional cabinets for your home.

Leave a Reply