

Making your own kitchen cabinets from wood pallets can be a fun and rewarding project! Sometimes, though, these handmade cabinets might feel a little wobbly. This is a common thing for beginners to wonder about when they are figuring out How to Strengthen DIY Kitchen Cabinets Made from Pallets.
Don’t worry, it’s easier than you might think to make them sturdy and last a long time. We’ll walk you through it step-by-step so you can have beautiful, strong cabinets that you built yourself. Let’s get started on making them super strong.
Making Pallet Kitchen Cabinets Stronger
This part is all about making sure your DIY kitchen cabinets built from pallets are tough and can hold up to everyday use. Pallets are great for projects, but they aren’t always the strongest wood on their own. We’ll look at different ways to add strength, from picking the right wood to using smart building tricks.
You’ll learn how to make sure your cabinets don’t sag or break, even when they’re full of dishes and food. This section will cover the main ideas for making them super secure.
Choosing the Right Pallets
The first step to strong cabinets is picking good wood. Not all pallets are made the same, and some are much better for building than others. You want to find pallets that are made of hardwood if you can.
Hardwood is much tougher and lasts longer than soft wood. Also, look for pallets that don’t have too many knots or cracks. These weak spots can make the wood break easily.
Think of it like picking good building blocks; you want the strongest ones you can find.
When you’re looking for pallets, try to find ones that are marked with “HT” which means they were heat-treated. This is good because it shows they are safe for indoor use and not treated with nasty chemicals. Avoid pallets with a “MB” stamp; this means they were treated with methyl bromide, which is a chemical you don’t want in your kitchen.
Also, check the pallet’s condition. Are there signs of rot or insect damage? If a pallet looks moldy or has holes drilled by bugs, it’s best to leave it behind.
The cleaner and more solid the pallet looks, the better it will be for building strong cabinets.
- Hardwood Pallets: Look for pallets made from oak, maple, or other hardwoods. These woods are naturally stronger and more durable than softwoods like pine. They resist dents and scratches better, which is important for kitchen use.
- Pallet Condition: Inspect each pallet carefully. Avoid wood that is cracked, warped, or shows signs of rot or insect infestation. Good quality wood is the foundation of strong cabinets.
- Heat Treatment (HT): Pallets marked with “HT” are safe for furniture and home projects. This stamp indicates they were treated with heat, not chemicals, to kill pests.
For example, a cabinet made from solid oak pallet planks will feel much more substantial and hold more weight than one made from thin, splintery pine. Imagine trying to build a bookshelf; you wouldn’t use balsa wood for the main shelves if you planned to put heavy books on them. The same idea applies here.
Picking the right wood is the first and most important step to making sure your cabinets are strong from the start.
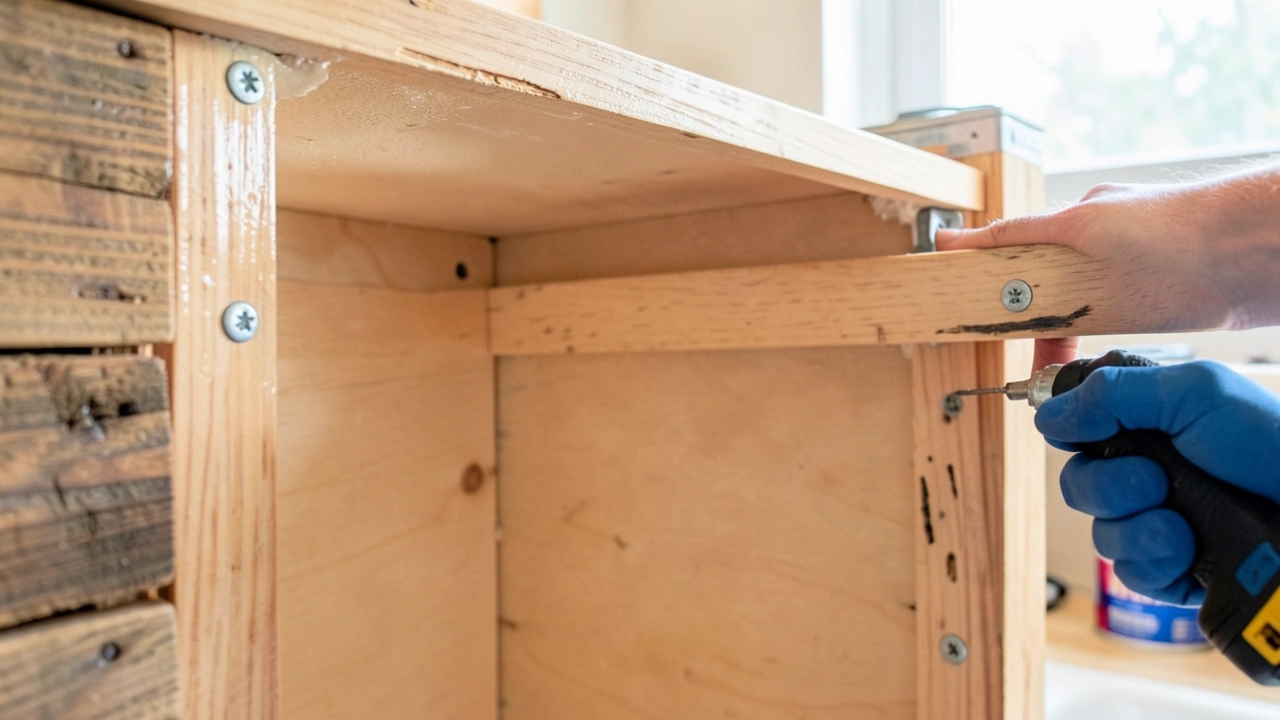
Reinforcing Joints and Connections
Cabinets are only as strong as their weakest joint. This is where many DIY projects can start to feel a bit shaky. For your pallet cabinets, you need to make sure all the pieces are joined together very securely.
This means using more than just a few small nails or screws. We want to use methods that give the wood extra support and make it hard to pull apart. Think about how a real furniture maker builds things – they use strong joints for a reason.
One simple way to make joints stronger is to use wood glue along with screws. Glue fills in tiny gaps and creates a solid bond when it dries. When you add screws, you’re holding the pieces together while the glue sets, and even after it dries, the glue adds a lot of strength.
Pocket hole joinery is another great technique. This involves drilling angled holes in one piece of wood and then driving screws through those holes into the other piece. This creates a very strong connection without visible screw heads on the outside.
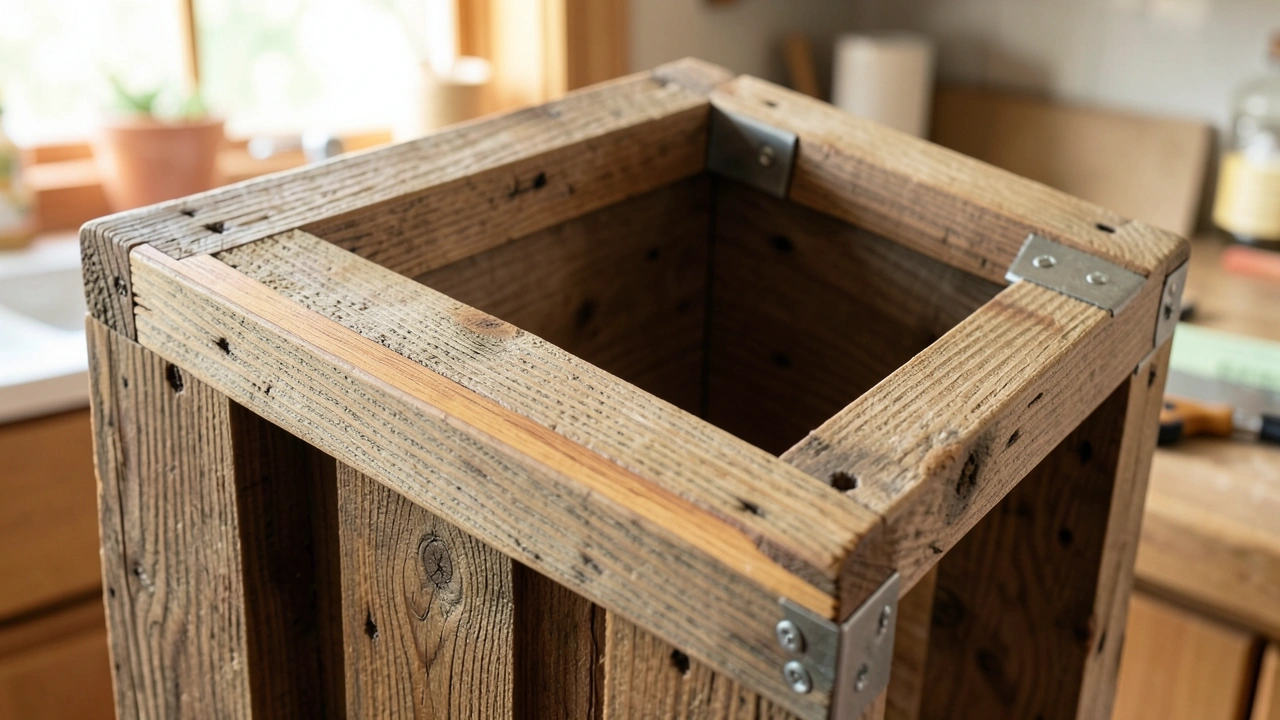
Corner braces are also your friend. These are small metal or wooden pieces that you can add to the inside corners of your cabinet boxes to give them extra support.
- Wood Glue: Always use a good quality wood glue on all joints before screwing or nailing. It creates a bond stronger than the wood itself. Wipe away any excess glue that squeezes out before it dries.
- Screws vs. Nails: While nails can hold things together, screws provide much better holding power, especially in hardwood. Use screws that are long enough to go through one piece of wood and deep into the next.
- Pocket Holes: This method creates strong, hidden joints. It requires a special jig, but it’s worth it for the extra strength and clean look.
- Corner Braces: For added stability, especially in larger cabinets or where shelves connect, small metal L-brackets or wooden blocks can be screwed into the inside corners.
A real-life example could be building a shelf that will hold heavy books. If you just used a few nails to attach the shelf to the sides, it would likely sag or even break. But if you use wood glue, long screws, and maybe even some corner brackets, that shelf can hold a lot more weight and stay strong for years.
This is exactly the principle we apply to strengthening our pallet cabinets.
Adding Internal Support Structures
Sometimes, the basic box of a cabinet just isn’t enough, especially if you plan to store heavy items like pots, pans, or stacks of dishes. Adding internal supports acts like a skeleton for your cabinets, giving them a solid frame to prevent any bowing or breaking over time. This might sound complicated, but it’s usually just about adding a few extra pieces of wood in the right places.
These hidden supports make a big difference in how strong your cabinets feel and how much weight they can carry.
Think about where the most stress will be. Shelves are a prime spot. Instead of just resting a shelf on the cabinet sides, you can add a cleat or a small piece of wood along the front and back edges of the shelf that the shelf sits on.
This stops the shelf from bending downwards in the middle. For the cabinet boxes themselves, you can add horizontal pieces, called rails or stretchers, at the top and bottom, and even in the middle for larger cabinets. These connect the front and back of the cabinet and the sides, making the whole structure much more rigid.
You can also add a back panel, which really squares up the cabinet and adds a lot of structural integrity.
- Shelf Cleats: Attach a piece of wood (a cleat) to the inside of the cabinet walls where the shelf will sit. The shelf then rests on these cleats, supporting its weight from below and preventing sagging.
- Horizontal Rails: Add horizontal pieces of wood across the back of the cabinet, connecting the side panels. These help keep the cabinet square and prevent racking (sideways movement).
- Vertical Supports: For very wide cabinets, consider adding a vertical divider in the middle. This splits the cabinet into smaller sections, making each section stronger.
- Solid Back Panel: Instead of leaving the back open, attach a thin piece of plywood or hardboard. This adds significant rigidity and stops the cabinet from twisting.
Imagine a long, thin piece of cardboard. If you try to push down on the middle, it will bend easily. But if you add a few strips of wood along the edges, it becomes much stiffer.
That’s what internal supports do for your cabinets. They turn a flexible structure into a strong and stable one.
Strengthening Techniques for Pallet Cabinet Doors
Cabinet doors are the face of your kitchen cabinets, and they need to look good and work smoothly. With pallet wood, doors can sometimes warp or feel a bit light. We need to make sure they are strong enough to withstand opening and closing many times a day, and that they stay flat and don’t twist.
This section focuses on how to build or reinforce your pallet cabinet doors so they are both beautiful and tough.
One common way to strengthen a wooden door, especially one made from planks, is to add a cross-brace or a Z-brace on the back. This is simply a piece of wood that runs diagonally or in a Z shape across the back of the door. It stops the door from racking or twisting, keeping all the planks aligned.
If you’re building the doors from scratch, consider making them with a frame and panel design. This involves building an outer frame and then ntly stronger and less prone to warping than a door made of solid, wide planks.
- Z-Bracing: Attach a wooden slat in a Z-shape across the back of the door. This connects the top and bottom edges and the side edges, preventing the door from warping or sagging.
- Frame and Panel Design: Build the door with a solid wood frame and insert thinner panels into grooves. This traditional method offers excellent stability and resistance to warping.
- Wood Type for Doors: If possible, use slightly thicker or harder wood for the doors compared to the cabinet boxes. This will give them more heft and stability.
- Hinge Placement: Ensure hinges are attached to solid parts of the door and cabinet frame. Using longer screws or reinforcing the hinge area with extra wood can prevent the hinges from pulling out over time.
A case study might involve a DIYer who built pallet cabinet doors that started to sag after a few months. They then added a simple Z-brace to the back of each door. The result was that the doors immediately felt more rigid, and the sagging stopped completely.
This simple addition transformed their functionality. This is similar to how a wall is made stronger by adding diagonal bracing in construction.
Making Doors Flat and Warp-Resistant
Warping is a common problem with wood, especially when it’s exposed to changes in humidity. For pallet wood cabinet doors, this can mean they don’t close properly or look uneven. The goal here is to use techniques that keep your doors as flat and straight as possible, no matter what.
It’s about building them in a way that resists these changes or fixing them if they start to happen.
One key is how you join the wood pieces. If you are making a door from several planks, alternating the grain direction slightly can help. However, the most effective method is often the frame and panel construction.
The frame, made from stronger pieces, holds the panel in place. The panel itself can be made of thinner wood, which is less likely to warp significantly. If it does move a little, the way it’s set into the frame allows for some expansion and contraction without deforming the entire door.
Another tip is to seal all surfaces of the door, front, back, and edges, with a good quality sealant or paint. This helps to equalize the moisture content on all sides, reducing the tendency for one side to expand or contract more than the other, which is what causes warping.
- Sealant Application: Apply multiple coats of a good quality sealer, varnish, or paint to all sides of the door, including the edges. This creates a barrier against moisture changes.
- Alternating Grain: When joining planks for a door, try to alternate the direction of the wood grain. This can help to balance the wood’s tendency to expand and contract.
- Proper Drying: Ensure that any glue used on the door dries completely under even pressure. Clamping the door flat while it dries is crucial.
- Environment Control: Try to maintain a stable humidity level in your kitchen if possible. This reduces stress on the wood.
Consider two doors. One is made from planks glued side-by-side and left untreated. After a few weeks in a humid kitchen, it might start to cup noticeably.
The second door is built with a solid oak frame and a thinner plywood panel, all sealed with polyurethane. This door remains flat and true, looking just as it did when it was first made. The sealing and construction method made all the difference.
Attaching Hinges Securely
Hinges are the connection points for your doors, and if they aren’t attached well, the doors will droop, sag, or even fall off. This is especially true with pallet wood, which can sometimes be softer or have an uneven surface. Making sure your hinges are firmly attached is vital for both the function and the longevity of your pallet cabinet doors.
First, choose the right type of hinges for your doors and cabinets. For cabinet doors, overlay hinges (which sit on the outside of the cabinet frame) or inset hinges (which sit within the frame) are common. Make sure the hinge you choose is rated for the weight of your door; pallet wood can be surprisingly heavy.
When attaching the hinges, don’t just use the screws that come with them. Often, they are quite short.
- Hinge Type Selection: Choose hinges appropriate for the door’s weight and swing style. Consider the thickness of your pallet wood.
- Longer Screws: Always use screws that are long enough to anchor firmly into the solid wood of the cabinet frame and door, not just the surface layer.
- Reinforce Hinge Areas: If the wood is soft or you anticipate heavy use, add small wood blocks or dowels behind the hinge mounting points for extra strength.
- Precise Placement: Measure carefully to ensure hinges are placed evenly on both sides of the door and at the correct depth within the cabinet frame.
A practical scenario: A person attaches hinges with short screws to a pallet wood cabinet door. After a week, the door starts to hang crooked. They then remove the short screws, drill pilot holes, and use 1.5-inch screws that go deep into the cabinet frame.
They also added a couple of small wood blocks behind the hinge plates on the door itself. The door now hangs perfectly straight and feels much more secure.
Improving Durability and Finish
Once your pallet cabinets are built and strengthened, the final touch is crucial for making them last. This isn’t just about making them look pretty; it’s about protecting the wood from moisture, stains, and everyday wear and tear. A good finish will keep your cabinets looking great and functioning well for many years to come.
This part is about giving your creations the best possible protection.
The type of finish you choose depends on the look you want and the level of protection you need. For kitchen cabinets, which are exposed to water, grease, and heat, a durable finish is essential. Polyurethane is a popular choice because it’s tough and water-resistant.
It comes in different sheens, from matte to high gloss. Another option is a good quality cabinet paint. If you’re painting, a good primer is key to ensuring the paint sticks well and provides a smooth finish.
For a more natural look, a clear varnish or lacquer can also work, but ensure it’s rated for high-traffic areas. Proper preparation, like sanding the wood smooth before applying any finish, is incredibly important. This allows the finish to adhere properly and look its best.
- Sanding is Key: Before applying any finish, sand all surfaces of the cabinets thoroughly. Start with a coarser grit sandpaper to smooth out rough pallet wood, then move to finer grits for a smooth feel.
- Primer for Paint: If you plan to paint, use a high-quality primer. This helps to block stains, create a uniform surface, and ensure the paint adheres well to the pallet wood.
- Durable Top Coats: For kitchens, choose finishes like polyurethane, polycrylic, or a tough cabinet enamel. These offer excellent resistance to moisture, stains, and scratches.
- Sealing Edges: Pay special attention to sealing the edges of shelves and cabinet doors, as these are areas most exposed to moisture and wear.
A common statistic in woodworking is that the finish can add up to 50% to the lifespan of a piece of furniture when applied correctly. Imagine a wooden deck that isn’t sealed; it will rot and wear down much faster than a sealed one. The same principle applies to your kitchen cabinets.
A good finish acts like armor for the wood.
Sanding and Preparing the Wood
Pallet wood is often rough and may have splinters, nails, and uneven surfaces. Before you can strengthen or finish your cabinets, you need to make them smooth and safe to touch. Sanding is the process that does this, and it’s a vital step for a good result.
Taking the time to sand properly will make a huge difference in how your cabinets look and feel, and how well the finish holds up.
Start by removing any old nails or staples. A pry bar and hammer are useful for this. Once the hardware is out, begin sanding.
Use a coarser grit sandpaper, like 60 or 80 grit, with a power sander if you have one, or by hand. This will quickly remove the rough surface and any deep imperfections. After you’ve gone over the entire piece with the coarse grit, switch to a medium grit, like 120 grit.
This will smooth out the scratches left by the coarser paper. Finally, use a fine grit sandpaper, like 180 or 220 grit, to get a really smooth finish. Wipe away all the dust between each sanding stage with a damp cloth or a vacuum cleaner attachment.
A clean surface is essential for the next steps.
- Remove All Hardware: Carefully remove all nails, screws, staples, and any other metal objects from the pallet wood. This protects your tools and prevents injury.
- Progressive Grits: Work through a series of sandpaper grits: coarse (e.g., 60-80), medium (e.g., 120), and fine (e.g., 180-220). Never skip a grit level.
- Power Tools: Orbital sanders or belt sanders can speed up the process significantly, especially for larger surfaces. Use them carefully to avoid creating uneven spots.
- Dust Removal: After each sanding session, thoroughly clean the wood by wiping it down with a tack cloth or a slightly damp rag. This prevents dust from being trapped in the finish.
A common mistake is not sanding enough. If you only do a quick once-over with medium grit sandpaper, you might still have a surface that feels rough to the touch or has visible scratches. This will show up even more once you apply a finish.
Think of it like preparing a canvas for painting; a smooth, clean canvas makes for a much better finished painting.
Applying Protective Finishes
Now that your cabinets are strong and smooth, it’s time to protect them. The right finish will shield your pallet cabinets from spills, stains, and general wear and tear. It also gives them a polished, professional look that you might not expect from pallet wood.
Choosing and applying the finish correctly is the final step to making your DIY project both beautiful and built to last.
For kitchen environments, durability is key. Polyurethane is a workhorse. It’s a clear protective coating that dries hard and resists water and scratches.
It comes in water-based and oil-based formulas. Water-based poly is easier to clean up and dries faster, with less odor. Oil-based poly offers a slightly more durable finish and a warmer amber tone, but it takes longer to dry and has a stronger smell.
Apply it in thin, even coats. Two to three coats are usually recommended for cabinet surfaces. Allow each coat to dry completely and lightly sand with very fine sandpaper (220 grit or higher) between coats for a super smooth feel.
Paint is another great option. Start with a good quality primer, then apply two or more coats of a durable cabinet paint. Make sure to use a paint designed for cabinets, as it will be more resistant to chipping and wear.
- Polyurethane Application: Apply thin, even coats of polyurethane using a good quality brush or foam applicator. Avoid applying it too thickly, which can lead to drips and unevenness.
- Water-Based vs. Oil-Based: Water-based is ideal for a quick, low-odor finish. Oil-based provides superior hardness and a richer color but requires more drying time and ventilation.
- Multiple Thin Coats: Always apply multiple thin coats rather than one thick coat. This provides better protection and a smoother, more professional appearance.
- Light Sanding Between Coats: After each coat of polyurethane dries, lightly sand with very fine-grit sandpaper (220+) and wipe away dust. This knocks down any imperfections and helps the next coat adhere better.
A user shared that after finishing their pallet cabinets with just one coat of basic varnish, they started to see water marks after only a few months. They then stripped the cabinets and reapplied a system of primer, two coats of cabinet paint, and two coats of polyurethane. The result was a much more resilient finish that held up beautifully against daily kitchen use.
Frequently Asked Questions
Question: Is pallet wood safe to use for kitchen cabinets?
Answer: Yes, but only if you choose the right pallets. Look for those marked with “HT” (heat-treated) and avoid any marked “MB” (methyl bromide) or those that show signs of mold or chemical spills. Properly cleaned and finished pallet wood is safe.
Question: How can I make sure my pallet cabinets don’t smell musty?
Answer: Pallet wood can sometimes have a musty smell. Thoroughly clean the wood with a mild detergent and water, let it dry completely in the sun if possible, and then apply a good sealant or paint. This usually seals in any lingering odors.
Question: What is the best way to join pallet wood planks for cabinet sides?
Answer: Using wood glue along with screws is very effective. For extra strength, consider pocket hole joinery or using reinforcing corner blocks on the inside of the cabinet box. Making sure the planks are straight and well-fitted before joining is also important.
Question: Can I use a router on pallet wood?
Answer: Yes, you can use a router, but be cautious. Pallet wood can be unpredictable. Ensure the wood is securely clamped and always wear safety glasses.
It’s best to use sharp router bits and take shallow passes to avoid tear-out, especially on rougher sections.
Question: How much weight can strengthened pallet cabinets hold?
Answer: With proper reinforcement, internal supports, and good joinery, strengthened pallet cabinets can hold a significant amount of weight, comparable to many commercially made cabinets. For typical kitchenware, they should be more than sufficient.
Summary
Strengthening your DIY kitchen cabinets made from pallets involves careful selection of wood, reinforcing all joints, adding internal supports, and applying a durable finish. By following these steps, you ensure your cabinets are not only functional and sturdy but also look great for years. Your hard work will result in beautiful, resilient cabinets you can be proud of.

Leave a Reply