
Thinking about how to make your kitchen cabinets extra strong is a smart idea, especially for folks just starting out with home projects. It might sound tricky, but learning How to Reinforce Wall-Mounted Kitchen Cabinets is simpler than you imagine. We’re going to walk through it step-by-step, making sure it’s easy to follow.
Get ready to learn how to secure those cabinets for good.
Why Reinforcing Kitchen Cabinets Matters
This part is all about why you might want to make your wall cabinets stronger. Sometimes, cabinets can feel a bit wobbly, or you might plan to store heavy items. Knowing how to reinforce them helps keep your kitchen safe and your cabinets looking great for years.
We’ll cover the main reasons this job is important and what you can expect.
Checking Your Cabinet’s Strength
Before you do anything, it’s good to check if your cabinets really need extra support. Gently push on the bottom and sides. Do they move more than you’d like?
Listen for any creaking sounds when you open or close them. Think about what you usually keep inside. If you store a lot of dishes, pots, or canned goods, these can add up in weight.
- Weight Concerns: Kitchen cabinets hold a lot of things, and over time, this weight can strain the screws and the wall itself. If cabinets start to sag, it’s a clear sign they need more support. This can happen even with cabinets that were installed correctly years ago as materials can wear.
- Loose Mounting: The screws that hold your cabinets to the wall can loosen over time due to vibrations from appliances, movement of the house, or just repeated use. Loose screws mean the cabinet is not as secure as it should be.
- Adding New Cabinets: If you are adding new cabinets next to older ones, you want to ensure they are all equally strong. This makes the entire bank of cabinets look and feel more stable.
The Importance of Secure Cabinets
Having securely mounted cabinets is more than just about looks; it’s about safety. Imagine a cabinet full of heavy items falling from the wall. It could cause serious damage to your countertops, your floor, or even hurt someone.
Reinforcing them adds a layer of protection against accidents. It also makes your kitchen feel more solid and well-built.
Think of it like building a sturdy shelf. If the brackets are weak, the shelf won’t hold much. Your kitchen cabinets are similar.
They need a strong foundation on the wall to perform their job well.
What You’ll Need for Reinforcing Cabinets
Gathering the right tools and materials makes the job much smoother. You don’t need a fancy workshop for this. Most items are easy to find at any hardware store.
Having everything ready before you start means less stopping and starting.
Essential Tools for the Job
You’ll need some basic tools that most DIYers have. A good drill is key. Make sure it has enough power for the screws you’ll be using.
A level will help you make sure everything is straight.
- Drill and Drill Bits: For making pilot holes and driving screws. Having various sizes of drill bits is helpful.
- Level: To ensure cabinets are installed straight, preventing future issues.
- Stud Finder: This tool helps you locate the wooden studs inside your wall, which are vital for secure mounting.
- Screwdriver Bits: To match the screws you are using. Usually, Phillips head is common.
- Measuring Tape: For accurate placement and marking.
- Pencil: For marking positions on cabinets and walls.
Choosing the Right Materials
The type of screws and reinforcement pieces you use matters. It’s best to go with strong, high-quality materials. This ensures the reinforcement will last.
- Screws: Use sturdy wood screws that are long enough to go through the cabinet back, the drywall, and well into the wall studs. For example, 3-inch or 3.5-inch screws are often a good choice. Always check the recommended length for your specific wall and cabinet setup.
- Washers: These can be used with screws to help distribute pressure and prevent the screw head from pulling through the material.
- Wood Blocks or Metal Brackets: These are the actual reinforcement pieces. Wood blocks can be cut to size and screwed into place. Metal L-brackets are also very effective and can be bought at most hardware stores. They offer strong support.
- Wood Glue (Optional): If you are using wood blocks, a little wood glue can add extra strength to the joint.
Simple Steps for Reinforcing Wall-Mounted Kitchen Cabinets
Now we get to the practical part of How to Reinforce Wall-Mounted Kitchen Cabinets. We will break down the process into easy steps. You can do this with a bit of patience and the right tools.
Step 1: Prepare Your Workspace
Clear out the cabinets you plan to work on. This makes it easier to access the back and sides. Put down a drop cloth to protect your countertop and floor from dust and dropped tools.
- Empty Cabinets: Remove all dishes, food items, and anything else stored inside. This reduces the weight and makes it easier to move around.
- Protect Surfaces: Cover countertops and floors with old sheets, blankets, or drop cloths. This catches dust and prevents scratches.
Step 2: Locate Wall Studs
This is a crucial step for strong support. Wall studs are the vertical wooden beams inside your walls. You need to screw into these for the best hold.
Use your stud finder to locate them. Mark their positions clearly on the wall.
A stud finder uses electronic signals to detect changes in density behind the drywall. When it finds a stud, it usually beeps or lights up. Make sure you find the center of the stud for the most secure connection.
You might need to test in a few spots to be sure.
- Using a Stud Finder: Slide the electronic stud finder horizontally across the wall where the cabinet is mounted. Mark where it indicates a stud.
- Verifying Stud Location: You can test by lightly tapping the wall. It sounds more solid over a stud. Sometimes, drilling a very small test hole can confirm.
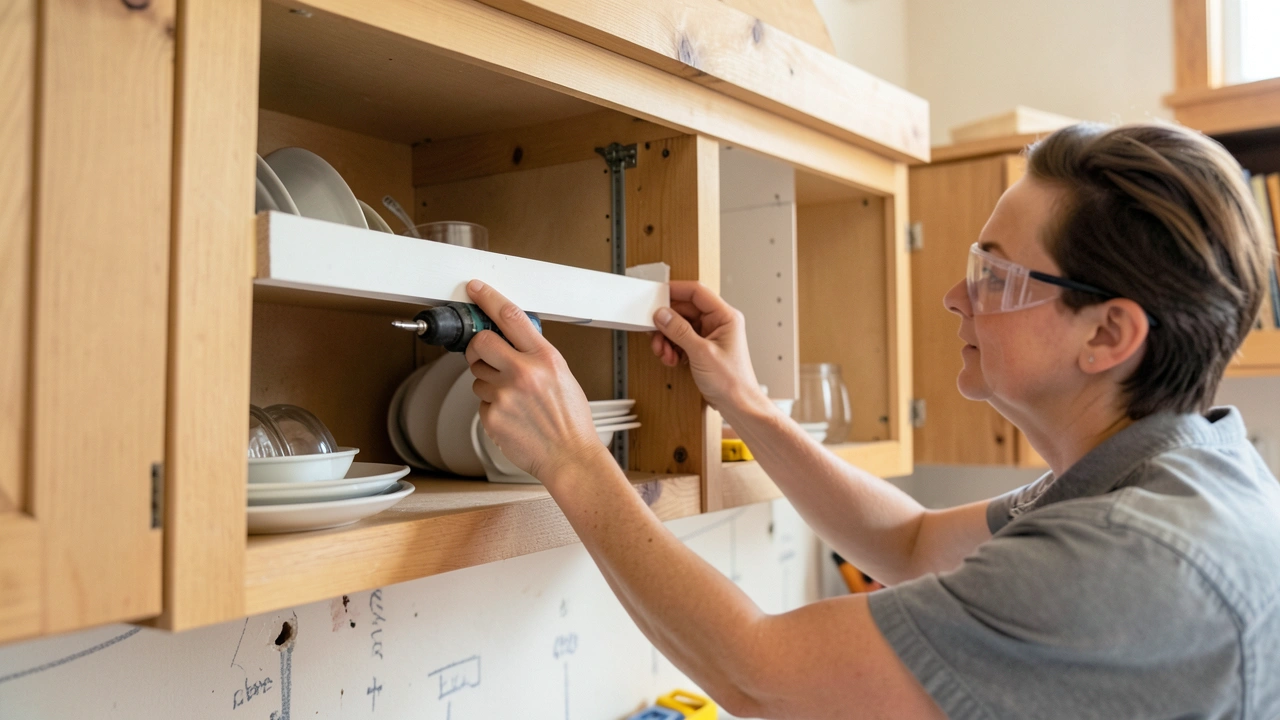
Step 3: Add Reinforcement from the Inside
This is where you’ll add the extra support. You can do this by adding wood blocks or metal brackets behind the cabinet where it meets the wall.
-
Adding Wood Blocks: Cut pieces of wood (like 1×2 or 2×2 lumber) to fit snugly between the inside top of the cabinet and the wall, or between the sides. Screw these blocks into the cabinet’s frame and then screw them into the wall studs.
For example, if you have a cabinet that feels a little loose at the top, you could cut a block of wood to fit vertically behind the cabinet’s top support rail. You would then screw this block into the cabinet from the inside, and then screw the block itself into the wall studs that are behind it. This creates a much stronger connection.
-
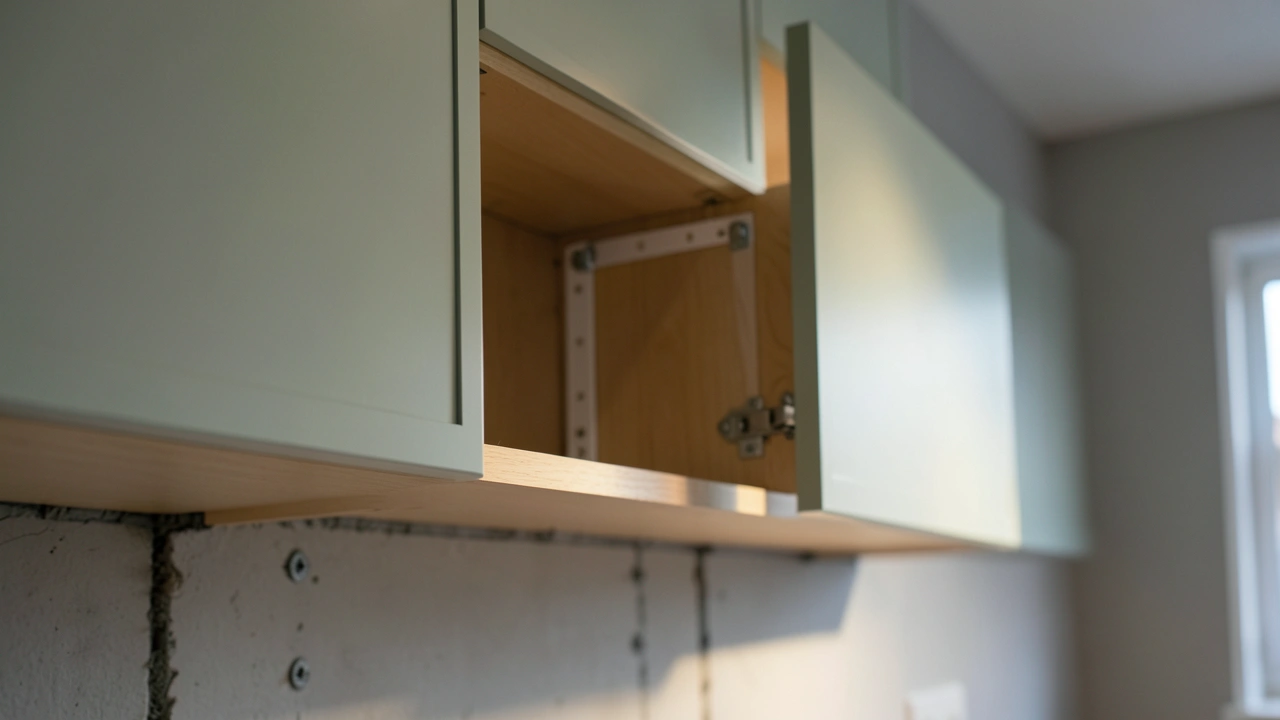
Using L-Brackets: Metal L-brackets are a very common and effective solution. Place the bracket so one side is against the back or bottom edge of the cabinet, and the other side is against the wall. Screw both sides securely into the cabinet and into the wall studs.
You can often find these brackets in various sizes at hardware stores. They are made of strong metal and are designed to handle significant weight. When installing, make sure the bracket is flush against both surfaces for maximum contact and support.
When screwing into the studs, always drill pilot holes first. This prevents the wood from splitting and makes it easier to drive the screws.
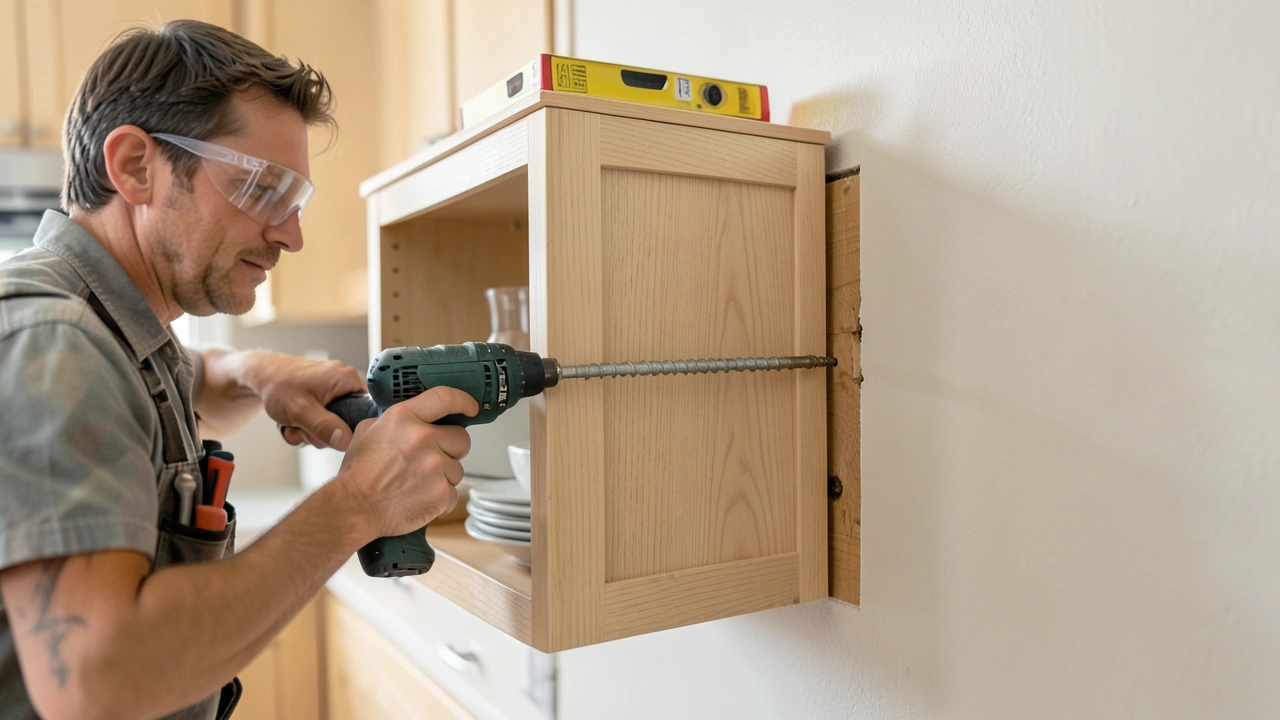
Step 4: Secure with Longer Screws
If your cabinets are attached with short screws that are only in the drywall, this is where you’ll upgrade. Use longer, stronger screws that go all the way through the cabinet’s backing, the drywall, and deeply into the wall studs.
You might already have some screws holding the cabinet up. If they seem short, you can remove one at a time, and
- Replacing Short Screws: Take out an existing screw. Measure its length. Select a new screw that is at least 1.5 inches longer, or long enough to penetrate the stud by at least 1 inch.
- Driving New Screws: Carefully drive the new, longer screw through the cabinet’s backing and into the stud. Do this in several locations, especially at the top and bottom of the cabinet, and along its sides, targeting studs.
Step 5: Test the Stability
Once all reinforcements are in place, it’s time to check your work. Gently push and pull on the cabinet again. It should feel much more solid and secure.
Open and close the doors. Listen for any unusual noises. If it still feels loose anywhere, you might need to add more screws or brackets in that area.
- Gentle Push Test: Apply steady pressure to different parts of the cabinet. It should not move or flex significantly.
- Check Cabinet Doors: Open and close cabinet doors a few times. They should operate smoothly without any sagging or sticking.
Advanced Techniques for Extra Strength
For those who want to go the extra mile, or if you have particularly heavy items to store, there are a few other methods. These involve reinforcing the cabinet structure itself or using stronger mounting hardware.
Reinforcing Cabinet Joints
Sometimes, the cabinet’s own joints can become weak. You can add glue and screws to strengthen these.
- Corner Blocks: For the inside corners of cabinet boxes, you can add small triangular wood blocks. Glue and screw these blocks into place, connecting the side panels to the top and bottom panels. This adds significant rigidity to the cabinet box itself.
- Pocket Hole Joinery: If you are comfortable with pocket hole jigs, you can use them to create strong, hidden joints. This is more common when building cabinets from scratch but can be used for repairs or reinforcement.
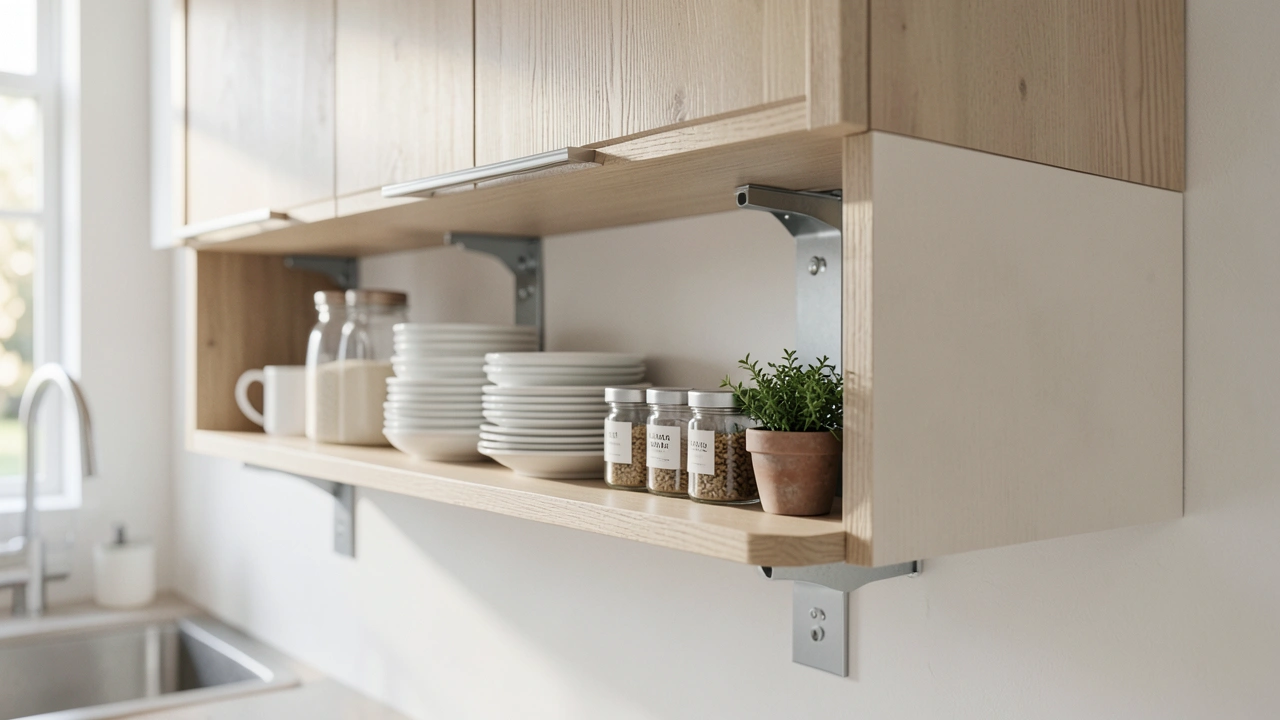
Using Heavy-Duty Mounting Hardware
Standard screws are usually fine, but for very heavy loads, consider specialized hardware.
-
French Cleats: This is a system where two interlocking beveled strips are used. One is attached to the wall (into studs), and the other to the cabinet. It’s a very secure way to hang heavy items, including cabinets.
A French cleat system works by having a piece of wood or metal with a beveled edge attached to the wall, and another piece with a matching bevel attached to the back of the cabinet. When you hang the cabinet, the two bevels interlock, distributing the weight evenly across the cleat. This is often used for mounting very heavy items like large mirrors or artwork, and it works wonderfully for kitchen cabinets too.
- Toggle Bolts (for specific situations): While not typically the primary method for cabinets, toggle bolts can be useful if you can’t hit a stud in a particular spot. They have spring-loaded wings that expand behind the drywall, offering a stronger hold than regular screws in drywall alone. However, they are not as strong as screwing directly into studs.
Maintaining Your Reinforced Cabinets
Once your cabinets are reinforced, a little ongoing care helps keep them strong. It’s mostly about being aware of the weight you are placing in them and occasionally checking for any signs of loosening.
- Distribute Weight Evenly: Try not to overload one side of a cabinet. Spreading heavy items across the entire shelf and cabinet helps prevent undue stress on any one mounting point.
- Regular Checks: Once a year, or if you notice any changes, give your cabinets a gentle push test. Listen for any new creaks or groans. If you find any looseness, re-tighten screws or add more reinforcement.
- Avoid Excessive Force: Don’t slam cabinet doors or drawers. Treat them with care to prolong their lifespan and maintain their secure mounting.
Frequently Asked Questions
Question: How often should I check my reinforced cabinets?
Answer: It’s a good idea to give your reinforced cabinets a quick check about once a year, or whenever you notice something feels a bit off. Just a gentle push to see if they still feel solid is usually enough.
Question: Can I reinforce cabinets myself if I’m not very handy?
Answer: Yes, absolutely! The steps we’ve gone over are designed to be easy to follow for beginners. With basic tools and a little patience, you can do it.
Question: What kind of screws are best for this job?
Answer: You’ll want sturdy wood screws. They should be long enough to go through the cabinet, the drywall, and into the wall stud by at least an inch. About 3 to 3.5 inches is often a good length.
Question: Do I need to remove the cabinets to reinforce them?
Answer: For most common methods, like adding wood blocks or L-brackets from the inside, you don’t need to remove the cabinets. You’ll be working from the inside and behind them.
Question: How do I know if my cabinets are already strong enough?
Answer: Gently push on the bottom and sides of the cabinet. If it feels sturdy and doesn’t move much, it might be strong enough. If it wiggles or creaks, reinforcement is a good idea.
Conclusion
Learning How to Reinforce Wall-Mounted Kitchen Cabinets is a straightforward project. You now have the knowledge to make them extra secure. Following these steps will give you peace of mind and a stronger kitchen.
Get started today and enjoy your sturdy cabinets!

Leave a Reply