
Building kitchen cabinets can be a fun project, but a tricky part for many new builders is making sure the plywood stays nice and flat. It’s really common for plywood to bend or twist, especially when it gets wet or when the temperature changes a lot. This can make your cabinets look crooked and not work right.
But don’t worry, it’s not as hard as it sounds! We’re going to show you simple steps so you can make sure your cabinets stay straight. Let’s look at what makes plywood warp and how we can stop it before you even start building.
Keeping Plywood Flat: Why Warping Happens
This part talks about why plywood can bend or warp. We’ll explain how the layers in plywood can move differently. This happens because of things like moisture, heat, and how the wood is made.
Understanding these reasons helps us know how to stop the bending. We will cover the main causes so you can fix them before they become a big problem for your cabinets.
The Nature of Plywood
Plywood is made from thin sheets of wood glued together. These sheets, called veneers, are layered with their wood grains running in different directions. This cross-graining makes plywood strong and helps stop it from splitting.
However, it also means the wood can expand and contract at different rates. This is the main reason why plywood can warp.
When plywood gets wet, the wood fibers swell. Because the grains run in different directions in each layer, some parts will swell more than others. This uneven swelling causes the wood to bend.
Think of it like a team where everyone pulls in a slightly different direction; it’s hard for them to move in a straight line. The glue holding the layers together also plays a role. If the glue isn’t strong enough or is applied unevenly, it can’t hold the veneers flat against each other when they try to move.
The type of wood used for the veneers also matters. Some woods are naturally more stable than others. For example, hardwoods like oak or maple are generally more stable than softwoods like pine.
When you buy plywood, you’ll often see it described by the type of wood used. For cabinets, it’s usually best to choose plywood made from hardwoods for better stability.
The manufacturing process also affects how stable plywood is. How the veneers are dried, how much glue is used, and how the panels are pressed together all contribute to the final flatness of the sheet. High-quality plywood is made with more care to minimize these issues.
Moisture’s Big Role in Warping
Moisture is a major enemy of flat plywood. Wood is a natural material that absorbs and releases water vapor from the air. This process is called absorption and desorption.
When plywood absorbs moisture, its wood fibers swell, causing expansion. When it dries out, the fibers shrink, causing contraction.
In a kitchen environment, moisture can come from many places. Cooking creates steam, and spills can happen. Even normal humidity levels can affect the wood over time.
If one side of the plywood panel absorbs more moisture than the other, it will swell more on that side. This uneven expansion is a primary cause of bending or cupping.
For example, if you have plywood panels for your cabinet doors, and one side is exposed to high humidity while the other side is not, that panel will likely start to warp. This can happen if one side is finished and the other isn’t, or if the kitchen has very uneven air circulation. The internal stresses built up by this uneven moisture content are what force the wood out of its flat shape.
To combat this, controlling moisture is key. Keeping your workshop and the finished cabinets in a stable humidity environment is important. Using moisture-resistant finishes can also help by creating a barrier that slows down moisture absorption.
Temperature Changes and Plywood
Temperature changes also cause wood to expand and contract, though usually not as much as moisture changes. When the temperature goes up, wood expands. When it goes down, wood contracts.
If this expansion and contraction happen unevenly across a piece of plywood, it can lead to warping.
Think about a hot, sunny day versus a cool evening. If your plywood panels are exposed to these different temperatures without being held firmly, they might slightly change shape. While this effect might be small on its own, it can add up, especially when combined with moisture variations.
In a kitchen, temperature can fluctuate. Appliances like ovens and dishwashers produce heat. Air conditioning and heating systems also change the air temperature.
If plywood cabinet parts are placed near heat sources or in areas with poor air circulation, they are more likely to experience these temperature-related stresses.
The way plywood is stored before it’s used also matters. If it’s stored in a hot attic or a damp basement, it can already have internal stresses before you even start building. This makes it more prone to warping later on.
Smart Ways to Prevent Warping in Your Plywood Cabinets
Now that we know why plywood warps, we can talk about how to stop it from happening. This section gives you practical tips and techniques. We’ll cover everything from choosing the right wood to building your cabinets in a way that keeps them flat and strong.
Following these steps will help you make beautiful, long-lasting cabinets.
Selecting the Right Plywood for Cabinets
Choosing the best plywood from the start is the first big step to preventing warping. Not all plywood is made the same, and some types are much better for kitchen cabinets than others. We need to look for plywood that is known for being stable and strong.
For kitchen cabinets, plywood with an “AC” or “AB” grade is a good choice. The letter grades tell you about the quality of the wood veneer on the front and back surfaces. ‘A’ means a smooth, sanded surface with very few defects.
‘C’ means there might be small knots or veneer patches. An “AC” grade means the front is A-grade, and the back is C-grade, which is often fine for cabinet backs or internal parts.
Another important factor is the type of wood the veneers are made from. Hardwood plywood, such as birch, maple, or oak, is generally more stable than softwood plywood. These hardwoods are denser and less prone to expanding and contracting with moisture and temperature changes.
They also hold screws and finishes better, which is important for cabinets.
You should also look for plywood that is rated for its use. For kitchen cabinets, you want plywood that is strong enough to hold shelves and drawers and resist bending. Plywood with an odd number of veneers (layers) is typically more stable because the grain direction alternates with each layer, creating a more balanced structure.
Consider the thickness too. For cabinet boxes, 3/4-inch (18mm) thick plywood is common. For cabinet doors, you might use 1/2-inch (12mm) or 3/4-inch plywood, depending on the design.
Thicker plywood is generally more rigid and less likely to warp, but it also adds weight.
- Hardwood Veneers: Opt for plywood made with hardwoods like birch, maple, or oak. These woods are naturally more stable and resistant to warping than softwoods. Their denser structure helps them maintain their shape better under varying conditions.
- AC or AB Grade: Look for AC or AB grades for cabinet fronts and visible parts. An ‘A’ veneer offers a smooth, defect-free surface ideal for finishing. For less visible areas or internal components, grades like ‘B’ or ‘C’ might be acceptable and more budget-friendly, but prioritize stability for the main structure.
- Cabinet-Grade Plywood: Many lumber yards sell “cabinet-grade” plywood. This is a general term, but it usually means the plywood has fewer defects, better-matched veneers, and is made for use in furniture and cabinetry where appearance and stability are important.
- Moisture Resistance: Some plywood is made with moisture-resistant glues, which can add an extra layer of protection against humidity. While not completely waterproof, this can be beneficial in a kitchen environment where occasional moisture is unavoidable.
Proper Storage is Key
How you store your plywood before you start building is just as important as the type of plywood you buy. Storing it incorrectly can introduce stresses that lead to warping, even before you cut it. Keeping your plywood flat and dry will save you a lot of trouble later.
The best way to store plywood is on a flat, level surface. This means laying it flat on sawhorses or a dedicated plywood rack. Never store plywood on its edge, especially for long periods.
Storing it on its edge allows gravity to work on the unsupported panel, which can cause it to sag and develop a permanent bow or twist.
It’s also important to store plywood in a dry environment. Avoid damp basements or sheds where humidity levels are high. A climate-controlled garage or workshop is ideal.
If you can’t control the humidity, try to store the plywood away from sources of moisture, like water heaters or pipes.
When you stack sheets of plywood, use stickers or battens between the sheets. These are small strips of wood placed evenly across the width of the sheets. They help to distribute the weight evenly and prevent the sheets from pressing too hard against each other, which can also cause bowing.
Here’s a quick guide to good storage:
- Flat Storage: Always store plywood flat on a level surface. Use a sturdy rack or sawhorses.
- Avoid Edges: Never store plywood vertically on its edge. This will cause it to warp over time.
- Dry Environment: Keep plywood in a dry, stable environment to prevent moisture absorption.
- Stickers Between Sheets: When stacking multiple sheets, place wooden stickers evenly between them. This ensures even support and prevents pressure points.
Acclimating Plywood to Your Workshop Environment
Wood is a living material that reacts to its surroundings. When you bring new plywood into your workshop, it’s probably been stored in a different environment at the lumber yard. To prevent warping, you need to let the plywood get used to the temperature and humidity levels of your workshop.
This process is called acclimation. It means allowing the wood to slowly adjust its moisture content to match the air in your workshop. This helps to release some of the internal stresses that might be present from its previous storage.
If you cut and build with plywood immediately after bringing it in, it might warp as it adjusts later.
The best way to acclimate plywood is to store it flat in your workshop for at least 24 to 48 hours before you plan to use it. If your workshop’s humidity levels change a lot, you might need to let it acclimate for even longer. This gives the wood time to absorb or release moisture until it’s in balance with the air around it.
Think of it like letting a new piece of furniture settle into a room. You don’t want to immediately put it under stress. Letting it adjust slowly makes it more stable.
For example, if you bring cold plywood into a warm, humid workshop, it will expand. If you didn’t let it acclimate, this expansion could cause it to bend.
Here are some tips for acclimation:
- Allow Time: Give your plywood at least 24-48 hours to acclimate in your workshop before cutting or assembly.
- Stable Environment: Store it in the same environment where you will be doing your building.
- Avoid Sudden Changes: Don’t move plywood directly from a cold truck to a hot workshop. Let it warm up gradually.
- Monitor Humidity: If your workshop has very fluctuating humidity, consider using a dehumidifier or humidifier to create a more stable environment.
The Importance of Finishing for Stability
Finishing your plywood cabinets is not just about making them look good; it’s also a critical step in preventing warping. A good finish creates a protective barrier that seals the wood and helps to regulate its moisture content.
When you apply a finish like varnish, polyurethane, or paint to plywood, it seals the surface. This seal slows down the rate at which the wood absorbs or loses moisture from the air. This is especially important for kitchen cabinets, which are exposed to steam, humidity, and occasional spills.
It is vital to finish both sides of the plywood panels, not just the visible side. If you only finish one side, the moisture content on the unfinished side can change more rapidly than on the finished side. This uneven moisture exchange will create internal stresses, leading to cupping or warping.
Imagine trying to hold a book open with one hand while the other hand is wet and swollen; the pages would start to curl.
When finishing, apply multiple thin coats rather than one thick coat. Thin coats allow the finish to penetrate the wood fibers better and create a more uniform seal. Make sure to sand lightly between coats to ensure good adhesion and a smooth surface.
Consider using a moisture-resistant finish specifically designed for cabinets or furniture. These finishes offer better protection against the challenges of a kitchen environment. A well-applied finish contributes significantly to the long-term stability and appearance of your plywood cabinets.
Here are some finishing tips:
- Finish Both Sides: Always apply finish to both the front and back of plywood panels to ensure balanced moisture protection.
- Multiple Thin Coats: Apply several thin coats of your chosen finish rather than one heavy coat for better sealing and durability.
- Moisture-Resistant Products: Use finishes known for their moisture resistance, such as polyurethane or specific cabinet lacquers.
- Proper Application: Ensure you apply the finish evenly and allow adequate drying time between coats.
Building Techniques to Combat Warping
The way you build your cabinets also plays a big role in keeping the plywood flat. Strong construction methods can help counteract any tendencies for the wood to warp. This section looks at how to assemble your cabinets to make them as stable and rigid as possible.
Reinforcing Cabinet Panels
Even with the best plywood, making sure the panels are strong enough is important. Reinforcing them adds extra stability and helps them resist bending or twisting over time. This is especially true for larger panels or those that will bear weight, like shelves.
One common way to reinforce panels is by adding a solid wood frame around the edges. For cabinet doors, this means using rails and stiles. For cabinet boxes, you can add solid wood edging or cleats along the back edges.
This frame provides rigidity and helps to keep the plywood flat.
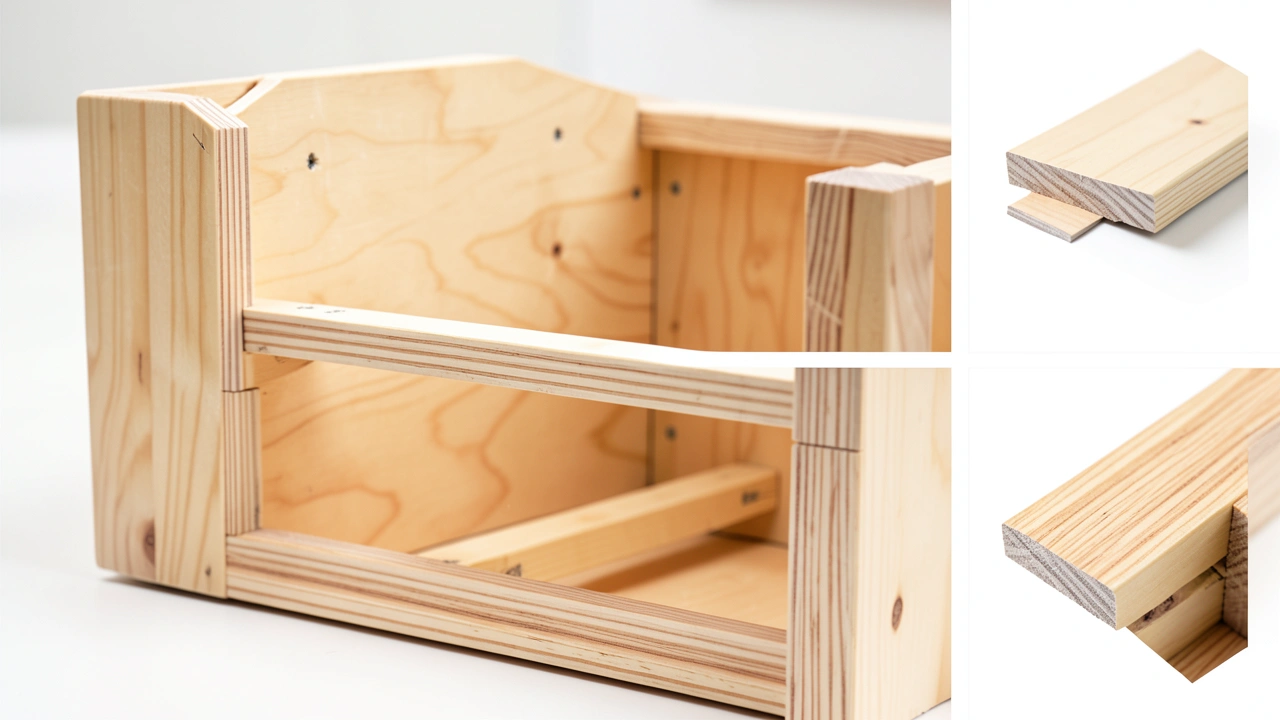
For cabinet boxes, adding a solid wood back panel or a reinforcing cleat along the back top and bottom edges can make a huge difference. These elements act like cross-braces, preventing the sides from bowing inwards or outwards. Even a simple strip of 1×2 lumber glued and screwed to the back edge of the cabinet can provide significant reinforcement.
When building cabinet shelves, consider using thicker plywood or adding a front edge band made of solid wood. This band not only adds a finished look but also provides strength. Another technique is to create a dado or groove in the shelf and slide a solid wood backer into it for extra support.
The goal is to create a structure that resists the forces that cause warping. Think of it like building a bridge: you need strong supports and bracing to keep it from sagging. For cabinets, this means strong connections and added structural elements where they are needed most.
Here are some reinforcement methods:
- Solid Wood Edging: Gluing and screwing solid wood strips around the edges of plywood panels adds significant rigidity.
- Back Panels: For cabinet boxes, a solid plywood or hardboard back panel, properly attached, helps square up the cabinet and prevents racking.
- Cleats and Bracing: Adding wooden cleats to the back edges of cabinets or internal bracing can significantly increase stability.
- Reinforced Shelves: Use thicker plywood for shelves or add solid wood front edges to prevent sagging.
Using Proper Joinery Techniques
The way you connect the pieces of your cabinets, known as joinery, is crucial for their overall strength and stability. Strong joints mean that the cabinet structure is held together tightly, which helps resist warping. Weak joints can allow movement, which can lead to bending over time.
For cabinet boxes, strong joinery often involves methods like pocket screws, dadoes, or rabbets. Pocket screws are a fast and strong way to join panels. They involve drilling angled holes in one piece and then screwing into the mating piece.
This creates a very strong, tight joint.
Dadoes and rabbets are cuts made into the wood that allow pieces to fit together. A dado is a groove cut across the grain, and a rabbet is a groove cut along the edge. When cabinet sides are fitted into dadoes on the top and bottom panels, or when a back panel fits into rabbets on the sides, it creates a very strong and square box.
This method locks the pieces together and adds a lot of rigidity to the entire cabinet.
For cabinet doors, using cope and stick joinery for frame-and-panel doors is a classic and very strong method. The “stick” part of the door stile (the vertical piece) is shaped to fit into a matching “cope” cut on the end of the rail (the horizontal piece). This creates a strong mechanical lock.
The key is to create joints that are tight, strong, and resist racking (sideways movement). Over time, a cabinet with weak joints might start to sag or twist as the fasteners loosen or the wood flexes. Using the right joinery for the job ensures that your cabinets stay square and flat.
Consider these joinery methods:
- Pocket Screws: A quick and strong method for joining cabinet panels, creating tight, secure joints.
- Dadoes and Rabbets: These cuts allow for interlocking joints that greatly increase the structural integrity of cabinet boxes.
- Dovetail Joints: For drawer construction, dovetails are exceptionally strong and resist pull-apart forces, contributing to overall cabinet stability.
- Dowel Joints: Using dowels with glue creates strong, aligned joints, especially when used in conjunction with other fastening methods.
The Role of Hardware and Support
The hardware you use and how you support your cabinets also play a role in preventing warping. Properly installed hinges, drawer slides, and shelves can help maintain the flatness of your cabinet components.
For cabinet doors, using high-quality hinges is important. Hinges that are not properly aligned or that are too weak for the weight of the door can put uneven stress on the door panel, leading to sagging or warping over time. Make sure the hinges are installed correctly and that they are rated for the size and weight of your doors.
Drawer slides should also be robust and installed precisely. If drawer slides are misaligned, they can force the drawer box to rub, causing stress on the drawer sides and front. This can indirectly affect the cabinet box if the forces are transmitted through the structure.
Shelves are another area where support is critical. Heavy items stored on shelves can cause them to sag, and this sag can sometimes transfer to the cabinet sides. Using strong shelves, proper shelf supports, and not overloading shelves can help prevent this.
For very long shelves, consider adding a reinforcing strip or a center support.
If you’re building base cabinets, ensure they are properly leveled and secured to the wall. An uneven cabinet box is more prone to stress and warping, as gravity and other forces will act on it unevenly. Using shims to level cabinets before securing them is a common practice.
Think of hardware and support as the final layer of defense. They help hold everything in place and distribute forces evenly, contributing to the long-term stability of your plywood kitchen cabinets.
Key points about hardware and support:
- Quality Hinges: Use well-made, appropriately rated hinges for cabinet doors to prevent sagging and stress.
- Accurate Drawer Slides: Precise installation of drawer slides ensures smooth operation and prevents undue stress on drawer boxes.
- Adequate Shelf Support: Ensure shelves are strong enough for their intended load and properly supported to prevent sagging.
- Level Installation: Properly leveling and securing base cabinets to the wall prevents uneven stress on the cabinet structure.
Real-World Scenarios and Solutions
Seeing how others have dealt with plywood warping can offer valuable lessons. This section shares some real examples of problems and how they were solved. These stories show how the principles we’ve discussed can be applied in practical situations.
Scenario 1: The Humid Basement Build
A hobbyist builder decided to build a set of custom pantry shelves in his basement. The basement was known to be quite humid, especially during the summer months. He used good quality birch plywood for the shelves and cabinet sides.
He stored the plywood flat, but didn’t let it acclimate in the basement for long before starting to cut.
After assembling the pantry cabinet, he noticed that the sides of the cabinet were starting to bow outwards. The shelves, while still mostly flat, seemed to have a slight sag in the middle. The problem got worse over a few weeks as the basement humidity increased.
The builder realized his mistake was not properly accounting for the high humidity and not allowing the wood to acclimate. To fix it, he carefully removed the back panel, which was a thin hardboard. He then used a powerful dehumidifier in the basement for several days to dry out the air and the wood.
While the wood was drying, he added several reinforcing cleats to the back edges of the cabinet sides. He also installed a solid wood backer strip along the front edge of each shelf.
Once the humidity was back to a more stable level, he reinstalled the back panel, making sure the cabinet was square. The extra cleats and shelf reinforcement helped to keep the structure stable. This experience taught him the importance of acclimation and reinforcement, especially in humid environments.
Scenario 2: The Over-Finished Cabinet Doors
Another woodworker was building shaker-style cabinet doors for his kitchen using maple plywood panels. He was very careful to select straight, flat plywood. He cut the panels to size and began applying a very thick, glossy polyurethane finish to them, believing more finish meant better protection.
He applied several heavy coats, letting each one dry for the minimum recommended time. He only finished the front side of the plywood panels, thinking the back wouldn’t be seen and didn’t need as much attention. A few weeks later, he noticed that the plywood panels in his cabinet doors were starting to cup inwards, making the doors look uneven and not fit tightly in their frames.
The problem was twofold: the thick coats of finish had sealed the front very effectively, but by not finishing the back, he allowed moisture to enter and exit that side much more freely. The uneven moisture content caused the cupping. Also, applying such thick, wet coats without proper drying time likely trapped some moisture within the wood itself, contributing to the issue.
To correct this, he had to lightly sand the panels to remove the thick finish. Then, he applied a thinner, more even coat of polyurethane to both the front and back of each panel, ensuring complete coverage. He also allowed ample drying time between coats.
After this, he carefully reassembled the doors. The balanced finishing approach and proper drying helped to stabilize the panels and reduce the cupping.
Sample Scenario: Building a Vanity Cabinet
Imagine you’re building a vanity cabinet for a bathroom, which is a high-moisture area. You’ve chosen 3/4-inch birch plywood for the main cabinet box. Here’s how you’d apply the principles discussed:
- Select Plywood: Choose cabinet-grade birch plywood, ensuring it’s flat and free from defects.
- Acclimate: Store the plywood flat in your bathroom or workshop for at least 48 hours to adjust to the local humidity.
- Cut with Care: Cut your cabinet panels accurately. Consider adding a solid wood edging strip to the front of the cabinet sides for added rigidity.
- Joinery: Use pocket screws or dadoes to join the cabinet sides, top, and bottom for strong, square connections.
- Reinforce the Back: Cut a back panel from 1/4-inch or 1/2-inch plywood and attach it securely with glue and screws or brad nails. This adds immense stability.
- Finish Both Sides: Apply at least two coats of a moisture-resistant polyurethane finish to all interior and exterior surfaces of the cabinet box before installing the doors and drawers.
This structured approach ensures that each step taken actively works to prevent warping, making the cabinet much more durable and stable in a challenging environment.

Common Plywood Problems and How to Fix Them
Sometimes, despite your best efforts, you might encounter some common issues with plywood. Knowing what these problems are and how to fix them can save your project. This section covers typical issues and practical solutions.
Dealing with Minor Cupping or Bowing
If you notice that a piece of plywood has a slight cup (bend across its width) or bow (bend along its length), don’t panic. Often, these minor distortions can be corrected or managed.
One simple method is to use clamps. If you’re working on a project where the panel will be fixed in place, like a cabinet back or a shelf, you can sometimes clamp the warped edge to a straight edge while you attach it. As you screw or glue the panel, the clamps will pull it into the desired flat position.
Once secured, the surrounding structure will help hold it flat.
Another technique is to use weights. For a panel with a slight cup, you can place heavy objects on the raised edge overnight. This is more effective for subtle cupping and works best if the plywood is already in a stable environment.
For more significant cupping, you might need to slightly mill or plane the high edge down. This should be done carefully and symmetrically to avoid weakening the panel. It’s a good idea to try simpler methods first, as milling can remove material and potentially alter the appearance.
If the cupping is minor and you’re building something like a cabinet door, you might be able to mask it with the frame. A well-built frame with strong joinery can often help pull the panel flat as it’s assembled.
Here are some quick fixes:
- Clamping: Use clamps to pull the panel flat while attaching it.
- Weighting: Place heavy, flat objects on the raised edge to encourage it to flatten overnight.
- Strategic Fastening: Screw or nail the panel down, starting from the center and working outwards, to pull it flat.
- Milling/Planing: For more pronounced issues, carefully mill or plane the high edge to match the lower edge.
Repairing Veneer Tears and Chipped Edges
Accidents happen, and sometimes you might get a small tear in the veneer or a chipped edge on your plywood. These issues are usually cosmetic but can be fixed to give your cabinets a professional look.
For minor veneer tears, you can sometimes use wood glue and a clamping block. Apply wood glue into the tear, then use a flat block of wood to press the torn veneer back into place. Clamp it firmly until the glue dries.
Any excess glue that oozes out can be wiped away with a damp cloth.
Chipped edges can be repaired using wood filler or epoxy. For small chips, a good quality wood filler that matches the color of your plywood can be applied. Once dry, it can be sanded smooth and then finished to blend in.
For larger chips or damage, an epoxy wood filler might be more durable and easier to shape.
Another option for chipped edges is to use a veneer repair kit. These kits often contain small pieces of veneer that can be glued into place and then sanded to match the surrounding surface. For a cleaner look on cabinet edges, you can also glue a thin strip of solid wood to the edge to cover the damage.
When repairing, it’s always a good idea to test your repair method on a scrap piece of plywood first. This allows you to practice your technique and ensure the filler or glue matches the color and texture of your project before you apply it to a visible area.
Repair tips:
- Glue and Clamp: For veneer tears, apply wood glue and clamp the veneer flat until dry.
- Wood Filler: Use color-matched wood filler for small chips and sand smooth after drying.
- Epoxy Repair: For larger chips, epoxy can provide a strong, shapeable filler.
- Solid Wood Edging: Cover damaged edges with a thin strip of solid wood for a clean, durable repair.
Dealing with Delamination
Delamination is when the layers of plywood start to separate. This is a more serious problem and is often caused by moisture damage or poor glue adhesion during manufacturing. If you discover delamination, it’s important to address it.
If the delamination is minor and in an area that won’t be under much stress, you might be able to repair it. You can try injecting wood glue into the gap with a syringe or a thin applicator. Then, apply pressure using clamps and a flat board to hold the layers together while the glue dries.
However, if the delamination is extensive or occurs in a critical structural area, the piece of plywood might be compromised and may need to be replaced. It’s better to use a new, sound piece of plywood for structural parts than to risk a failure later on.
Preventing delamination is largely about avoiding excessive moisture and using good quality plywood in the first place. Storing plywood properly and finishing it on all sides helps to keep the layers bonded.
If you encounter delamination:
- Assess Severity: Determine if the separation is minor or extensive.
- Glue Injection: For small areas, try injecting wood glue and clamping.
- Consider Replacement: If delamination is significant or structural, replace the plywood.
- Prevention is Key: Proper storage, finishing, and using quality plywood are the best defenses against delamination.
Frequently Asked Questions
Question: What is the most common reason plywood warps in kitchen cabinets?
Answer: The most common reason plywood warps is uneven moisture absorption. When one side of the plywood gets more moisture than the other, the wood fibers swell unevenly, causing it to bend.
Question: Can I use a thinner plywood for cabinet doors?
Answer: Yes, you can use thinner plywood, like 1/2-inch (12mm) thick, for cabinet doors, especially for shaker-style doors where the panel sits within a solid wood frame. The frame provides most of the rigidity.
Question: Does painting plywood help prevent warping?
Answer: Yes, painting can help prevent warping by creating a barrier that slows down moisture exchange. However, it’s crucial to paint both sides evenly for the best results.
Question: How long should I let plywood acclimate before using it?
Answer: It’s generally recommended to let plywood acclimate for at least 24 to 48 hours in the environment where you’ll be building. Longer is better if your environment has fluctuating humidity.
Question: What kind of glue is best for plywood cabinet construction?
Answer: For cabinet construction, a good quality wood glue or a PVA (polyvinyl acetate) glue is excellent. For areas exposed to more moisture, a water-resistant PVA or a polyurethane glue can offer extra protection.
Summary
Keeping your plywood kitchen cabinets flat is achievable by understanding why they warp. Choose stable hardwood plywood, store it flat and dry, and always acclimate it. Finish both sides evenly with a moisture-resistant product.
Build strong cabinets with good joinery and reinforcement. These simple steps help ensure your cabinets stay beautiful and functional for years.

Leave a Reply