
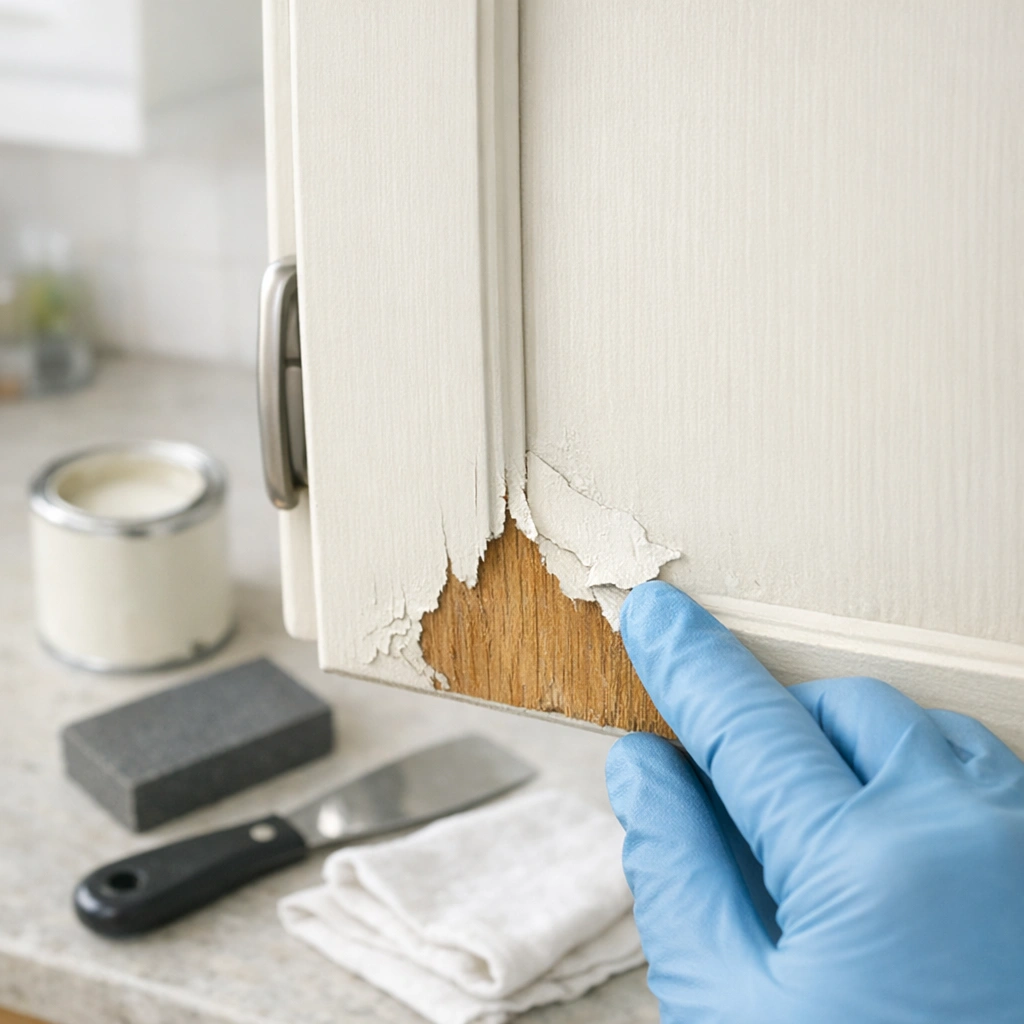
It’s super common to see paint flaking off kitchen cabinets, especially if they’re older or get a lot of use. This can make your kitchen look a bit sad, and fixing it might seem like a big job. But don’t worry, it’s totally doable, even if you’re new to DIY projects!
We’ll walk you through it step-by-step to get your cabinets looking great again. What you need to know first is how to get them ready for a fresh coat.

Getting Kitchen Cabinets Ready for Paint Repair
When your kitchen cabinets start to show signs of wear, like peeling paint, it’s natural to want to fix them up. This is a common problem because kitchens are busy places. Spills, steam from cooking, and just everyday bumps can all lead to paint chipping away over time.
For beginners, the thought of fixing this might feel a little overwhelming. You might wonder where to even start or if you’ll make it look worse. But this section is here to break down exactly what you need to do to prepare your cabinets.
We’ll go over the simple steps to get them ready so the new paint sticks well and looks smooth. This preparation is key to a good finish, and we’ll cover all the tools and materials you’ll need.
Gathering Your Supplies
Before you start any project, having all your tools and materials ready makes everything go much smoother. For fixing peeling paint on kitchen cabinets, you don’t need a whole workshop. Just a few basic items will do the trick.
This makes it easier for anyone to tackle this job. Having everything in one place means less running to the store mid-project and less frustration.
- Scrapers: These help you gently lift off the loose paint. A putty knife works well.
- You’ll use a scraper to carefully get under the edge of the peeling paint. It’s important to be gentle so you don’t damage the wood underneath. Work slowly and steadily, removing only the paint that is already loose.
- Sandpaper: You’ll need a few different grits. A medium grit (like 120) is good for smoothing rough edges, and a fine grit (like 220) is for making the surface feel nice and ready for primer.
- Sanding is vital because it removes any rough spots left after scraping and helps the new paint adhere better. Don’t press too hard; you want to smooth, not remove more of the original finish than necessary.
- Cleaning supplies: A mild soap and water solution, or a degreaser, will clean away grease and grime.
- Kitchen cabinets collect a lot of oil and food splatters. Cleaning them thoroughly removes these things so the primer and paint can stick properly. A clean surface is essential for a lasting repair.
- Primer: Use a good quality primer that’s made for cabinets or wood.
- Primer acts like a bridge between the old surface and the new paint. It helps the new color cover evenly and makes the paint job more durable. It’s especially important when you’re covering up old paint or stains.
- Paint: Choose a paint designed for cabinets or trim. Satin or semi-gloss finishes are popular for kitchens because they are durable and easy to clean.
- Cabinet paint needs to withstand a lot of wiping and occasional tougher cleaning. Picking the right type of paint ensures your hard work will last and keep your cabinets looking fresh.
- Brushes and rollers: A good quality angled brush is great for edges and details. A small foam roller works well for flat surfaces.
- Using the right tools for painting helps achieve a smooth, professional look. Foam rollers are good for avoiding brush strokes on larger areas.
- Drop cloths and painter’s tape: To protect your countertops and floors.
- These are simple but important for keeping your kitchen clean during the project. Painter’s tape helps create crisp lines and prevents paint from getting where you don’t want it.
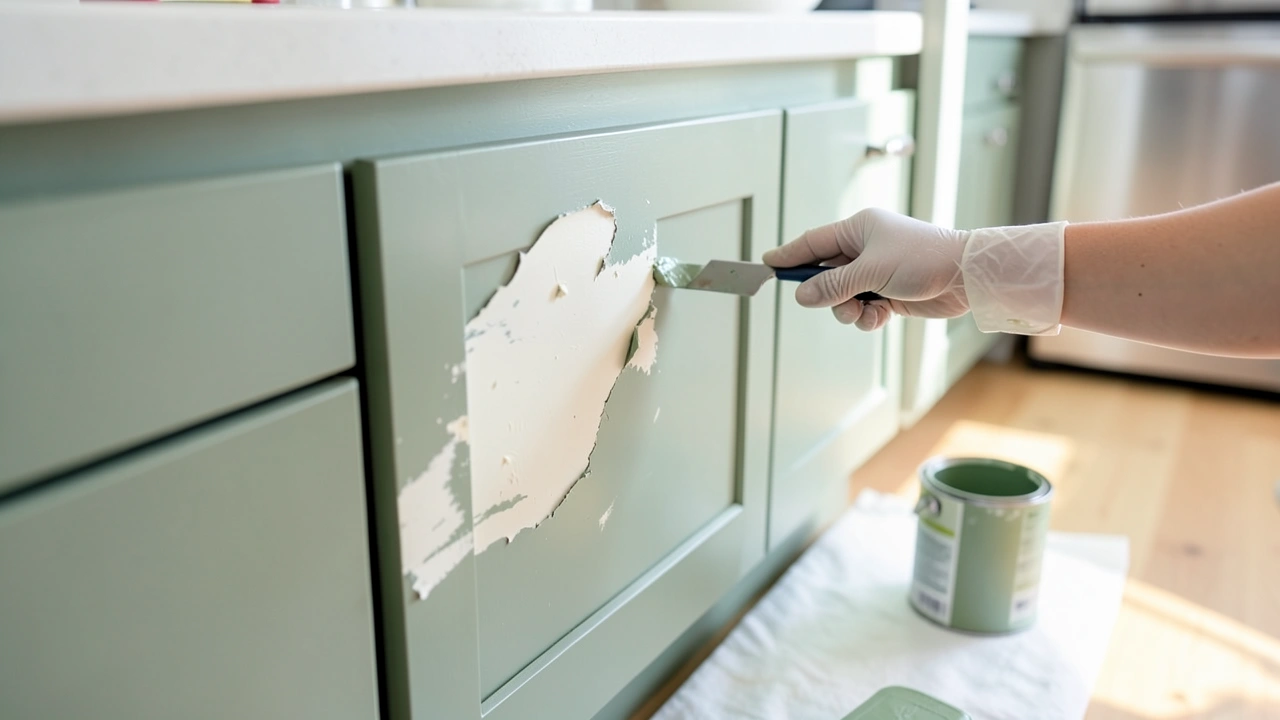
Removing Loose Paint
The first actual step in fixing peeling paint on kitchen cabinets is to get rid of all the paint that’s already coming off. This might seem obvious, but it’s important to do it thoroughly. If you paint over loose bits, they’ll just peel off again soon, and your repair won’t last.
Grab your scraper, like a putty knife. Gently slide the edge under the peeling paint. Work slowly and try to lift away only the paint that is loose and flaky.
You don’t want to dig into the wood itself or scrape away paint that’s still firmly attached. The goal here is to create a smooth transition from the painted area to the bare wood or the next layer of paint.
Sometimes, paint might be cracked or blistered but not quite peeling. You’ll want to scrape those areas too. If the paint is really stubborn, you might need to use a bit more pressure, but always be careful not to damage the underlying surface.
For really small, flaked-off areas, you might even be able to pick them off with your fingers or a damp cloth after scraping.
After you’ve scraped away all the loose bits, take a look at the edges. They might be a little rough or uneven. This is exactly what sandpaper is for, and we’ll cover that next.
For now, just focus on getting rid of all the paint that wants to come off easily.
Sanding for a Smooth Surface
Once you’ve scraped away all the loose paint, the edges where the old paint stops and the bare wood or remaining paint begins can be a bit rough. This is where sanding comes in. Sanding is super important for making the whole surface smooth and ready for new paint.
It helps the new paint stick better, which means your repair will last longer and look much nicer.
Start with a medium-grit sandpaper, something around 120 grit. Use this to gently sand down any rough edges. You’re not trying to sand off all the old paint or the original finish of the cabinet.
You just want to smooth out the transition so you can’t feel a bump when you run your hand over it. Focus on those scraped areas.
After you’ve smoothed the edges with the medium-grit paper, switch to a fine-grit sandpaper, like 220 grit. Use this to lightly sand the entire area you worked on, and even the rest of the cabinet door or drawer face if it’s needed. This step creates a uniform, smooth surface that primer and paint can easily adhere to.
It also removes any dust or residue from the scraping process.
When you’re done sanding, wipe everything down with a damp cloth to remove all the dust. You can also use a tack cloth, which is a special cloth designed to pick up fine dust particles. Make sure the cabinets are completely dry before moving on to cleaning.
A dust-free surface is critical for a good paint job.
Cleaning and Degreasing Cabinets
Kitchen cabinets are magnets for grease, food splatters, and general grime. Before you can paint, you absolutely must get them clean. If you try to paint over dirt or grease, the new paint won’t stick properly, and it will likely peel or chip off again very quickly.
This cleaning step is just as important as the scraping and sanding.
You can use a mild dish soap mixed with warm water for most cleaning jobs. For tougher grease build-up, a dedicated kitchen degreaser works wonders. Apply your cleaner to a soft cloth or sponge, not directly to the cabinets.
Wipe down all the surfaces you plan to paint, paying special attention to areas near the stove and sink. Don’t forget the undersides of cabinets and drawer fronts, as these can also get dirty.
After you’ve wiped them down with your cleaner, you need to rinse them thoroughly. Use a clean cloth dampened with plain water to wipe away any soap residue. It’s important to get all the soap off, as soap residue can also prevent paint from sticking.
You might need to rinse several times with a clean cloth.
Once they are rinsed, let the cabinets air dry completely. You can speed this up with a clean, dry towel, but make sure they are fully dry before you apply any primer. Any moisture left behind can affect how the primer and paint perform.
A truly clean and dry surface is essential for a lasting repair.
Applying Primer for a Lasting Finish
Primer is like a secret weapon when you’re fixing peeling paint on kitchen cabinets. It’s not just an extra step; it’s a really important one that helps your new paint look great and stick around for a long time. Think of it as laying down a good foundation before you build a house.
Without a solid foundation, the house won’t stand up well, and the same is true for your cabinet paint.
Primer helps in a few key ways. First, it seals the surface. This means if you’ve sanded down to bare wood in some spots, the primer will create a uniform surface that all takes paint the same way.
It prevents the bare wood from soaking up more primer or paint than the surrounding areas, which can lead to an uneven finish. Second, primer acts as an adhesive, giving the topcoat of paint something really strong to grip onto. This is especially helpful for cabinets, which get a lot of touching and cleaning.
If you’re painting over a dark color with a lighter one, primer can help block the old color from showing through. This means you might need fewer coats of your actual paint, saving you time and money. When you’re dealing with cabinets that have seen better days, a good primer ensures that the fresh paint will cover smoothly and evenly, giving them a renewed look that can last for years.
We’ll talk about how to apply it just right.
Types of Primer for Cabinets
Choosing the right primer makes a big difference when you’re repairing peeling paint on kitchen cabinets. Not all primers are created equal, and some are better suited for cabinet surfaces than others. The main goal is to find one that will stick well to the existing finish and the bare wood, and also provide a good base for your new paint.
One common and effective type is an oil-based primer. These are known for their excellent adhesion and their ability to block stains. If your cabinets have any old varnish or wood stains that might bleed through your new paint, an oil-based primer is a great choice.
However, they can have strong fumes and require mineral spirits for cleanup, so good ventilation is a must. They dry slower than water-based options.
Water-based or latex primers are another popular option. They are easier to work with, have fewer fumes, and clean up with soap and water. Many modern water-based primers are formulated to offer excellent adhesion and durability, making them a good choice for kitchens.
Look for a primer labeled as a bonding primer or an all-purpose primer that specifies it can be used on wood and previously painted surfaces.
For cabinets that are particularly challenging, like those with a glossy laminate finish or a lot of wear and tear, a shellac-based primer might be the best bet. Shellac primers offer superior adhesion and can block even the toughest stains and odors. They dry very quickly, which can be a time-saver, but they also have strong fumes and require denatured alcohol for cleanup.
Applying Primer Correctly
Applying primer is a critical step in fixing peeling paint on kitchen cabinets. You want to make sure you cover the surface evenly and completely. This sets the stage for how your final paint job will look and how well it will hold up over time.
Proper application means fewer headaches down the road.
Start by opening your primer and giving it a good stir. Don’t shake the can, as this can create air bubbles that will transfer to your cabinets. Use a good quality brush, like an angled sash brush, for getting into corners and edges.
For the larger, flat surfaces, a small foam roller works best to achieve a smooth finish.
Begin by applying the primer to the detailed areas, like the edges and any grooves on the cabinet doors or drawer fronts. Work from the top down, so any drips can be smoothed out as you go. Then, move on to the larger, flat sections using your roller.
Apply the primer in thin, even coats. It’s much better to apply two thin coats than one thick one.
Allow the first coat of primer to dry completely according to the manufacturer’s instructions. This usually takes a few hours. Once it’s dry, lightly sand the entire primed surface with your fine-grit sandpaper (220 grit).
This step is called “de-nibbing” or “scuff sanding.” It knocks down any little bumps or imperfections that may have appeared during priming and creates a slightly rough surface for the paint to grip. After sanding, wipe away all the dust with a clean cloth or tack cloth. Then, apply a second coat of primer if needed, especially if you’re painting over a very dark color or if the original surface was very uneven.
Let this second coat dry fully before proceeding.
When to Apply a Second Coat of Primer
Sometimes, one coat of primer is enough. But for the best results when you’re fixing peeling paint on kitchen cabinets, a second coat can make a big difference. It’s especially helpful if you’re painting over a dark, stained, or problematic surface.
If you notice that the original color is still showing through after the first coat of primer, applying a second coat will help ensure full coverage. This is particularly true if you are switching from a dark paint color to a significantly lighter one. You want that old color to be completely hidden.
Also, if you had to do a lot of scraping and sanding, and you have patches of bare wood mixed with old paint, a second coat of primer can help even out the surface. It ensures that all areas absorb the topcoat of paint in the same way, leading to a more uniform final appearance. Don’t skip this if your cabinets have a lot of variations in their surface after your initial repairs.
After the second coat of primer dries, do another light sanding with fine-grit sandpaper and wipe away all the dust. This ensures that the surface is perfectly smooth and ready for your chosen paint color. A well-primed surface is the key to a professional-looking and long-lasting paint job on your cabinets.
Painting Your Kitchen Cabinets
Now for the fun part: painting! After all that prep work, this step will feel much more manageable. Painting your kitchen cabinets is what really brings them back to life.
You’ve cleaned, scraped, sanded, and primed, and now it’s time to add that beautiful new color. The goal is to get a smooth, even coat of paint that looks professional and can stand up to the everyday wear and tear of a busy kitchen.
Choosing the right paint is important, as we mentioned before. A good quality paint specifically designed for cabinets or trim will give you the best results. These paints are usually more durable and easier to clean than wall paint.
You’ll also want to have the right tools: a good brush for cutting in edges and corners, and a small foam roller for the larger flat areas. This combination helps you get a smooth finish without visible brush strokes or roller marks.
We’ll go through the best way to apply the paint so you get a flawless look. It’s all about thin coats and patience. Getting this right means your cabinets won’t just look good; they’ll look like they were professionally redone, making your whole kitchen feel refreshed and updated.
So, let’s get your cabinets looking their best!
Choosing the Right Paint for Cabinets
When you’re ready to paint your kitchen cabinets, selecting the correct type of paint is crucial for a long-lasting and beautiful finish. Kitchen cabinets endure a lot of use, so the paint needs to be tough, durable, and easy to clean. Using the wrong kind of paint can lead to chips, scratches, and a surface that’s hard to maintain.
For most kitchen cabinets, a water-based acrylic enamel paint is a popular and effective choice. These paints offer good durability, flexibility, and a smooth finish. They are also relatively easy to clean up with soap and water.
Many brands offer specific cabinet and trim paints that are formulated for high-traffic areas and provide a harder finish than standard interior paints.
Semi-gloss or satin finishes are generally recommended for kitchen cabinets. A semi-gloss finish has a noticeable sheen, making it very durable and easy to wipe clean. It’s great for hiding minor imperfections and stands up well to grease and grime.
A satin finish offers a softer sheen than semi-gloss but is still quite durable and easy to maintain. High-gloss finishes are also durable but can highlight every imperfection on the surface, so they are often used sparingly.
If you’re painting over a previously painted surface that might have had oil-based paint, you could consider an oil-based enamel. These paints create a very hard, durable finish and offer excellent adhesion. However, they have stronger fumes, require mineral spirits for cleanup, and can yellow over time, especially in lighter colors.
Most people find modern water-based acrylic enamels to be a better all-around choice for their ease of use and excellent results.
Techniques for Applying Paint
Applying paint to your kitchen cabinets requires a bit of care to achieve a smooth, professional look, especially after you’ve dealt with peeling paint. The key is to use thin, even coats rather than trying to cover everything in one thick application. This approach prevents drips, runs, and brush strokes, leading to a much better finish.
Start with your brush for the detailed areas. Use an angled sash brush to paint the inside edges of the cabinet frames, the details on cabinet doors, and any other tight spots. Load the brush with paint but avoid overloading it.
Apply the paint in smooth, even strokes, working from the top down. If you’re painting cabinet doors off the cabinet frame, work on a flat surface.
For the larger, flat surfaces of the doors and cabinet frames, use a high-quality foam roller. These rollers are designed to leave a very smooth finish without the texture that traditional rollers can create. Dip the roller into the paint tray, then roll it gently on the ribbed area of the tray to remove excess paint.
Apply the paint to the cabinet surface in long, even strokes. Overlap each stroke slightly to avoid creating visible lines.
Work in sections. For cabinet doors, paint the back side first, let it dry completely, then paint the front. When painting the cabinet frames, start with the inside edges and then move to the outer faces.
Always aim for thin coats. It’s better to apply three thin coats with drying time in between than one thick, messy coat. After each coat, and before the final coat, inspect your work for any drips or uneven spots and gently correct them while the paint is still wet.
Drying Times and Multiple Coats
Patience is a virtue when painting cabinets, especially after repairing peeling paint. The drying times between coats are crucial for a durable and smooth finish. Rushing this process can lead to problems like paint peeling, smudging, or an uneven texture.
Most cabinet paints recommend a drying time of at least 2-4 hours between coats. However, this is just “dry to the touch.” The paint is still curing and hardening during this time. For cabinets, which get a lot of wear, it’s often best to wait even longer, perhaps 6-8 hours, or even overnight between coats if possible, especially before applying the final coat.
After the first coat of paint is dry, it’s a good idea to do a very light sanding with your fine-grit sandpaper (220 grit). This “de-nibbing” step helps to smooth out any tiny bumps or dust particles that may have settled on the surface, ensuring a super smooth finish for the next coat. Wipe away all dust thoroughly with a tack cloth or damp cloth after sanding.
You will likely need at least two coats of paint for good coverage and durability. Some colors, especially reds or yellows, might require a third coat to achieve a solid, opaque finish. Always allow each coat to dry thoroughly before applying the next.
The final coat will need the longest drying period. Cabinets usually need to cure for several days (sometimes up to 30 days, depending on the paint) before they can withstand heavy use or vigorous cleaning.
Curing vs. Drying
It’s important to understand the difference between “drying” and “curing” when it comes to paint, especially for cabinets that have had peeling paint repaired. Drying is when the paint is no longer wet to the touch and has set on the surface.
Curing, on the other hand, is a much longer process. During curing, the chemical reactions within the paint complete, and the paint film hardens and reaches its maximum durability and resistance. For most cabinet paints, this curing process can take anywhere from 7 to 30 days.
During the drying period (the first few hours or day), you need to be careful not to scuff or mark the paint. After the paint has dried and you’ve applied all your coats, you can start using the cabinets gently. However, avoid harsh cleaning, banging doors shut, or placing heavy items that could scratch the surface during the curing period.
Understanding this difference helps you protect your freshly painted cabinets and ensure your repair lasts. Be gentle for the first month, and your cabinets will thank you with a beautiful, lasting finish that looks like new.
Dealing with Specific Cabinet Issues
When you’re tackling the project of how to fix peeling paint on kitchen cabinets, you might run into a few different types of problems. Sometimes, the paint is just flaking off in large sections. Other times, you might see little blisters, cracks, or even just worn-down areas where the paint is almost gone.
Each of these issues needs a slightly different approach to ensure the repair is effective and blends in well with the rest of the cabinet.
We’ve already covered the main process of scraping and sanding, which works for most peeling paint. However, if you encounter stubborn old paint that won’t scrape easily, or if you find areas where the wood has been damaged, you might need to adjust your strategy. Also, cabinets in high-moisture areas like near dishwashers or sinks might require special attention to prevent future problems.
Understanding how to handle these specific issues will help you achieve a seamless repair. It’s not just about covering up the problem; it’s about fixing it right so your cabinets look great and the repair lasts. Let’s look at some common cabinet problems and how to deal with them.
Blistered or Bubbling Paint
Blistered or bubbling paint is a common issue, often caused by moisture trapped beneath the paint layer. This moisture can come from steam in the kitchen, leaks, or even humidity. When the paint blisters, it creates a gap between the paint and the cabinet surface, which can eventually lead to peeling or flaking.
To fix this, you’ll need to remove the affected paint. Carefully use a paint scraper or a putty knife to lift the edges of the blister. Try to peel back the paint until you reach an area where the paint is still firmly attached to the cabinet.
You want to remove all the loose, bubbled paint, even if it means exposing more of the underlying surface than you initially expected.
Once you’ve removed the blistered paint, you’ll likely have an uneven surface. This is where sanding comes in. Use medium-grit sandpaper (around 120 grit) to feather the edges of the remaining paint so they blend smoothly into the exposed cabinet surface.
Then, switch to fine-grit sandpaper (220 grit) to smooth the entire area and create a uniform surface. Clean the area thoroughly afterward to remove all dust and debris.
After cleaning and ensuring the surface is completely dry, you’ll need to prime the repaired area. Use a good quality primer designed to block moisture or a bonding primer. Apply one or two coats of primer, allowing each to dry completely.
Once the primer is dry and lightly sanded, you can apply your topcoat of paint. This method helps to seal the area and prevent future blistering.
Cracked or Chipped Paint
Cracked or chipped paint is another sign that your cabinet finish is aging or has experienced some stress. Cracks can appear as fine lines, while chips are small pieces of paint that have broken away entirely. Both need to be addressed to prevent further damage and maintain the cabinet’s appearance.
For small chips, you might be able to simply fill the gap with a bit of wood filler or putty, let it dry, sand it smooth, and then prime and paint. However, if the paint is cracked extensively or the chips are larger, you’ll need to scrape away all the loose paint surrounding the damage. Use a sharp scraper to get under the cracked or chipped edges and remove everything that isn’t firmly attached.
After scraping, you’ll want to sand the area. Use medium-grit sandpaper to feather the edges of the remaining paint into the exposed wood or underlying surface. This creates a smooth transition.
Then, use fine-grit sandpaper to smooth out the whole section. Clean the area meticulously to remove all dust. If there are any small gouges or unevenness from scraping, you can use a bit of wood filler, let it dry, and sand it smooth.
The next step is to prime. Apply a coat of primer over the repaired and sanded areas. Make sure the primer covers the bare wood and the feathered edges of the old paint.
Once the primer is dry, lightly sand it and wipe away the dust. Then, apply your topcoat of paint. Multiple thin coats are usually needed to blend the repaired area with the rest of the cabinet.
Worn-Through Areas
Some cabinets, particularly around the edges of doors and drawers, or on the front of the cabinet frames where hands often touch them, can experience worn-through areas. This is where the paint has been rubbed away over time, exposing the wood or primer underneath. These areas can make cabinets look old and tired.
For simple worn-through spots where there isn’t any peeling or chipping, the fix is quite straightforward. The main thing is to ensure the surface is clean and smooth. Gently sand the worn area with fine-grit sandpaper (220 grit).
This will knock down any rough edges and create a slightly textured surface for the primer to adhere to.
After sanding, thoroughly clean the area to remove all dust. You can use a damp cloth followed by a dry one. Then, apply a coat of primer directly to the worn-through section.
Make sure to extend the primer slightly beyond the worn area to help blend it in. Allow the primer to dry completely.
Once the primer is dry, you might want to give it a very light sanding with fine-grit paper and wipe away the dust again. Then, apply your topcoat of paint. You’ll probably need two or three thin coats of paint to fully cover the primed area and match the sheen and color of the surrounding cabinet.
The goal is to make the repaired area disappear into the rest of the cabinet.

Maintaining Your Newly Painted Cabinets
You’ve put in the work, and your kitchen cabinets look fantastic after fixing the peeling paint. Now, the most important part is keeping them that way! Good maintenance ensures your hard work pays off and your cabinets continue to look great for years to come.
It’s not complicated, but it does require a little bit of regular attention. This will help prevent future peeling and keep them looking fresh and clean.
The key to maintaining painted cabinets is gentle cleaning and avoiding harsh chemicals or abrasive materials. Because you’ve likely used a durable paint designed for kitchens, they can handle everyday messes. But being mindful of how you clean them will make a big difference.
We’ll go over the best ways to clean them and what to watch out for.
Following these simple tips will help protect your investment and keep your kitchen cabinets looking their best. It’s about being a little careful and consistent, which is much easier than having to do another big repair job!
Daily Cleaning Tips
Keeping your kitchen cabinets clean on a daily basis is one of the easiest ways to maintain their fresh look, especially after you’ve fixed any peeling paint. Kitchens are prone to splatters and grease, so a quick wipe-down can prevent build-up that might damage the paint over time.
For everyday spills and splatters, a soft, damp cloth is usually all you need. Wipe the area gently as soon as possible after the mess occurs. This prevents the spill from drying and becoming harder to remove, and it also stops liquids from potentially seeping into any tiny cracks or imperfections that might still exist.
If you encounter a bit of grease or a sticky spot, you can use a mild dish soap mixed with warm water. Apply the soapy water to your cloth, not directly to the cabinets, and gently wipe the affected area. Make sure to follow up with a clean, damp cloth to rinse away any soap residue, and then dry the surface with a soft, dry cloth.
Avoid using abrasive cleaners, scrub brushes, or steel wool, as these can scratch or dull the paint finish, no matter how durable it is. Gentle, consistent cleaning is the best strategy for keeping your cabinets looking pristine.
Avoiding Damage
Protecting your freshly painted cabinets from damage is crucial for their longevity. While paint is durable, certain actions can lead to chips, scratches, or wear, undoing all your hard work. Being mindful of these potential issues will help your cabinets stay looking new.
One common way cabinets get damaged is from harsh cleaning products. Always opt for mild soap and water or specific cabinet cleaners. Avoid abrasive cleaners, scouring pads, or anything that could scratch the surface.
Also, be careful with knives or other sharp objects when you’re working in the kitchen; try not to let them bump hard against the cabinet doors or drawers.
Steam from cooking, especially near the stove, can sometimes affect paint over time. Ensure your kitchen is well-ventilated when cooking with steam. Similarly, if you have a dishwasher, make sure its vents aren’t directly blowing hot, moist air onto cabinet doors, as this can cause issues.
Be careful when opening and closing cabinet doors and drawers, especially if they are self-closing. A forceful slam can cause them to bang against the frame, potentially leading to chips or dings over time. A gentle touch goes a long way in preserving your cabinet finish.
Long-Term Protection and Touch-Ups
For the long haul, consistency in how you treat your cabinets will pay off. Even with the best initial repair, some wear and tear over the years is natural. Knowing how to protect and touch up your cabinets will keep them looking their best.
A simple policy of gentle cleaning and avoiding direct abrasion is your best defense. For instance, when cleaning up after cooking, always use a soft cloth and mild soap. If you notice a spot that looks a little dull, a quick wipe with a cleaner designed for painted surfaces can restore its sheen.
Avoid letting spills sit, especially acidic ones from food or drinks, as they can etch certain finishes if left too long.
When it comes to touch-ups, it’s wise to keep a small amount of your original paint and primer handy. If you do get a small chip or scratch, you can lightly sand the area, apply a tiny bit of primer, let it dry, and then carefully touch up the spot with your cabinet paint. Using a fine artist’s brush can help blend these small repairs seamlessly into the existing finish.
Doing these small touch-ups promptly prevents minor damage from becoming a larger issue.
Consider using drawer liners or shelf paper inside cabinets to protect the bottoms from scratches caused by cans or jars. While this doesn’t directly protect the painted exterior, it’s a good practice that contributes to the overall care of your kitchen cabinetry. Overall, a little preventative care and prompt touch-ups are the secrets to lasting beauty.
Frequently Asked Questions
Question: How long does it typically take to fix peeling paint on kitchen cabinets?
Answer: The time it takes can vary a lot depending on how much peeling there is and how many cabinets you have. For a few doors, it might take a weekend. For a whole kitchen, it could be several days to a week because you need to wait for paint and primer to dry between coats.
Question: Do I really need to sand the cabinets if the paint is just peeling in a few spots?
Answer: Yes, sanding is important. You need to sand down the edges where the paint is peeling to create a smooth transition. Lightly sanding the whole cabinet also helps the new primer and paint stick better, making your repair last longer.
Question: What is the best way to clean kitchen cabinets before painting?
Answer: Use a mild dish soap mixed with warm water or a kitchen degreaser. Wipe down all surfaces thoroughly with a soft cloth or sponge. Then, rinse with a clean, damp cloth to remove all soap residue.
Let them air dry completely before priming.
Question: Can I paint over old peeling paint without removing it?
Answer: No, you absolutely should not paint over peeling paint. The new paint will just peel off with the old layer. You must scrape away all loose paint, then sand and prep the surface before applying primer and new paint.
Question: How many coats of paint do I need for kitchen cabinets?
Answer: You will typically need at least two coats of paint. Some colors, especially lighter ones over dark surfaces, might require a third coat for full, even coverage. Always apply thin, even coats and allow each to dry completely before applying the next.
Wrap Up
Fixing peeling paint on kitchen cabinets is totally doable with simple steps. You’ll scrape, sand, clean, prime, and paint. This process makes your cabinets look new and last longer.
Now you have the know-how to get your kitchen looking its best.

Leave a Reply