
Sometimes cabinets can start to pull away from the wall. This can be a worry for homeowners, especially if you’re not used to fixing things around the house. The problem, often called How to Fix Cabinets Separating Due to Wall Stud Failure, might sound like a big job, but it’s usually quite manageable with the right steps.
Don’t fret; we’ll walk you through it with simple, easy-to-follow instructions. First, let’s look at what causes this common issue and what tools you’ll need.

Understanding Wall Stud Failure and Cabinet Separation
This section explains why cabinets might loosen and detach from your walls. It’s all about the support structure behind your drywall – the wall studs. When these studs weaken, shift, or weren’t properly secured in the first place, they can’t hold the weight of your cabinets anymore.
This often leads to the cabinets starting to separate from the wall, creating a gap. We’ll cover the common culprits behind this problem, from water damage to simple wear and tear.
What Causes Wall Studs to Fail?
Wall studs are the vertical beams inside your walls that provide structure and a place to hang things like cabinets and shelves. Several things can make these studs less effective over time. Knowing these causes helps you prevent future problems and understand the extent of the current one.
It’s like knowing why a plant wilts to figure out how to revive it.
One common reason is moisture. Water leaks from pipes, roofs, or even excessive humidity can rot the wood of the studs. Rotten wood becomes soft and crumbly, losing its strength.
This is especially a problem in kitchens and bathrooms where water is frequently used. Without solid studs, the screws holding your cabinets will eventually pull out or the wood itself will fail.
Another issue is simply the weight. Cabinets, especially when loaded with dishes, pots, and pans, can put a lot of stress on the wall. If the studs weren’t strong enough to begin with, or if the original installation didn’t use the right kind of fasteners, the constant downward pull can cause the studs to bend or the screws to loosen.
Over many years, this can lead to noticeable separation.
Sometimes, settling of the house itself can be a factor. As houses age, they naturally settle slightly into the ground. This can cause minor shifts in the framing, putting unusual stress on certain studs.
If a stud is already weakened or not perfectly plumb, this shifting can exacerbate the problem, leading to cabinet detachment.
Finally, improper installation is a frequent, though often overlooked, cause. If the original builders didn’t secure the cabinets directly into the studs with appropriate screws, or if they relied too much on drywall anchors that aren’t rated for the weight, the cabinets are bound to loosen over time. The studs themselves might be fine, but the connection to them is weak.
Recognizing the Signs of Separation
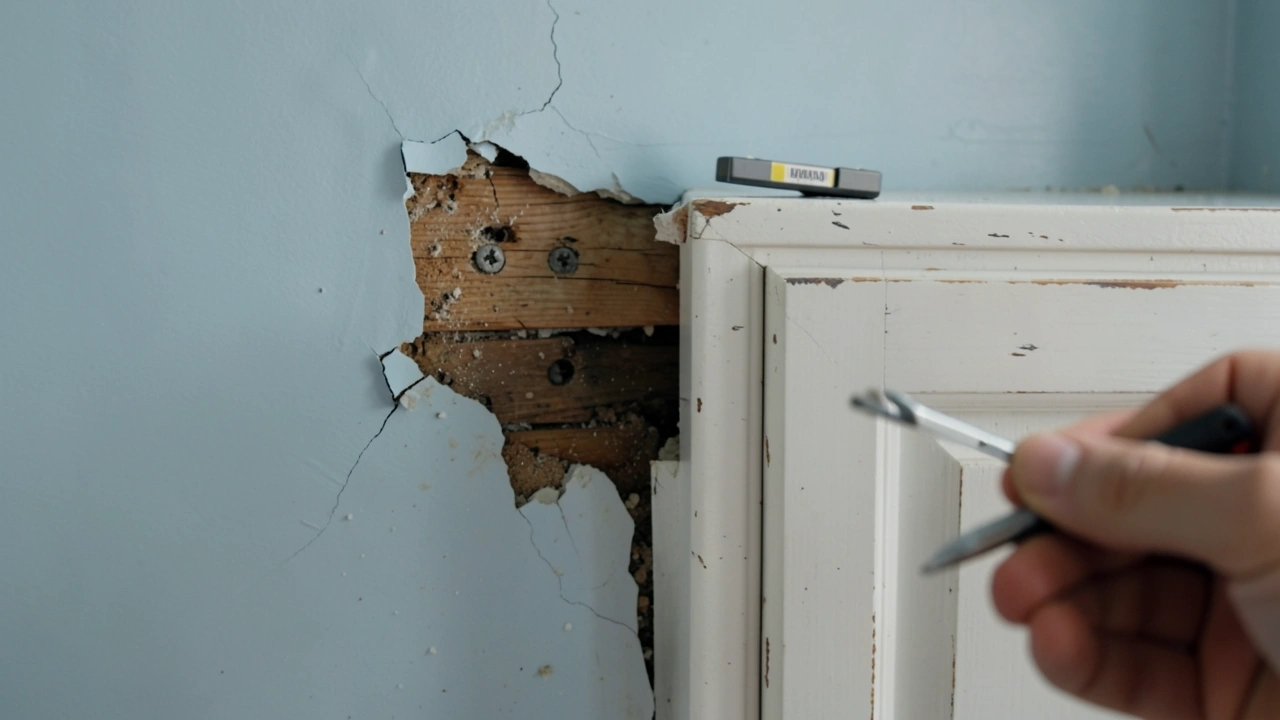
Before you can fix cabinets separating due to wall stud failure, you need to know what to look for. The signs are usually quite obvious once you know where to check. Ignoring these early warnings can lead to bigger problems, like cabinets falling off the wall entirely, which is much more dangerous and expensive to fix.
The most apparent sign is a visible gap. You’ll see a space between the back of your cabinet and the wall. This gap might be small at first, maybe just a hairline crack, but it will likely grow wider over time if the underlying issue isn’t addressed.
This gap is direct evidence that the cabinet is no longer firmly attached to the wall structure.
You might also notice that the cabinet doors don’t close properly anymore. They might sag, be uneven, or rub against each other. This is because the cabinet box itself is no longer square and plumb; it’s pulling away from the wall unevenly, distorting its shape.
This affects how the doors align and function.
Another indicator is a loose or wobbly cabinet. If you gently push on the cabinet and it moves more than it should, this is a clear sign that the fasteners are pulling out of the studs or the studs themselves are compromised. This instability is a warning that the cabinet is not securely attached and needs attention.
You might also hear creaking or groaning sounds when you open or close cabinet doors, or when you place items inside. This is the sound of wood shifting and screws straining. These noises are the cabinet and its mounting hardware protesting under stress, signaling a problem with the wall support.
Gathering Your Tools and Materials
Getting ready for this fix is key to making the job smooth and successful. Having all your tools and materials laid out before you start means you won’t have to stop halfway through to hunt for a missing item. This makes the whole process feel less overwhelming and more like a manageable task.
We’ll cover the essentials you’ll need to get the job done right.
Essential Tools for the Job
To tackle cabinets separating due to wall stud failure, you’ll need a few basic tools. Most of these are pretty common in a home toolbox. If you don’t have them, they are relatively inexpensive to purchase and will be useful for many other home repairs.
- Stud Finder: This is crucial for locating the wall studs behind your drywall. Electronic stud finders are generally the easiest to use, emitting a beep or light when they detect a stud.
- Drill/Driver: You’ll need this to remove old screws, drill pilot holes, and drive in new, longer screws to secure the cabinet. A cordless one is highly recommended for convenience.
- Drill Bits: A set of various drill bits is necessary. You’ll need bits for creating pilot holes that are smaller than your screws, and possibly larger bits for countersinking if needed.
- Screwdriver Set: Even with a drill, having a set of screwdrivers with different head types (Phillips, flathead) can be useful for adjustments or if your drill battery dies.
- Level: A level ensures that your cabinets are straight and plumb before you re-secure them. This is important for both appearance and proper door function.
- Measuring Tape: You’ll use this to measure distances, check alignment, and ensure you’re placing screws in the correct spots.
- Pencil: For marking locations on the wall and cabinets.
- Safety Glasses: Always protect your eyes when drilling or working with tools.
- Gloves: To keep your hands clean and protected.
Necessary Materials for Reinforcement
Besides tools, you’ll need specific materials to fix the cabinet issue permanently. The right fasteners are critical here. Using the wrong screws or anchors will just lead to the problem recurring.
- Longer, Stronger Wood Screws: You’ll need screws that are long enough to go through your cabinet’s back panel (if it has one), through the drywall, and securely into the solid wood of the wall stud. Aim for screws that are at least 2.5 to 3 inches long. They should also be coarse-threaded wood screws for good grip.
- Washers: These can be helpful to use with screws, especially if the existing holes in the cabinet mounting strip are a bit enlarged. Washers help distribute the pressure and prevent the screw head from pulling through.
- Wood Shims (Optional): If the wall is uneven or bowed, you might need thin pieces of wood called shims to place between the cabinet and the wall to create a flat, stable surface for mounting.
- Wood Glue (Optional): If a stud is showing signs of minor splitting, a little wood glue can help reinforce it before you re-secure the cabinet.
- Paint Touch-up (Optional): If the repair process requires moving the cabinet slightly and scuffs the paint, having some touch-up paint on hand will be useful.
Step-by-Step Guide to Fixing the Cabinets
Now that you have your tools and materials ready, it’s time to get to work. This part explains exactly how to fix cabinets separating due to wall stud failure. We’ll break it down into simple, manageable steps so you can confidently repair your cabinets and make them sturdy again.
Follow these steps carefully for the best results.
Step 1: Clear the Cabinet and Assess the Damage
Before you do anything else, empty the cabinet you’re working on. Remove all its contents. This makes the cabinet lighter and easier to move or work with.
It also prevents items from getting damaged. Once empty, take a good look at the gap between the cabinet and the wall. Try to gently wiggle the cabinet to see how loose it is and where the main points of separation are.
Note any visible damage to the cabinet itself, like cracks in the wood or loose hinges. Also, check the wall behind it. Is there any sign of water damage like discoloration or peeling paint?
If you see significant water damage, you might need to address that first before re-mounting the cabinet. For this guide, we assume the primary issue is stud failure, not extensive water damage.
Carefully examine the existing screws or mounting hardware. Are they still in place? Are they stripped?
Are they pulling out of the drywall or the cabinet? This assessment will give you a clearer picture of what needs to be done and help you confirm that the problem is indeed related to the wall studs not holding firm.
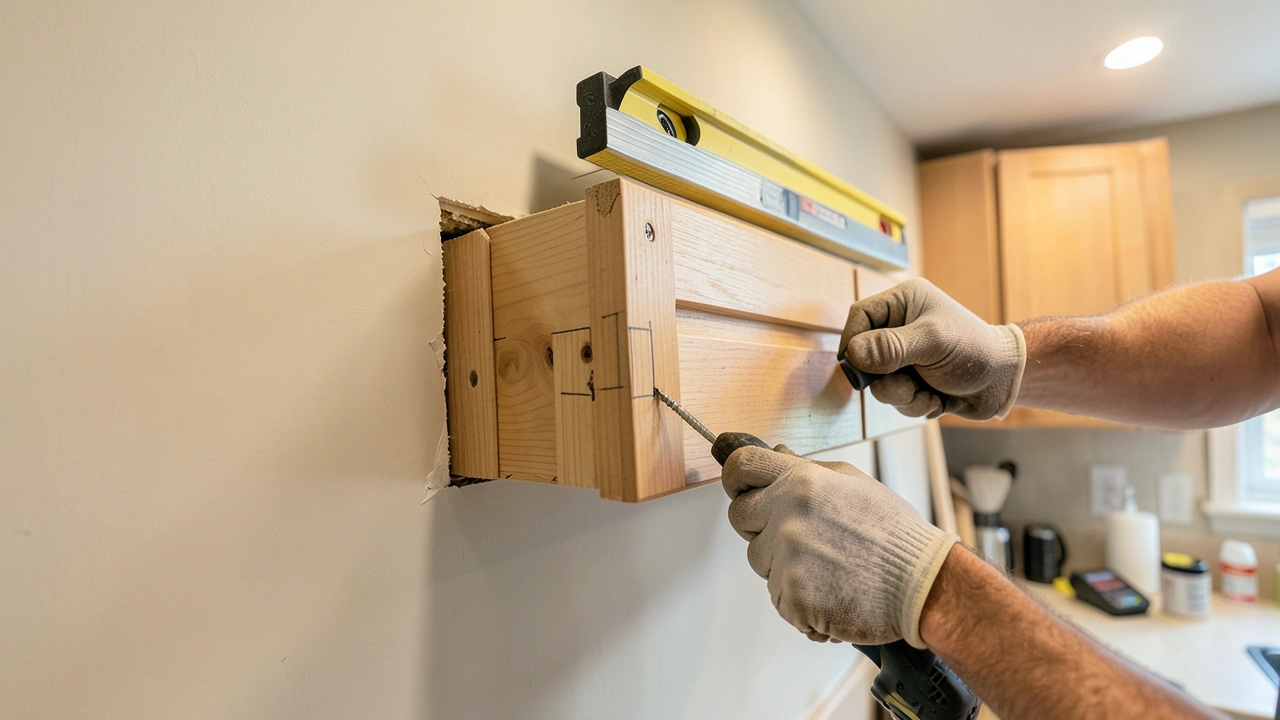
Step 2: Locate the Wall Studs
This is where your stud finder comes in handy. With the cabinet slightly pulled away from the wall (you might need to loosen existing screws slightly or simply have enough of a gap), run your stud finder horizontally across the wall where the cabinet is mounted. Most stud finders will beep or light up when they find the edge of a stud.
Mark the center of each stud you find with your pencil.
It’s a good idea to find at least two studs if possible, ideally more, that are directly behind the cabinet’s mounting area. Cabinets are typically secured to studs at multiple points. If you can’t find any studs where the cabinet is supposed to be attached, there might be an issue with the framing, or the cabinet might have been mounted in a way that doesn’t align with standard stud placement.
For standard wall construction, studs are usually placed 16 or 24 inches apart.
You may need to experiment a bit with the stud finder. Sometimes the drywall is thicker, or there’s a metal plate behind it, which can affect the readings. Try moving the stud finder slowly and systematically.
If you are unsure, you can carefully drill a very small pilot hole (the size of a finishing nail) in an inconspicuous spot to feel for wood. If you hit solid wood, you’ve found a stud.
Step 3: Prepare the Cabinet for Re-mounting
If your cabinet has a thin back panel, you might need to drill pilot holes through it if you plan to screw directly through it into the studs. However, many cabinets have a thicker frame or mounting strip at the back designed for this purpose. Check your cabinet’s construction.
If you see a solid wood strip along the back top or bottom where it meets the wall, focus your efforts there.
If the existing screw holes in the cabinet’s mounting strip are enlarged or stripped, this is a good time to reinforce them. You can fill these holes with wood filler and let it dry completely, then re-drill a pilot hole. Alternatively, you can use slightly larger washers on your new screws to help them grip better, or even use a small block of wood behind the cabinet mounting strip if needed for added support.
If the cabinet itself seems warped or slightly damaged from being pulled away, try to gently push it back into its original shape. You might need to loosen any remaining screws holding it to the wall further to allow this. The goal is to get the cabinet as close to its correct position and orientation as possible before you start the securing process.
Step 4: Secure the Cabinet to the Wall Studs
This is the most critical step. With your stud locations marked, position the cabinet back against the wall. Use your level to ensure it’s straight.
Now, using your drill and the long, strong wood screws, drive screws through the cabinet’s mounting strip and through the drywall, directly into the center of the wall studs you located. Start with one screw into a stud to hold the cabinet in place.
Then, use your level again to check the cabinet’s alignment. If it’s straight, drive in another screw into a different stud. Continue adding screws, spacing them out along the stud, about 12-16 inches apart if possible, to provide maximum support.
Make sure the screws are snug but don’t overtighten them, which could strip the wood in the stud or crack the cabinet’s mounting strip.
If you had to slightly pull the cabinet away from the wall to locate studs, gently push the cabinet firmly against the wall as you drive in the screws. If the wall surface isn’t perfectly flat, you might find that some screws go in deeper than others. This is where wood shims can be useful – place them behind the cabinet’s mounting strip at specific points to create a flush surface against the wall before screwing.
The goal is a tight, secure fit with no gaps.
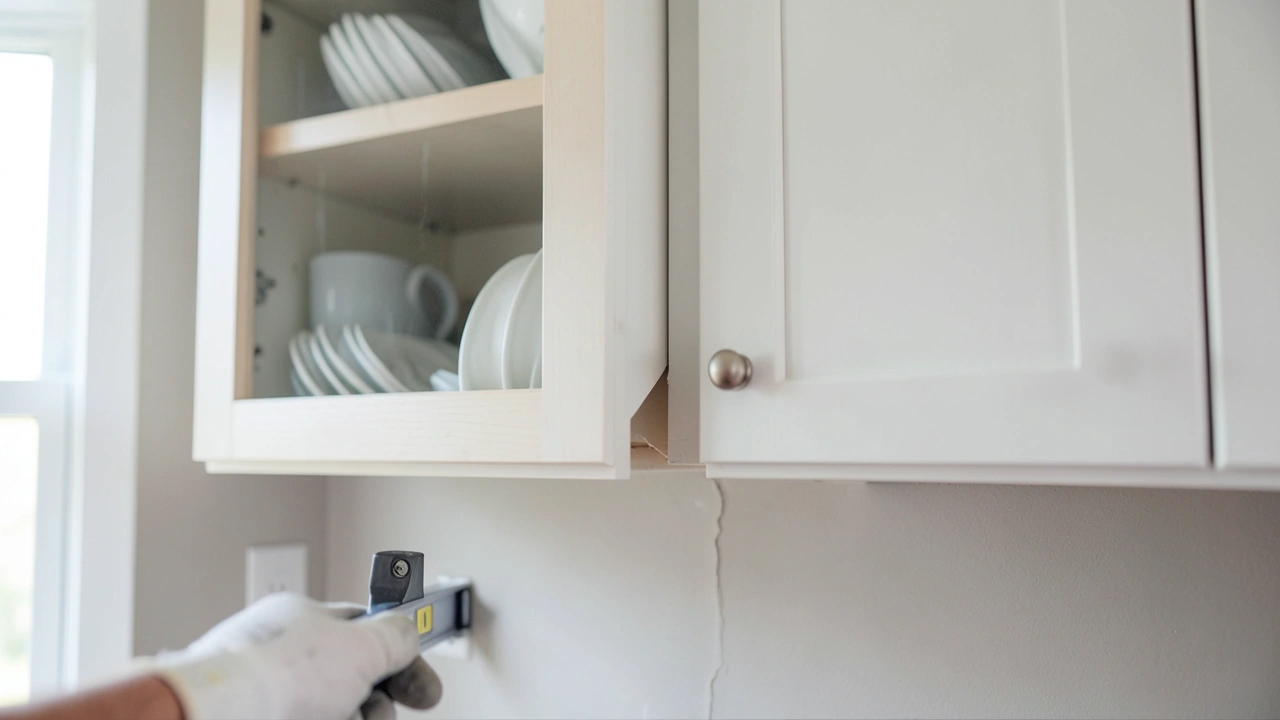
Step 5: Test the Stability and Finishing Touches
Once all screws are in place and the cabinet feels solid, give it a gentle push and pull to test its stability. It should feel firmly attached to the wall and not move independently. Open and close the cabinet doors to ensure they function smoothly and are properly aligned.
If they’re still a bit off, you might need to adjust the cabinet’s position slightly or check the hinge screws.
If you notice any scuffs on the wall from the process, touch them up with paint. Clean up any dust or debris from your work area. If you used any wood filler or glue, ensure it’s fully dry before putting items back into the cabinet.
The most satisfying part is loading your cabinet back up and knowing it’s secure.
This fix is designed to be a long-term solution. By anchoring directly into the wall studs with sufficient screw length and strength, you are creating a robust connection that can hold the weight of your cabinets for years to come. It’s a fundamental repair that brings peace of mind.
Preventing Future Cabinet Separation Issues
Learning how to fix cabinets separating due to wall stud failure is great, but preventing it from happening again is even better. Taking a few proactive steps can save you a lot of trouble down the line. These preventative measures are simple and don’t require a lot of extra effort, but they can make a big difference in the longevity of your cabinets.
Regular Inspections and Maintenance
Make it a habit to occasionally check your cabinets. A quick visual inspection every few months can catch small issues before they become big problems. Look for any tiny gaps that might be starting to form between the cabinet and the wall, especially at the top and bottom.
Also, check if cabinet doors are starting to sag or if the cabinet feels loose when you open it.
Pay attention to any new noises, like creaking or groaning, when you use your cabinets. These sounds can be early indicators of stress on the mounting hardware or the wall studs. If you notice any small signs of wear, it’s much easier and quicker to address them when they are minor rather than waiting until there’s a noticeable gap.
Another important maintenance tip is to address any leaks promptly. If you have a leaky pipe under a sink or a drip from the faucet, fix it immediately. Water damage is a primary cause of wood rot, which weakens wall studs and can lead to cabinet failure.
Wiping up spills around sinks and backsplashes also helps prevent moisture buildup.
Proper Loading and Weight Distribution
Avoid overloading your cabinets. While cabinets are built to hold items, there’s a limit. Distribute the weight of your items evenly within the cabinet.
Try not to place all the heaviest items on one side or on the very top shelf, as this creates uneven stress. Stagger heavier items and place them closer to the cabinet’s back where they are better supported by the wall.
For cabinets containing very heavy items, like collections of books or large appliances, consider if they might need extra reinforcement. Sometimes, adding an additional screw into a stud, or using a heavier-duty mounting bracket, can provide that extra security. This is particularly true for upper cabinets where gravity is constantly pulling downwards.
When cleaning cabinets or the surrounding walls, avoid using excessive amounts of water, especially around the mounting areas. Damp cloths are usually sufficient. Excessive moisture can seep into the wood and eventually weaken the studs over time.
If you are installing new cabinets, always ensure they are properly secured to the wall studs with appropriate hardware rated for the expected load.
Understanding Weight Limits and Professional Advice
Different cabinets have different weight capacities. If you are unsure about the weight limit of your cabinets, it’s wise to err on the side of caution. For very heavy items, like large pantry items or built-in shelving units, it’s always best to consult with a professional.
They can assess the situation and recommend the best way to ensure secure mounting.
If you have older cabinets or have recently purchased a home with existing cabinetry, a professional inspection might be a good idea. A carpenter or handyman can check the condition of your wall studs and the mounting of your cabinets. They can identify potential weak points that you might not notice yourself and offer solutions.
Remember that proper installation from the start is the best preventative measure. If you are ever in doubt about how to properly mount a cabinet, especially a heavy one, hiring a professional is a worthwhile investment. It ensures the job is done safely and correctly, preventing future headaches and potential damage.
Frequently Asked Questions
Question: What are wall studs made of?
Answer: Wall studs are typically made of wood, most commonly pine, spruce, or fir. These are softwood lumber types that are strong enough for framing but also easy to work with. In some modern construction or specific areas, metal studs made of galvanized steel are also used, offering durability and resistance to rot and pests.
Question: How do I know if my cabinet is separating due to stud failure and not just a loose screw?
Answer: If only a screw is loose, the cabinet will likely still feel quite stable, and the gap might be very small or non-existent. If it’s stud failure, you’ll usually see a noticeable gap, the cabinet will feel significantly wobbly, and the screws might be pulled out of the wall or the stud material itself may be crumbling.
Question: Can I fix this problem if I have plaster walls instead of drywall?
Answer: Yes, you can fix this on plaster walls. The process is similar, but locating studs behind plaster can sometimes be trickier. You’ll still use a stud finder, and you might need to be more careful when drilling to avoid excessive cracking of the plaster.
Ensure your new screws are long enough to securely reach the studs.
Question: What if the stud is damaged beyond just being loose?
Answer: If a stud is significantly rotted or broken, it may need to be repaired or
Question: Do I need to remove the cabinet completely to fix it?
Answer: Usually, no. For most cases of cabinets separating due to wall stud failure, you can often fix the issue by loosening the cabinet just enough to access the mounting area and then re-securing it with longer screws into the studs, without needing to fully remove the cabinet.
Summary
Repairing cabinets separating due to wall stud failure is manageable. By locating studs and using longer, stronger screws, you can re-secure your cabinets effectively. Regularly inspect for gaps and moisture.
Proper loading prevents future issues. A stable cabinet means a safer, more functional kitchen.

Leave a Reply