
Painting kitchen cabinets that are not yet finished can seem easy, but it’s actually pretty tricky, especially if you’re new to it. You might wonder why painting unfinished kitchen cabinets can lead to problems. Many people make mistakes without realizing it, which can make the cabinets look not so great.
But don’t worry! This guide will show you the simple, step-by-step way to get beautiful cabinets. We’ll cover all the tricky parts so your project turns out perfect.
Getting Started with Unfinished Kitchen Cabinets
Starting a DIY project with unfinished kitchen cabinets can be exciting, offering a blank canvas to transform your kitchen. However, this seemingly simple task holds several pitfalls for the uninitiated. Without proper preparation and technique, the final result can fall short of expectations, leading to a less-than-ideal aesthetic and potential durability issues.
This section will lay the groundwork for a successful cabinet painting project, emphasizing the importance of a clean slate and the right approach from the very beginning. We will explore the initial steps that are vital for avoiding the most common issues people encounter.
Why Preparation Matters for Cabinets
The most critical phase in painting unfinished kitchen cabinets is preparation. Skipping this step is a sure way to encounter problems down the line. Unfinished wood is porous and can have dust, oils, or even wood fibers clinging to it.
If these aren’t removed properly, your paint won’t stick well, and the finish will look rough and uneven. Think of it like building a house; you need a strong foundation. A well-prepared surface is that foundation for your cabinet paint.
This means more than just a quick wipe. You need to ensure every inch of the cabinet surface is clean, smooth, and ready to accept primer and paint. Without this attention to detail, you’re setting yourself up for peeling paint, drips, and a finish that doesn’t last.
It’s the difference between cabinets that look professionally done and cabinets that look like a weekend project gone wrong.
Understanding Different Wood Types
Unfinished cabinets are often made from various types of wood, like pine, oak, maple, or MDF (medium-density fiberboard). Each type of wood behaves differently when it comes to absorbing paint and primer. For instance, some woods, like pine, have knots that can bleed through paint if not properly sealed.
Other woods might be very smooth, requiring a different kind of primer to ensure good adhesion. Knowing what kind of wood you’re working with helps you choose the right products and techniques.
If you’re unsure about your cabinet’s wood type, it’s a good idea to do a little research or consult with the cabinet supplier. This knowledge will guide your choice of primers and paints, preventing issues like tannin bleed from dark woods or poor adhesion on very dense hardwoods. Understanding your material is key to avoiding future headaches and achieving a beautiful, lasting finish on your unfinished kitchen cabinets.
Essential Tools and Materials
To tackle painting unfinished kitchen cabinets, you’ll need a few key items. This isn’t just about paint; it’s about having the right tools to apply it and prepare the surface. Having everything ready before you start will save you time and frustration.
- Cleaning Supplies: You’ll need a good degreaser or TSP (trisodium phosphate) substitute, clean cloths, and water. This is to wash away any dirt or grease that might be on the wood. A clean surface is non-negotiable.
- Sanding Equipment: Fine-grit sandpaper (150-220 grit) is essential for smoothing the wood and creating a surface for the primer to grip onto. An orbital sander can speed things up, but sanding by hand is fine too.
- Primer: A high-quality primer is vital, especially for unfinished wood. It seals the wood, blocks stains, and gives your paint something to stick to. Look for a primer recommended for wood and cabinetry.
- Paint: For kitchen cabinets, you want a durable, washable paint. Alkyd enamel or a high-quality acrylic latex paint designed for cabinets are good choices. They can withstand the wear and tear of a kitchen.
- Applicators: High-density foam rollers or good-quality synthetic brushes are best for a smooth finish. Avoid cheap brushes that leave bristles behind.
Having these items ready means you can move through the process smoothly. It prevents you from stopping midway to run to the store, which can break your concentration and the flow of your work. Proper tools make the job easier and the results much better when painting unfinished kitchen cabinets.
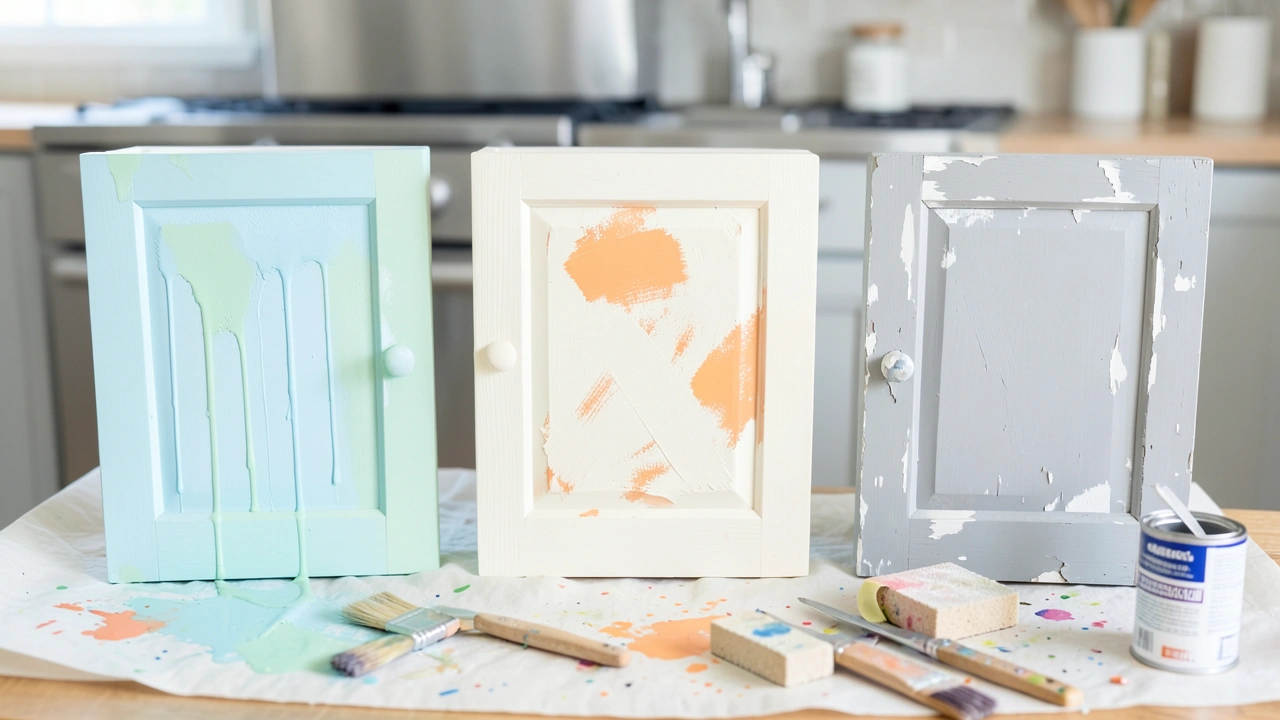
Common Mistakes When Painting Unfinished Kitchen Cabinets
Even with good intentions, beginners often stumble over specific steps when painting unfinished kitchen cabinets. These missteps can lead to a finish that looks unprofessional, chips easily, or doesn’t last. Understanding these common errors is the first step to avoiding them.
This section will detail the most frequent mistakes and explain why they happen and how to prevent them, ensuring your painted cabinets are a source of pride, not regret.
Skipping Surface Preparation
One of the biggest mistakes people make is not preparing the unfinished wood surfaces thoroughly. This involves skipping cleaning, degreasing, and sanding. Unfinished wood can have dust, oils, or even sap from the tree that needs to be removed.
If you paint over these imperfections, the paint won’t adhere properly. You might see spots where the paint peels or looks bumpy.
Sandpaper is your friend here. You need to create a smooth surface so the primer and paint can bond well. Skipping sanding means the paint has nothing to grip, leading to a weak bond.
Even though the cabinets are “unfinished,” they are not perfectly smooth and clean. Taking the time to wash, degrease, and sand properly is the most crucial step for a long-lasting finish and avoiding problems down the road. It’s the foundation for any successful paint job, especially for furniture or cabinetry.
Using the Wrong Primer
Another common error is using the wrong type of primer, or none at all. Unfinished wood can be quite porous and may have tannins or other compounds that can bleed through the paint, especially if the wood is knotty or dark. A primer’s job is to seal the wood, block these stains, and create a uniform surface for the topcoat.
For unfinished kitchen cabinets, an oil-based primer or a stain-blocking shellac-based primer is often recommended. These are excellent at preventing bleed-through from tannins or knots. Using a latex primer might not be sufficient for certain woods, leading to unsightly yellow or brown marks appearing through your freshly painted cabinets.
Always choose a primer designed for wood and for stain blocking if you’re unsure.
A primer also helps with adhesion. The paint will stick much better to a primed surface than directly to raw wood. This is particularly important in a kitchen where cabinets get a lot of use and are exposed to moisture and grease.
A good primer ensures your paint job is durable and looks professional, preventing the need for early touch-ups.
Applying Paint Too Thickly
When people are eager to finish, they often apply the paint too thickly in an attempt to get good coverage quickly. This is a mistake because thick coats of paint don’t dry evenly. The surface might feel dry to the touch, but the layers underneath remain wet.
This can lead to drips, sagging paint, and a surface that is easily damaged or marked.
It’s better to apply multiple thin coats of paint rather than one or two thick ones. Each thin coat dries more uniformly, creating a harder, more durable finish. This also allows you to catch any imperfections and fix them between coats.
Thin coats help you achieve a smooth, professional look that will stand up to daily use in your kitchen.
For example, if you apply paint too thickly with a brush, you might see visible brush strokes that never smooth out. With a roller, thick paint can create an orange-peel texture that is hard to fix. Thin, even coats are key to a professional finish.
Not Letting Coats Dry Properly
Rushing the process by not allowing each coat of primer and paint to dry completely is another frequent error. Paint needs time to cure, not just dry to the touch. This curing process strengthens the paint film.
If you apply a second coat before the first is fully dry, you can pull up the previous layer, causing streaks, peeling, or an uneven finish. This is especially true for oil-based paints, which have longer drying and curing times.
Always check the manufacturer’s instructions on the paint can for drying and recoating times. These times can vary based on humidity and temperature. Patience is crucial here.
Allowing ample drying time between coats ensures that each layer is solid and ready for the next, leading to a much more durable and attractive outcome for your painted unfinished kitchen cabinets.
Choosing the Wrong Type of Paint
Kitchen cabinets are subjected to a lot of wear and tear, including moisture, grease, and frequent cleaning. Using a paint that isn’t designed for high-traffic areas or humid environments will lead to problems. Standard wall paint often isn’t durable enough for cabinetry.
It might chip, scratch, or fade easily.
For kitchen cabinets, it’s best to use a durable enamel paint. These paints are formulated to be hard, washable, and resistant to moisture and stains. Options include alkyd (oil-based) enamels or high-quality acrylic or latex enamels specifically designed for cabinets and trim.
They offer a tougher finish that can withstand the demands of a busy kitchen environment. Investing in the right type of paint will make your cabinets look great for years to come.
Not Sanding Between Coats
Many people don’t realize the importance of sanding lightly between coats of primer and paint. This step isn’t about removing paint; it’s about smoothing out any imperfections, dust nibs, or minor ridges that may have formed. A light sanding with very fine-grit sandpaper (220-320 grit) creates a perfectly smooth surface for the next coat to adhere to.
After sanding, it’s important to wipe away all the dust with a tack cloth or a slightly damp cloth. This prevents dust from getting trapped in the next layer of paint, which can make the finish look bumpy and unprofessional. This simple step significantly enhances the smoothness and overall quality of the final finish on your painted unfinished kitchen cabinets.
It truly elevates the look from DIY to professional.
Painting Cabinets While Still Attached
A very common mistake is attempting to paint the cabinets while they are still installed in the kitchen. This leads to a host of issues, including drips on the floor and walls, uneven coverage in hard-to-reach spots, and overall frustration. It’s also difficult to get a consistent finish when working in such tight spaces.
The best approach is to remove the cabinet doors, drawers, and hardware. This allows you to lay them flat and paint them more evenly and thoroughly. You can also paint the cabinet frames more easily without worrying about getting paint on appliances or the backsplash.
This method takes more time initially but results in a much cleaner, more professional, and consistent finish on your unfinished kitchen cabinets.
Ignoring Hardware
Sometimes, people focus so much on painting the cabinets themselves that they overlook the hardware, like knobs and handles. Either they leave old, outdated hardware on, or they don’t prepare it properly if they choose to paint it.
Old hardware can detract from the fresh look of newly painted cabinets. If you plan to reuse hardware, ensure it’s thoroughly cleaned and possibly scuffed up to help new paint adhere. Consider updating the hardware altogether; new knobs and pulls can make a significant difference and are a relatively inexpensive way to refresh your kitchen’s look.
Painting hardware can be tricky, and sometimes replacement offers a better result.
The Step-by-Step Painting Process
Transforming unfinished kitchen cabinets into a stunning focal point requires a systematic approach. By following these steps carefully, you can avoid the pitfalls that often plague DIY projects and achieve a professional-looking finish. This guide will walk you through each stage, from initial cleaning to the final topcoat, ensuring you have the knowledge to paint your unfinished kitchen cabinets with confidence and success.
Step 1: Disassemble and Clean
The first and most critical step is to remove all cabinet doors, drawer fronts, and hardware. This gives you a flat surface to work on, ensuring even coverage and preventing drips. Once disassembled, thoroughly clean all surfaces.
Use a good degreaser or a TSP substitute to remove any grease, dirt, or grime. Kitchen cabinets accumulate a lot of buildup that can interfere with paint adhesion.
Wipe down all surfaces with a damp cloth to remove any cleaning solution residue. Let everything dry completely. This cleaning step is non-negotiable for ensuring your paint sticks well and lasts a long time.
A clean surface is the foundation of a great paint job, especially when dealing with unfinished wood which can absorb impurities.
Step 2: Sanding for Smoothness
After cleaning and drying, it’s time to sand. Use fine-grit sandpaper (around 150-220 grit) to lightly scuff the entire surface of the unfinished cabinets. The goal isn’t to remove wood, but to create a slightly rough texture that the primer can grip onto.
This is especially important for any existing glossy or smooth areas, even on unfinished wood, as some finishes might have a slight sheen from manufacturing.
Pay close attention to any rough spots or splinters. Sand in the direction of the wood grain. After sanding, use a shop vacuum or a dry cloth to remove all dust.
Then, wipe down the surfaces with a tack cloth to pick up any remaining fine dust particles. A clean, smooth surface is essential for the primer to adhere properly.
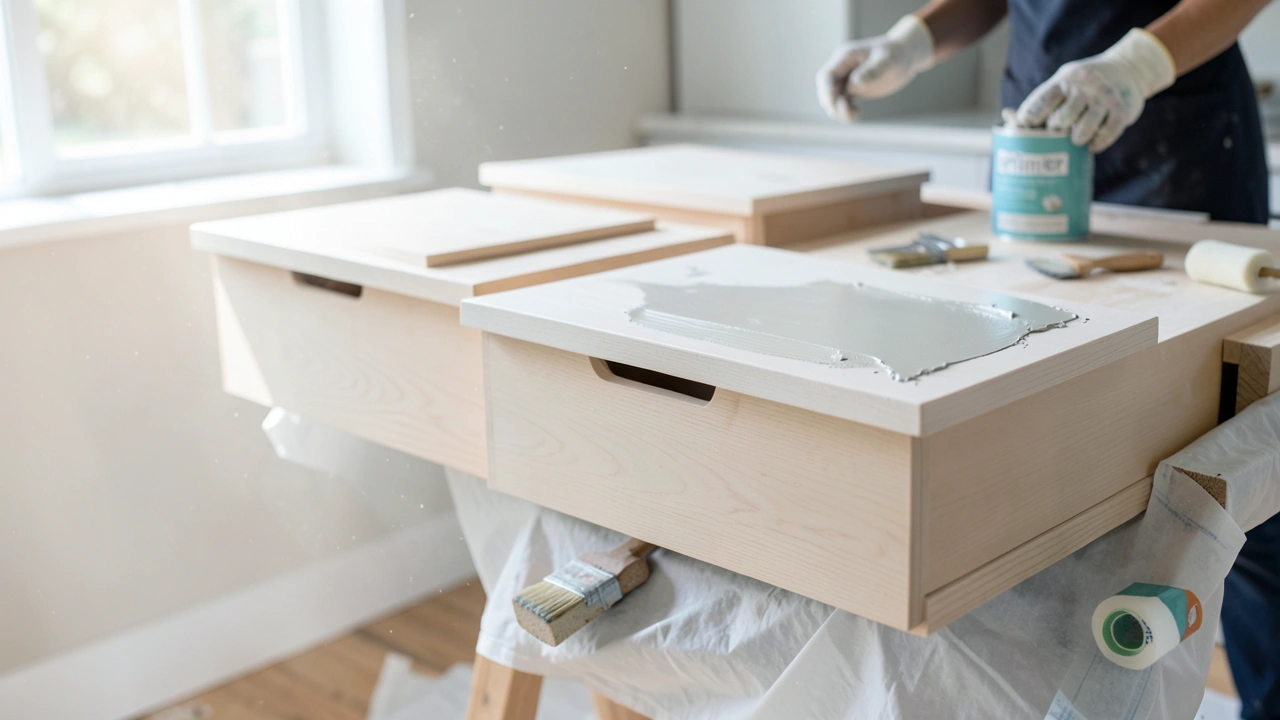
Step 3: Prime the Cabinets
Apply a high-quality primer. For unfinished kitchen cabinets, a stain-blocking primer is often best, especially if you’re painting over knotty wood or dark wood that might bleed through. Apply the primer evenly using a high-density foam roller for large areas and a good quality synthetic brush for edges and details.
Make sure to get good coverage on all surfaces.
Allow the primer to dry completely according to the manufacturer’s instructions. This usually takes a few hours. For very porous wood or if you’re concerned about bleed-through, you might consider a second coat of primer after the first has dried.
This ensures a solid base that will prevent any wood tannins or stains from showing through your paint.
Step 4: Sanding Between Coats
Once the primer is dry, lightly sand the entire surface again with very fine-grit sandpaper (220-320 grit). This step is crucial for achieving a super smooth finish. It knocks down any tiny bumps or imperfections left by the primer or the sanding process.
After sanding, clean off all dust thoroughly with a tack cloth.
This light sanding between coats is a key part of getting that professional, factory-like finish. It ensures the surface is perfectly smooth for the paint to adhere to, preventing any grit or roughness from showing through your final color. It’s a small step that makes a big difference in the final appearance.
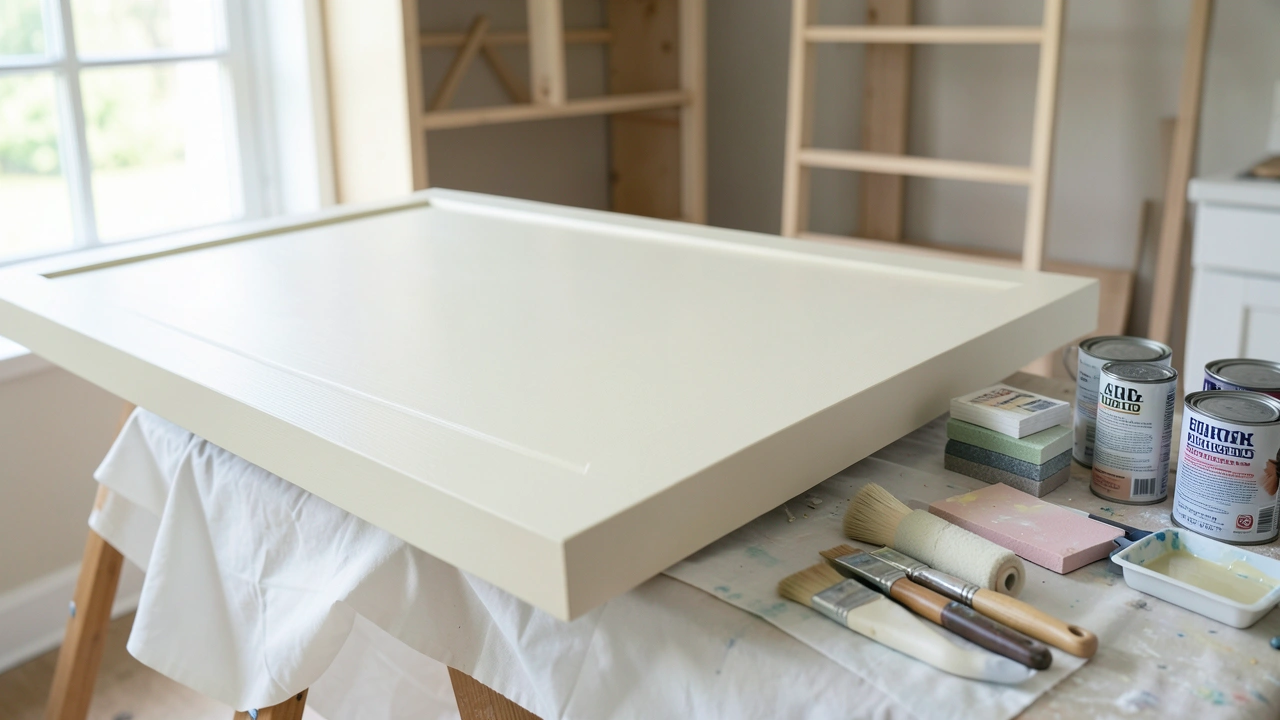
Step 5: Apply Paint Coats
Now it’s time for paint. Apply thin, even coats of your chosen cabinet paint. Use a high-density foam roller for flat surfaces and a good synthetic brush for edges and corners.
Avoid overloading your roller or brush, which can lead to drips and an uneven finish. It’s better to apply multiple thin coats than one thick one.
Allow each coat of paint to dry completely before applying the next. Check the drying times on the paint can. This patience is key to a durable finish.
For most projects, two to three thin coats of paint are usually sufficient. Ensure you are painting in a well-ventilated area, away from dust and direct sunlight.
Step 6: Light Sanding Between Paint Coats
Just like after priming, it’s a good idea to lightly sand between paint coats. Use your fine-grit sandpaper and then wipe away all dust with a tack cloth. This ensures each subsequent coat goes on smoothly over a perfectly prepared surface.
This step is what separates a decent paint job from an excellent one.
This extra effort prevents any dust specks or slight imperfections from ruining the final look. It creates a smooth, glass-like surface that the next coat of paint can adhere to beautifully. When painting unfinished kitchen cabinets, this attention to detail pays off greatly in the end.
Step 7: Reassemble and Install
Once the final coat of paint is completely dry and cured (this can take several days for some paints), it’s time to reassemble. Reattach the hardware to the doors and drawers. Then, carefully rehang the doors and reinsert the drawers onto their runners.
Take your time during this process to avoid scratching or damaging the new paint. If you’ve replaced your hardware, this is the moment to install it. Step back and admire your newly transformed kitchen cabinets.
The difference from unfinished wood should be dramatic and satisfying.
Enhancing Durability and Longevity
Painting unfinished kitchen cabinets is more than just applying color; it’s about creating a durable finish that can withstand the rigors of a kitchen environment. From moisture and grease to everyday wear and tear, cabinets need protection. This section focuses on techniques and product choices that will ensure your painted cabinets not only look great but also last for years to come, preventing the need for frequent touch-ups or repainting.
Choosing the Right Finish
The finish you choose for your paint plays a significant role in its durability and appearance. For kitchen cabinets, a semi-gloss or satin finish is generally recommended. These finishes are more durable, easier to clean, and more resistant to moisture than matte or flat finishes.
A satin finish offers a soft sheen and is excellent at hiding imperfections, while a semi-gloss finish provides a brighter sheen and is very easy to wipe clean.
High-gloss finishes are the most durable and easiest to clean but can highlight every flaw in the surface. For most DIYers aiming for a professional look without extreme shine, satin or semi-gloss are the best options. Always consider the trade-offs between appearance and practicality when selecting your finish.
The goal is a beautiful, functional, and long-lasting result for your painted unfinished kitchen cabinets.
Using a Topcoat or Sealer
For an extra layer of protection, consider using a clear topcoat or sealer over your paint. This is especially beneficial for kitchen cabinets, which are exposed to a lot of moisture, heat, and potential stains. A high-quality polyurethane or a cabinet-specific sealer can significantly increase the durability and scratch resistance of your painted finish.
When choosing a topcoat, opt for one that is water-based and non-yellowing if you’re using latex or acrylic paints. For oil-based paints, an oil-based polyurethane can be used. Apply thin, even coats of the topcoat, allowing adequate drying time between layers.
This extra step provides a robust barrier that helps maintain the beauty of your cabinets over time.
Proper Curing Time
Paint needs time to fully cure, which is a longer process than simply drying to the touch. While cabinets may feel dry within a few hours, they can take anywhere from 7 to 30 days to fully cure, depending on the type of paint and environmental conditions. During the curing period, the paint film hardens and reaches its maximum durability.
It’s essential to be gentle with your newly painted cabinets during this time. Avoid harsh cleaning, aggressive scrubbing, or placing heavy items against them. Understanding and respecting the curing time will prevent damage and ensure your painted unfinished kitchen cabinets have the longest lifespan possible.
Proper curing is vital for the paint to achieve its hardest, most resilient state.
Maintenance Tips
Regular maintenance will help keep your painted cabinets looking their best and extend their life. For routine cleaning, use a soft cloth and a mild soap-and-water solution. Avoid abrasive cleaners or scrubbing pads, as these can scratch or damage the paint finish.
Wipe up spills and splatters immediately, especially those containing acidic substances like lemon juice or tomato sauce.
Periodically, inspect your cabinets for any signs of wear or damage. Address small chips or scratches promptly with touch-up paint to prevent them from worsening. By taking simple, consistent care of your painted unfinished kitchen cabinets, you can maintain their beautiful appearance for many years.
Frequently Asked Questions
Question: What is the best way to clean unfinished kitchen cabinets before painting?
Answer: The best way to clean unfinished kitchen cabinets before painting is to use a degreaser or a TSP (trisodium phosphate) substitute. Wipe them down thoroughly with a damp cloth to remove any cleaning residue, and let them dry completely. This removes grease, dirt, and oils that could prevent paint from sticking.
Question: How many coats of primer should I use on unfinished cabinets?
Answer: For most unfinished cabinets, one good coat of a quality stain-blocking primer is sufficient. However, if the wood is very porous, has dark knots, or you’re painting a light color over a dark wood, a second coat of primer might be necessary to ensure no bleed-through.
Question: Can I paint unfinished cabinets with a roller or do I need a sprayer?
Answer: You can achieve a smooth, professional finish using a high-density foam roller and a good synthetic brush. While a sprayer offers the quickest and often smoothest finish, it requires more setup and practice. Rollers and brushes are perfectly adequate for DIY projects, especially if you focus on thin, even coats.
Question: How long should I wait between paint coats on kitchen cabinets?
Answer: Always check the paint can for specific drying and recoating times. Generally, for latex or acrylic paints, you should wait at least 4-6 hours between coats. Oil-based paints require longer drying times, often 24 hours.
Patience is key to a durable finish.
Question: What kind of paint is best for kitchen cabinets?
Answer: A durable enamel paint is best for kitchen cabinets. Look for high-quality acrylic latex enamels or alkyd (oil-based) enamels specifically designed for cabinetry and trim. These paints are formulated to be tough, washable, and resistant to moisture and stains.
Final Thoughts
Painting unfinished kitchen cabinets doesn’t have to be a challenge. By avoiding common mistakes like skipping preparation or rushing the drying times, you can achieve a beautiful, lasting finish. Follow these simple steps, use the right materials, and be patient.
Your newly painted cabinets will be a proud achievement and a lovely update to your kitchen.

Leave a Reply